Second build, first build thread, no turning back

WOLFHAWK

XS650 Addict
Messages
152
Reaction score
1
Points
16
Location
Brooklyn, NY
First and foremost, hey all. Thanks for the motivation and information, it is truly priceless.

A little backstory on my first build: 82 bobber, PMA, Pamco, no battery, no signals, drop seat hardtail from FnA in Florida
The headlight was actually an aftermarket 7" smoked crosshair from my 84 VW Rabbit (I come from a Volkswagen enthusiast and rat rod background so use what you have right?)
ImageUploadedByTapatalk1432152396.013901.jpgImageUploadedByTapatalk1432152412.927182.jpgImageUploadedByTapatalk1432152547.019240.jpgImageUploadedByTapatalk1432153879.004366.jpg

I painstakingly sold her to a friend in order to fund my move from upstate NY to Brooklyn, NY and I kept the truck she is sitting in.

Fast forward to 2 years later and I'm now selling the truck to a friend and picked up this 80 special from another friend haha oh the irony
ImageUploadedByTapatalk1432153984.559584.jpg on the truck from Colorado
And here she sits in my VW Rabbit pickup ImageUploadedByTapatalk1432154001.309762.jpg

Not a bad starting point for $600 eh?

As I waited for it to arrive from across the country, I plunked down some coin on known parts I knew I wanted/needed for this build so I wouldn't be waiting on them with a bike sitting in front of me.

Picked up a bunch of stuff from Hugh on his site (bars, fork lowering kit, solid riser bushings, PMA, slim upper motor mount) and in turn gave him a few laughs via Instagram with a small video upon arrival of all the goodies.

Grabbed some necessities including a P-Nut tank from Lowbrow Customs who I can't help but suggest to anyone building a custom bike. Also ordered some bearings from MikesXs, Yo Mama pipes from Pandemonium Choppers, and a few other companies.
Snagged a set of spoke wheels from gggGary on here. Quick smooth transaction. Tires and tubes should be on the way and arrive about the same time. I have a good idea of where I want to go with this build and plan to document as much of it as possible for entertainment purposes for some and educational purposes for others.

Enough of that, on to the tear down.

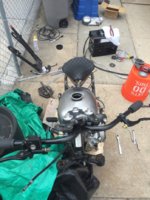
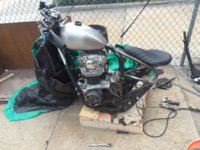
Not really into the street tracker look so first bit was removing the tank, fender, side covers, and tail/seat section

Next I removed the battery, battery box, harness, and all electrical components.

Cleaned off the bars of the cluster and removed the headlight.

Carbs are proving to be a PITA to get off but that's next as I want to clean them out good and document the jetting before I start resizing for the new pipes (the trumpets my buddy threw on it supposedly sound nice according to him but I haven't heard them myself) so I'll leave them on when I get her running so I can record how they sound and be sure the bike is in proper order before messing with it too much

I have a monster craftsmen brat kit with solo seat to go on and picked up a matching pillion pad for the lady so a rear fender will eventually be in the works but for now, going stag.

I'm trying to leave the engine in the frame with it all strapped down in the back of the truck so that I can cut the tail off and prep it for welding and drop it off locally as my 90amp harbor freight flux welder won't get the job done

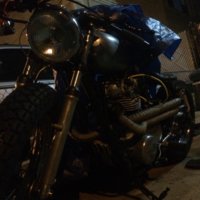
While that is going on, I'll have the front end off to rebuild and clean up the forks, clean the swing arm and install the bronze bushing, throw the new bars on with new grips, controls, Hugh's slim MC, and mirror from Dime City Cycles ImageUploadedByTapatalk1432155136.640714.jpg
The mirror isn't installed all the way because I plan on taking some length off the bars after I mount them up.

Gotta run to class but I'll write more later!


Will make separate post for any items that are for sale. (Tank, bars, seat/tail section, side covers, front fender, stock parts, etc)
 
Last edited:
Oh while taking out the battery box I snapped a bunch of pictures to help anyone who has trouble getting that sucker out of there.
First remove the seat and battery, get the electrical wires out of the way, and take out the bolts, mounts with rubber inserts, and disconnect the ground wire and remove the TCI unit from underneath (if equipped with such)
I also removed the rear inner fender as it was coming off anyway, it helps.

ImageUploadedByTapatalk1432165643.184392.jpgImageUploadedByTapatalk1432165702.078796.jpg
To get it out you have to turn it sideways, I found turning it counter clockwise was easier
ImageUploadedByTapatalk1432165731.963879.jpg
Then tilt it upwards pulling the bottom to the right side of the bike
ImageUploadedByTapatalk1432165754.450662.jpg
Continue flipping it up and out
ImageUploadedByTapatalk1432165768.368900.jpg
And kiss her goodbye
ImageUploadedByTapatalk1432165782.703569.jpg
 
Didn't have much daylight after class and the 45 min commute home but thankfully it was my last class for the next 3 months so as long as I'm not doing 12 hour days tomorrow and Thursday, I should be in good shape for some Memorial Day weekend progress.

Didn't touch the carbs yet, got her out of the truck and took off the caliper, MC, and other controls, also removed the pipes so I can prop it up on a stand without damaging them (center stand was removed by PO) all within an hour.

Will be removing the rear wheel and swingarm next followed by the front end. Hopefully tomorrow evening!
 
Ok so didn't get the swing arm off but I got her propped up on a small wood platform
Took off the shocks, chain, and alternator cover
ImageUploadedByTapatalk1432268286.209605.jpg
Sprayed some degreaser in there to soak prior to removing the wiring etc
Moved to the front end and took the bars off, triple trees, forks, and front wheel
ImageUploadedByTapatalk1432268300.260501.jpg
Knocked out the old crappy neck bearings and replaced with tapered roller bearings
Went ahead and mocked up the PNut tank as well as put together the triple trees with the HHB solid riser bushings ImageUploadedByTapatalk1432268090.017767.jpgImageUploadedByTapatalk1432268099.132747.jpg

My tires arrived today, so that was really quick.
Throwing together another parts list; as I'm tearing into it noticing things I either forgot entirely or that slipped my mind and I never wrote down.

Here's a shot of the difference between the HHB upper mount and the stock XS mount ImageUploadedByTapatalk1432268329.498355.jpgImageUploadedByTapatalk1432268336.244691.jpg


And the slight mock up for the P-Nut tank before I get some Jam Nuts and trim the shank of the bolt to allow it to really come down on the backbone

ImageUploadedByTapatalk1432268468.592586.jpg

Stay tuned!
 
That's hilarious! I went absolutely nuts the first time I tried to take one out without removing back tire. Wound up buying another on EBay after the ensuing carnage.
 
Long day at work but couldn't help myself when I got home to jump right back into it.

Got the swingarm off with the rear wheel still on, just had to disconnect the rear MC from the frame ;)

Buuuttttttt I ended up taking everything off the swingarm anyway lol

Old bushings are proving to be a PITA to remove. That brittle old junk is just falling apart sliver by sliver.

Got dark, called it a day.

ImageUploadedByTapatalk1432348766.423608.jpgImageUploadedByTapatalk1432348774.251969.jpg

Wheels from gggGary showed up. Stellar packing job my friend. ImageUploadedByTapatalk1432348865.428231.jpg
Waiting on new tubes to arrive so I can get these ready while I work on the frame.

Firing up the grinder and cutting wheel this Memorial Day weekend.
 
Took the new angle grinder for a literal spin.
ImageUploadedByTapatalk1432429832.505229.jpg

Off goes the tail

ImageUploadedByTapatalk1432429850.427600.jpg

Cleaned up and a few other things cleared

ImageUploadedByTapatalk1432429877.241953.jpg

Making some P-Nut tank clearance and cleaning up PO's grinds on the removed tabs

And here's the mock up of the Monster Craftsmen brat kit with solo seat mount (very clean, solid piece for the money) plugged ends made for such a simple assembly

ImageUploadedByTapatalk1432429978.651471.jpg

I am really enjoying how this is coming together.

Tubes arrived today so I can start truing and torquing the wheels and piece them together.

Enjoy your Memorial Day weekends everyone! Honor our troops, have a BBQ, and spend time with loved ones! AND YOUR BIKES!!!
 
Spent the weekend with the lady, and worked two 12 hour days putting up steel in Manhattan, had some time today to work on her again before going in for a 13 hour overnight shift unloading more steel.

ImageUploadedByTapatalk1432855971.150226.jpg
ImageUploadedByTapatalk1432855986.680505.jpg

Persuaded the stock tank mount inwards with a hammer to allow the PNut tank to slip further over at the front of the backbone.


Order of parts arrived so I cut about 3" off the Speedster bars (after mocking up as is and deciding they were far too wide for my taste) and threw on the new Biltwell whiskey throttle and dialed in the mirror

Before cutting bars
ImageUploadedByTapatalk1432856630.109616.jpg
ImageUploadedByTapatalk1432856639.310876.jpg

After chop
ImageUploadedByTapatalk1432856380.659728.jpg
ImageUploadedByTapatalk1432856388.641406.jpg
Really digging how they look and feel.

Next up is mounting the tank.
Still working out the old swing arm bushings and building the wheels.

If I'm not completely drained when I get home after this shift I'll dig right back in otherwise, until Saturday!

Take care.
 

Attachments

  • ImageUploadedByTapatalk1432856163.657907.jpg
    ImageUploadedByTapatalk1432856163.657907.jpg
    229.7 KB · Views: 189
  • ImageUploadedByTapatalk1432856572.541862.jpg
    ImageUploadedByTapatalk1432856572.541862.jpg
    224.6 KB · Views: 231
Got the bronze swingarm bushings in, cleaned up the frame some more, mocked up exhaust and put the shocks back on.

ImageUploadedByTapatalk1432945255.852919.jpgImageUploadedByTapatalk1432945263.004221.jpgImageUploadedByTapatalk1432945272.086878.jpgImageUploadedByTapatalk1432945280.318615.jpg

More parts arrived just as I packed it in for the day; clutch and throttle cables, clutch pushrod, bearing, bushing, and seal.

So glad the foreman gave us the day off tomorrow, I've been up for 39 hours straight so far and I'm gonna crash hard but I'll be tackling that leaky pushrod seal tomorrow!
 
Looking good dude. Good choice with those bars.


Thanks bud! I knew I wanted something very low profile to keep the overall look slim and sleek. Still unsure if I'm going to run the stock gauges, might make the front end look too bulky for my taste though. GggGary is selling a set of mini Drag Specialties gauges that would do the trick but then again, I didn't have any tach or speedo on my last bike [emoji23]
 
Yeah, definitely ditch those stock gauges. On that style bike, I'd run a mini speedo right off the front hub. You don't need it in the city anyways, traffic dictates speed lol


Yea but I will be making occasional trips upstate. You know those roads and scenery are way more enjoyable. However traffic sill dictates the speed on highways too... Hmmm
 
10 hours Monday
11 hours Tuesday
12 hours Wednesday

The work days really do get longer as the week goes by...

I finally got my hands back on her Thursday after another 12 hour shift

Went through one fork leg and installed the 3" HHB lowering kit, cut some spring off and reinstalled with fresh oil.
She fought me most of the way so I called it a night.

Left work early Friday to pick up the wheels.
ImageUploadedByTapatalk1433601912.415729.jpg
Carried them 3/4 of a mile home lol

Finished installing the lowering kit in the other fork and filled her with oil.

Replaced the 2 piece clutch pushrod with the 1 piece early style rod, new bushing, seal, and ball.

Greased up the bearings in the front end and threw in the forks, and put the wheels on front and rear.
ImageUploadedByTapatalk1433602021.787139.jpg
ImageUploadedByTapatalk1433602031.972175.jpg

I really am falling in love with this beast more and more every time I work on it.
ImageUploadedByTapatalk1433602069.422795.jpg
(Had to raise the forks up in the trees to get the front wheel on. No jack, no extra hands.)

Lowered back down after the wheel was on and sat back admiring the nice stance.
ImageUploadedByTapatalk1433602132.211531.jpg

Next up is mounting the tank, front brake, rear brake stay and linkage, then all the electrical goodies, exhaust, and carbs and she should be ready to rip!
 
Got a bit done since last update
Exhaust wrapped and on, tank mounted 100%, seat on with fuse box underneath, semi wired up, front brake on awaiting system bleed.
ImageUploadedByTapatalk1434030912.735336.jpg

ImageUploadedByTapatalk1434030935.251168.jpg

Headlight and Pamco arrive tomorrow
Too much overtime to do anything until Sunday though
Enjoy your weekends fellas
 
Haven't updated in a while. Finishing up at the job site so there has been a lot of overtime. That paired with it raining almost every night in the city has prevented me from getting much done but I rigged up a tarp to give me some cover and power through it.

ImageUploadedByTapatalk1436675094.795485.jpg
Mocked up the sissybar and fender

Drilled holes in the fender and welded up lower fender mount on the swingarm
Welded up the fender stay lower mounts to the swingarm and welded the sissybar itself
Drilled holes for the p pad and sissybar bungs
Mounted seat for mock up ImageUploadedByTapatalk1436675473.264596.jpg
ImageUploadedByTapatalk1436675484.030639.jpg
ImageUploadedByTapatalk1436675494.845888.jpg
Got the headlight mounted up
ImageUploadedByTapatalk1436675531.496912.jpg
All wiring is done less the taillight
Everything tucked away in an electrical conduit box (not my original plan but saw that was how another member did it and I walked past one of the electricians carts at work and saw a box laying there so I said screw it)
the regulator is mounted on the box
The entire thing is mounted on the frame where the stock regulator went.
Killswitch and neutral light are on top of box.

ImageUploadedByTapatalk1436675714.925956.jpg

ImageUploadedByTapatalk1436675801.251737.jpg

The coil is mounted with ground clamps to the frame

ImageUploadedByTapatalk1436675821.402625.jpg

ImageUploadedByTapatalk1436675855.434985.jpg

I kicked her over for about 10 minutes before realizing I needed to flip the killswitch if I wanted any life in her.
That and turning down the idle set screw...

She runs though. Just have to finish up the taillight/sissybar and adjust the clutch.

Put on a brand new chain as well as rebuilt the carbs with new mains, pilots, mixture screws, needles, you name it.

New clutch and throttle cable.
Stainless brake line and bled the brakes with new fluid.
ImageUploadedByTapatalk1436676164.926836.jpg
Sounds beautiful with the Pandemonium Ya Mama exhaust and I hit the throttle a bit and it seemed to be tuned well how I have the carbs set up but I'll know better when I actually take it for a spin on the highway.
There was no popping or stuttering, top end may need to be adjusted when I get on it but with the 2 up on mains and 1 up on pilots with 1 up on the needle stock setting on mixture screws it seemed to be pretty smooth from idle up through 3/4 turn

When I get a good video I'll post it as well as some really nice finished shots of her.
 

Attachments

  • ImageUploadedByTapatalk1436675347.835886.jpg
    ImageUploadedByTapatalk1436675347.835886.jpg
    265.7 KB · Views: 187
Last edited:
Back
Top