Sheet metal gurus!

phillycyclocross

XS650 Enthusiast
Messages
78
Reaction score
0
Points
6
Location
Philadelphia PA
So I want to cover the back corner of the rear triangle of the frame to hide the battery box and some wiring. The issue I have is that the top of the rear triangle is curved due to a brat style frame modification. I could just cut a piece of tin out that has a curve in it but I'd like this panel to have all the edges bent inward so that from the outside you do not see any welds. Kind of like a Christmas present box where the lid fit in the box instead of on top of it.
Any idea on how to bend the tin on a curve that has a .5" tab?

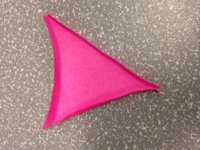
Here's a post it (sorry about the neon pink) note I made to look like what I want to make. This view would be of the inside of the piece.

Thanks
 

Attachments

  • image.jpg
    image.jpg
    291.7 KB · Views: 125
Make a form block from hardwood and a backing plate 1/8 smaller than that block to sandwich the sheet with, and hammer form the flanges around the form block.

In the pic below, a long curved flange is being formed. It is sandwiched between 2 pieces of phenolic sheet, which we commonly use for form blocks in aviation. It is often necessary with multiple sided work like you have to drill a through hole that goes through the web of the sheet and the form blocks about every 5 inches or so (or in your case, one near each corner should work) to keep everything aligned as you move the work piece around in the vice for each individual flange. Don't hit the metal directly with anything but a dead blow, rawhide mallet, or use a hardwood paddle between a dead blow and the metal. Direct impact with a metal hammer will tend to over stretch the material and split the block. be patient, and lay all of your flanges over about 10-15 degrees at a time, always starting from the radius of the bend and combing the metal toward the outer edge. Takes a bit of time to get good at it, but once you get a feel for how your material flows, it's not too bad. Might take you 2 or 3 shots at it to get one you really like.
 

Attachments

  • 5993big.jpg
    5993big.jpg
    90.6 KB · Views: 155
Last edited:
If the perimeter radius is constant, then you'd make the center triangle-like form to fit inside the area where you want to go, with space for the material thickness you are going to use, then use a router to make a consistent perimeter radius on your block at the edge you will form over. If you are making one for each side of the bike, thin you what a ying/yang block, and should cut it out on a bandsaw so you only have to make one form block, and one backing block. The backing block is only about 1/8" or whatever your radius is, smaller than the main forming block. It helps prevent the material from swelling backward into the web when you are getting to the end of your forming operation.
 
If you don't have the woodworking materials, you could always use pie cuts as a relief every so often... kinda like this:
 

Attachments

  • tab.jpg
    tab.jpg
    19.9 KB · Views: 97
If you don't have the woodworking materials, you could always use pie cuts as a relief every so often... kinda like this:

That's what I was originally thinking and I even tested it out on paper but the pie cuts only seem to help if I was making a 3 dimensional rounded shape like a sphere or something.
 
So it took me a few attempts. That lesson about measuring twice and cutting once has been lost on me. So I think this was my third or fourth one. And I'll probably do a fifth just to fix the bottom right corner that got scorched when I had to bend in that corner.

209rqlu.jpg
 
Looking pretty damn good for your first shots, and steel to boot. Hard to control the amount of stretch in the steel. You'll notice that the run across the top that would be concave on the block is easier to get a decent flange on than straight stuff, and especially anything with a crown to it. Then you have to master shrinking that flange, rather than just keeping the amount of stretch under control.

People find it hard to believe, but one of my Hungarian co-workers when I was in Maine pounded out a three-stepped door frame from a casting mold we made with some incredibly stout stuff (besides the red oak!) It's hard to see the details of the part (there's not one on it in this pic, but you get the idea) because of the holding fixture we made to keep each 90 degree bend stable as we hammered out the next. This part came off the mold and got re-annealed 4 times to keep it from cracking, as the 2024 material work hardens and will eventually crack if you don't relieve it. We made 3, installed number one, and shelved the other 2 as spares. Took several of us 20 plus year guys working together to figure out how to hammer this out by hand, which was still only about 1/3 of the cost of drop hammer or hydroform tooling.

The other pic is the aft pressure bulkhead that we made. It's an 84 inch diameter spherical part made from 4 separate pie wedges with a central dome 24 inches in diameter with a 1/2" return flange on it for stiffness.
 

Attachments

  • 20130926_092329.jpg
    20130926_092329.jpg
    221.9 KB · Views: 108
  • DSCN8456.jpg
    DSCN8456.jpg
    85.3 KB · Views: 130
That's amazing. Fabricators are talented artists. I have a lot of respect for them. If I could do it all over again I would've done black smithing instead of wasting my time/money in college.
 
Back
Top