Suggest a diagram

nobackhair

XS650 Enthusiast
Messages
62
Reaction score
5
Points
8
Location
Tempe, Az.
Going to install Hugh's complete CDI system w/ Sparx capacitor. Want to start over w/ wiring, like getting rid of harness and since I won't have a battery I just need lights to all that's needed, would like to have key starting, no indicator lights. Kickstart only, obviously.
 
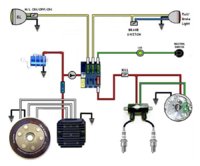
Sounds like a plan. . Have you checked the wiring diagrams in the Tech section.
 
Last edited:
......
 

Attachments

  • image.jpeg
    image.jpeg
    120.7 KB · Views: 877
Sounds like a plan. . Have you checked the wiring diagrams in the Tech section.
Yes I did. I saw a couple that look sufficient. Just wanted to know if anyone had imput. Being that Hugh's is so new, as far as the complete CDI kit I wouldn't expect a drawing of a layout w/ his set up. He's the one that told me to go here. I realize the pieces in the kit are still the same part for part. I even remember seeing one that had the Sparx cap.
 
Hugh should have a wiring diagram and instructions for his set up. Went onto Hughs site and there are no instructions at all for that system. That diagram wont have any relevance because the Pamco will be wired different to Hughs PMA/CDI unit.

Makes no sense to send you here when he dosen't help and it is a brand new system of his..........................

Go back and demand some tech support
 
Yes I did. I saw a couple that look sufficient. Just wanted to know if anyone had imput. Being that Hugh's is so new, as far as the complete CDI kit I wouldn't expect a drawing of a layout w/ his set up. He's the one that told me to go here. I realize the pieces in the kit are still the same part for part. I even remember seeing one that had the Sparx cap.

What do you mean "I wouldn't expect a drawing"......................stand up for your rights man!. You paid a lot of money, and part of that money paid for a wiring diagram and an instruction sheet. Any company that sells electrical kits for any product is obligated to supply drawings and instructions. This HHB guy is the same guy that says things like:
I'll paraphrase.................."I've got your back" and "just want to treat you forks with the communication and respect you deserve", and "backed by HHB, and you know that means it's the goof stuff, with even better tech support and customer service".

Lots of patronizing chit chat from him......................... but he sends you to a forum for technical help:doh:
I'm pretty sure he's sending instructions w/ the kit but I don't see why he would send a suggested wiring diagram for the whole electrical. I didn't want to cause any possible problems w/ my possible faulty existing wiring after the install so while I have the bike down I was going to rewire it since I only kickstart and it will be w/out a battery it seemed like it was a no brainer. So when I sent Hugh an email refering to him maybe suggesting wiring up the bike from scratch he said this word for word.


As for a wiring diagram for the entire bike, there are some great ones onXS650.com - we don't offer full wiring diagrams, too many variables and such that people want input on. We tried about 6 years ago, and we ended up doing wiring emails for DAYS, which is a bad use of our time - haha
 
It sounds like you have not even received the kit in the mail yet, so maybe the kit will have amazing instructions and a simple typical wiring diagram. If he comes through with the instructions and a diagram of wiring his specific parts, then this whole thread is moot.

Yes, of course aftermarket sellers only include instructions and diagrams for their specific parts, and do not give you a wiring diagram for your whole bike. Its not a good sign that his web site has no instructions and no typical wiring diagram. Be sure to post back on this thread when you receive the kit, so future customers know what to expect as far as documentation.
I should get it as early as Monday. Whenever I do I wlll alert. Thx for what you mentioned.
 
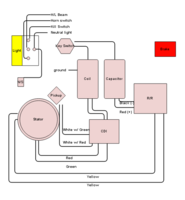
I recently got mine, the directions are good but no wiring diagram. Which i really wish there was. I am currently working on creating my own but not 100% on it yet. I will post what i have so far but it may not be correct

I will be running the same set up.

Here is the link on digi-key if anyone want to work off of what I have so far

http://www.digikey.com/schemeit/project/xs650-cdi-C4M3DOG201O0/
 

Attachments

  • schemeit-project.png
    schemeit-project.png
    25.2 KB · Views: 578
Last edited:
That wiring diagram looks ok. Where the wire from the cap back to the key switch, I would add the main fuse, this is the positive to supply power to the switch, after the switch just run a wire from the switch to a fuse, a wire from that fuse to the switch that powers what ever you want.
I like a fuse for each circuit. One for ignition, one for the head/tail light, one for brake light and turns, so on and so forth till you have power to everything you want.
Leo
 
Wold that be the 20amp for main and 10 amp for each light/horn/such? The fuse and gauge area is were I fall off. I always look at it as if it doest melt or catch fire. All is good
 
The system we sell does come with 43 Pages of very detailed Install Instructions, its pretty simple really. We do not publish it online, it comes in paper form only when purchasing the system.

Now, on the other hand, we do NOT supply a wiring diagram for the entire bike. We tried doing that in the past, and it ended up being a nightmare of emails, PM's, etc.. as everyone has a different setup these days. Turn Signals, Relays, Headlight Switches, kick only, battery or capacitor, Electric Start, Key Switches, Brake Lights, Running Lights, etc - people all do it a bit differently, and it became a full time job offering up wiring tech.

Our CDI system will come with instructions for Wiring up the Ignition and Charging System, the rest is up to the customer to customize as per their needs.

So basically, in addition your our system install, you just need a diagram that fits your needs for the rest of your machine.

Hugh
 
Hugh is right the instructions are thick and on point.
I havent removed anything in preperation for the install. I would like to get started doing something. I have Boyer Brandsdon ignition already. But I don't want to do anything out of order or uneccessary.
 
Your not gonna need the that Boyer anymore obviously, I'd start from scratch with Hughs instructions and install the cdi. Once you get running, timed and getting a charge then start adding components via a fuse box.
 
The instruction start assuming you have removed all the charging components. I got mine running, kick only minimal wiring. Though I think my timing is off. Also I ran into some trouble torqu in the stator nut up to 65lbs without turning the engine, and had to use a second lock washer as a spacer, anyone have any tricks in that department
 
Yeah, we don't go through the removal of the OEM system, thats all in the OEM Manual (which we should all have)

As for torquing the Flywheel Crank Nut, you can hold the opposite side of the crankshaft if you have the clutch cover off.

Timing should be spot on if you use the Brass Feeler Guage (longwise) to set the timing tab with #1 at TDC.

Hugh
 
Scratch that it runs great, just had to run it up and down the block. Though I don't have a kill switch yet or it wired to the ignition so I get to play touch the wire to the engine game
 
Back
Top