Sump Filter - Cover Removal

SteveH

XS650 Enthusiast
Messages
86
Reaction score
0
Points
6
Location
Del
All,
Im going through my new XS and need to remove the sump filter cover...But unfortunately it does not want to come off. Any suggestions here ? I surely don't want to start prying with a screw driver; as I imagine that'll be the end of it. I figure I can try a good rap with a soft-blo hammer - but I just don't know if there are any locating pins, etc that I might destroy.

Thanks !
Steve
 
As suggested no pins, I often use wood block on the flat front and a good smack with a large hammer. On reassembly use a sparing amount of sealer on only one side of the gasket. I like to apply silicone by dipping a Q-tip and applying it to the surface of the cover. I also like to lightly and evenly flat file the mating surface of the cover to check for and remove any raised areas around the bolt holes.
 
Thanks guys - that did the trick ! I took the cover off, removed the filter, and then carefully cleaned out the cover - looking for any particles, etc. Notta.
On the filter however - there are two areas on directly opposite sides of the filter (which I assume are passage ways) that have some hefty crap on them. Kinda looks like clutch material - but we'll see what happens when it dries out:
IMG_00345.jpg

IMG_00346.jpg


My new filter and gasket should be here on Thursday. i'll clean out the sump a little more and get it all bolted up.

Thanks again,
Steve
 
Those are magnets and that is normal ground up metal particles. It forms sort of a sludge although yours looks rather thick. The filter probably hasn't been cleaned in a while. Don't throw the old filter out, clean it up to re-use. If it has tears, repair them with JB Weld .....

SumpFilters.jpg


I use no sealer on the plate gasket, I just oil it with motor oil.
 
Ahh - nice ! I already ordered a new filter; but I will surely keep the old one around as a spare.
 
+1 that amount of stuff looks OK/good to me. I don't even see any tears in the filter screen...... Someone has replaced it before. How many miles showing on the Odo?
 
Personally, I prefer the original filters over the replacements, even if they need a patch job. I think they're made better. And a little tip about mounting the filter - there is some play in the holes so slide the filter to the right (clutch side) as far as possible. This will make the filter/plate assembly easier to install and remove. Many times the filter element hangs up on the left side, on the sidestand mount.
 
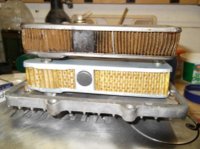
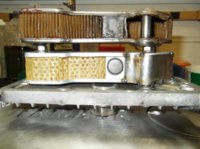
Side by side Yamaha vs mike's filters.
Note; I used metal from a lacquer thinner can to spot weld the cover over a new mike's filter.

tappets 003.jpg

tappets 004.jpg

The spaces of the mikes screen is obviously bigger than the OEM material and there is less of it. :shrug:
 
5Twins is right long term side stand use bends the mount/frame in til it interferes with the sump cover. While the sump cover is off I put a big oak plank under there and "persuade" the side stand mount back out once or twice with a 12 pounder, then the cover goes back on with no problems.

"to a boy with a hammer the world is a nail"
 
..... and for us guys, the world is our urinal, lol.
 
Took some pics of the bottom end that I could get through the sump cover - doesn't look too bad fwiw:

IMG_00347.jpg

IMG_00348.jpg

IMG_00349.jpg
 
Ya I see what you are saying. Nothing popped out at me when I was looking...I'll get a much better look tomorrow after I take the engine covers off and can rotate the engine easier.
 
I think that's the gear that the electric start engages into. The way many of these have the starter grinding problem, it's probably normal for that gear to look that way.
 
Yep - that's the starter gear. I'll take a look at the bendex gearset when I pull the sidecover off. Might not be a bad idea to pick up the repair kit for the bendex.
 
Back
Top