A_Starkz
XS650 Member
Hi,
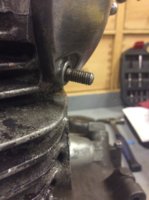
Sorry for the probably stupid question, but I am stuck. I just finished putting the engine back together for my 1972 XS2 and while putting the tappet covers back on, I realized the the previous owner didn't screw the studs in all the way. Therefore, when I try to put the acorn nut on, it doesn't fully seat against the cover. I cant get the stud to budge and I am worried about using pliers in the case that I ruin the threads.
If anyone has any advice, I would REALLY appreciate it.
Thanks for your time
 Couple of notes BEFORE you attempt to tighten them further! Remove them check/measure how deep they CAN go before they bottom in the hole. use a bottoming tap to chase threads in the head. Be very careful the threads are in aluminum and are kind of fragile. It helps to put the cover on with the other studs, to act as a guide and keep the tap straight.The bottom stud on the RH exhaust cover is notorious for stripping out. To tighten or remove studs get a pair of good quality metric nuts, tighten them against each other on the stud, now you can tighten loosen the stud with a wrench. You may need to heat the studs a bit, this is a place where threadlocker compound is often used.