Updating the cam chain tensioner system

Pasiv65

XS650 Enthusiast
Messages
47
Reaction score
2
Points
6
Location
Finland
Hello!

I bought a couple of years ago Yamaha XS2 yearmodel 1972, which was in a form of boxes full of parts. Now I have been slowly trying to put the parts together.

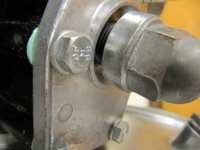
It has this early type of cam chain tensioner system. These parts were quite badly worn out, and I decided to update the system to the newer one.

Maybe it was a bad decision, because now I have problems with the cam chain. It is not long enough for this new system.

I can not use the newer (and propably longer) cam chain, because it is not suitable for this cam sprocket and crank sprocket.

Do you have some experiences with this kind of issue?

Thanks,
Pasi
 
Hi,

yes it would help, if I changed the camshaft and the crankshaft to newer ones. But I think they are quite expensive, and these are otherwise in a good condition.

Maybe I should try to find that longer chain. I was just wondering if there will then be some problems with adjusting the tension of it. But maybe not, I think I will try that!

Thanks for advices!

Pasi
 
Are you sure the chain is the right one. The 256 engine used a 8 mm/.315 inch pitch chain. The 447 engines used a 7.774 mm/.3061 inch pitch chain.
Another thing, when installing the chain leave the tensioner out of the engine. The new chains can fit very tight. They come with grease packed into the pins and rollers. Once on and you turn the engine over a few times the grease works out and the chain gets longer.
You may have to slip the cam bearings off the cam, get the chain around the sprocket then lift the cam to slip the bearings back on.
Just how much do you lack of getting the chain on? Pics will help.
Leo
 
Pasi, don't thank anyone for worthless advice. There's too much of it on this board. I've done this swap, and it's a bolt-in job .

If the cam chain can be joined at all, you don't need a longer one. The mounting holes for the tensioner are in exactly the same place and the cam chain follows exactly the same run in your XS2 motor as in later 447's, and if the parts are correctly assembled there are only two fitment problems you might encounter in replacing the old idler gear tensioner with the newer plastic shoe tensioner. One is, as Leo notes, if you attempted to join the cam chain with the adjuster rod and tube in place. They must be installed after joining the chain. The second is selection of an adjuster assembly (rod and tube) with compatible parts. If something else is going on, come back with a more detailed description of the issue.
 
Hi again,

I attach here some pictures of the situation. The distance between the chain ends is not long, only about one tooth on the sprocket. I think the chain is right one, I ordered it from XS650 shop. The tensioner rod is not in place, but the tensioner blade is in there. I suppose it has to be there at this stage? I appreciate everybodys help!

Pasi
 

Attachments

  • IMG_4502_kopio.jpg
    IMG_4502_kopio.jpg
    142.1 KB · Views: 118
  • IMG_4503_kopio.jpg
    IMG_4503_kopio.jpg
    133.4 KB · Views: 97
  • IMG_4505_kopio.jpg
    IMG_4505_kopio.jpg
    119.8 KB · Views: 141
  • IMG_4506_kopio.jpg
    IMG_4506_kopio.jpg
    159.7 KB · Views: 119
Right, Pasi, the tensioner shoe has to be there. What your photos show doesn't look unusual. Sometimes the chain can be moved enough with the help of a pair of snap ring pliers, and it may help to put spacers on the head studs and torque the head down a bit (10 or 12 foot pounds will usually do it); the head and cylinders may not be fully seated on the dowels, and if you're using a thick Athena head gasket the pressure will help to compress it--it's about .017" (almost .5 mm.) thicker than stock.
 
I had to use spacers on the studs and torque the nuts some to get my chain on. It wasn't as far out as yours but close. As I said you can slip the bearings off the cam, maybe just one end, hook the chain then lift the cam and slip the bearings back on.
Leo
 
I think your advices are very good, I will try those things as soon as I get back to the garage. And maybe the most important thing was to know, that there is nothing basically wrong with this chain tensioner updating idea. And that the chain is supposed to be tight, even when the tensioner rod is not in place.

Next weekend I can go on with my slow restoration project again, I will post some news then about the progress.

Thanks again!

Pasi
 
Ok, now I got the time to do the cam chain installation according to your instructions. And it went quite nicely, I think. The new chain is now in place, and the project can go on. Here are some pictures of the system I made. I also had to take the bearings off from the right side first, but in the pictures they are back again.

Pasi
 

Attachments

  • IMG_4507.JPG
    IMG_4507.JPG
    174.3 KB · Views: 114
  • IMG_4508.JPG
    IMG_4508.JPG
    164.7 KB · Views: 114
I was thinking of the tension of the cam chain. Can it now be too tight, because the chain was kind of forced to place? The tensioner blades back side is now tightly against the cylinder block wall, and actually I can not install the plunger assembly properly. The large threaded bolt does not go in far enough to get the cover bolt fully in place (I mean it does not reach the "bottom", so it is not sealing anything). Or to be precise, it goes far enough, but then the plungers end has been flush for a while. I dont know if I can descripe it understandably... I will post a picture when I go to the garage.

Pasi
 
Just an idea but maybe crank it over slowly while running a heat gun on the chain? let the grease move around a bit.
 
I've seen that sort of problem when the thick late model rubber damping washer was substituted for the thinner copper damping washer on early engines. Also, bear in mind that deck height is going to change when you complete assembly, so you might want to verify cam timing and see what happens when you button the motor up. When everything has settled in after being torqued down you'll have more adjustment room. It sometimes takes awhile for the parts to settle in on the dowels and for gaskets to compress, so after you've torqued the fittings down, let the motor sit 12 hours or so, go around with the torque wrench again, and repeat until torque readings are stable.
 
[I]
Pasi, don't thank anyone for worthless advice. There's too much of it on this board. I've done this swap, and it's a bolt-in job .
If the cam chain can be joined at all, you don't need a longer one. The mounting holes for the tensioner are in exactly the same place and the cam chain follows exactly the same run in your XS2 motor as in later 447's, and if the parts are correctly assembled there are only two fitment problems you might encounter in replacing the old idler gear tensioner with the newer plastic shoe tensioner. One is, as Leo notes, if you attempted to join the cam chain with the adjuster rod and tube in place. They must be installed after joining the chain. The second is selection of an adjuster assembly (rod and tube) with compatible parts. If something else is going on, come back with a more detailed description of the issue.

don't know you , but you are fast becoming one of the people I'd like to meet. you don't bullshit; and from what I have read in regard to your post, you obviously have built a motor or two and don't talk shit about what works and what don't.:thumbsup:

(Pasi, don't thank anyone for worthless advice. There's too much of it on this board. I've done this swap, and it's a bolt-in job)
and I will add this..........(Since light travels faster than sound, some people appear bright until you hear them speak):yikes:
 
Yes the chain can be very tight at first. As I mentioned in post #5 the chain comes with grease packed in the rollers and pins. Once you get the engine turning over the tension on the chain will force the grease out. This makes the chain longer.
Once you get the engine together turn the engine with the electric starter for a bit and see if the adjuster fits.
Leo
 
Hi!

Thank you all for your advices! I am now sure it is going to be OK, when I just get the engine ready and turning over, as Leo said. However, I attach here some pictures of the situation as I promised:

- picture 1: plunger flush with the end
- picture 2: another view of plunger flush with the end
- picture 3: cover cup fully in its threads (not reaching the bottom)

Pasi
 

Attachments

  • IMG_4510.JPG
    IMG_4510.JPG
    90.9 KB · Views: 80
  • IMG_4512.JPG
    IMG_4512.JPG
    108.5 KB · Views: 98
  • IMG_4511.JPG
    IMG_4511.JPG
    108.7 KB · Views: 86
Back
Top