Vacuum bleeder worth having?

GOT ONE OUT!!!! :D

I got the bleeder side out. :) 
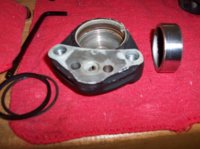
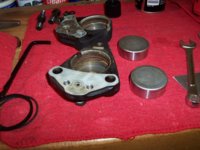
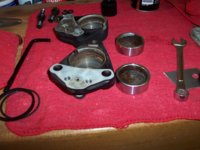
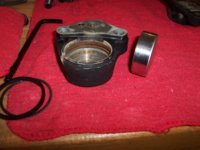
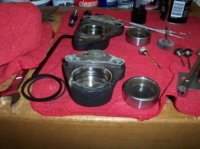
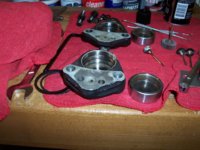
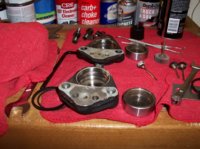
I'm using a combination of your guys' ingenious methods, and the HVC Cycle method that I posted; I'm doing it with the caliper split, with a metal patch, as you all and the article suggested. It made more sense when I saw a pic. I made the patch... just need to run out and get a couple nuts with the right thread so I can tighten it down and get air into the non-bleeder side. But I think the key really is the C-clamp! You have to get them moving on the dust seals. Then they surrender!

Surprisingly, the piston that came out came clean with a rag, except for the inside center. But I don't see any pitting anywhere!

More later on the second half... and maybe more questions on the rebuild... don't want to booger it now!

Thanks so much to all thus far! One of the best parts will be going down to my local shop to show them how to do this... :)

Lunch now... then hardware store...

TC
 
I coat the hollow inside of the piston, the part that faces out of the caliper, with a thin smear or grease, also the outer rim that contacts the back of the pad. That keeps the rust at bay.
 
Good tips, twins! I'll remember to do that.

Okay... got the other one out too! :) Once I put the little medal patch on there to get air to the bleeder side and got it moving with the C-clamp, it came right out.

So, tomorrow will be cleaning and maybe rebuild, time permitting. Few questions:

The kit has two dust seals each side, and one seal for the crossover hole. The dust seals are the same diameter, obviously, but one of a pair seems to be slightly larger than the other. I can't find anything that indicates which goes where in each caliper half. (I have not really closely inspected or removed the existing seals.) Any good suggestions on what to use to get them out if you don't own any picks?

Also, cleaning: I bought some DOT 3 fluid and some brake parts cleaner. Tomorrow, I'll have a better idea what I'm dealing with.

Thanks again... getting there! Also sorted out my lever/switch issue... after I get the caliper rebuilt, it'll be assembly time... routing the hoses and the like.

TC
 
Okay, guys... the old seals came right out with the tip of a sharp knife, and it became readily apparent to me which seal will go where upon reassembly.

In terms of cleaning and inspection, the mating surfaces of the pistons to not appear to have any scoring, and there was no leaking since I have had the bike. Cleaning-wise, I have just sprayed the bits with brake parts cleaner and wiped everything off with a clean shop rag. I wanted to ask about surface oxidation and/or rust in or around the seal troughs. Since there was no leaking before, how much of the discoloration that you see in the pictures is acceptable upon reassembly? It seems to me that attempts at removing it with anything but a rag and cleaner could compromise fit; I'm afraid to go at them with anything sharp and hard. So, how far do I go, and how clean is clean? The inside of this caliper will never be brand new.

Also, the Haynes refers to only two bridge bolts and their torque ratings, but there are four. Do the torque ratings refer to both the inner and outer bolts? I also noticed that my old pads seem to have a shim-looking thing... almost pointlessly thin... but the new ones do not. And the Haynes has no detailed information on how to reinstall the pistons and pads in terms of how far to press them in, etc.. Tips appreciated!

Please, if you will, have a peek at the pics and tell me if you think I'm close to reassembly after some more washing and blowing out with air.

Thanks!

TC
 

Attachments

  • 100_1223.jpg
    100_1223.jpg
    301.2 KB · Views: 116
  • 100_1228.jpg
    100_1228.jpg
    309 KB · Views: 89
  • 100_1227.jpg
    100_1227.jpg
    310 KB · Views: 112
  • 100_1226.jpg
    100_1226.jpg
    300.1 KB · Views: 100
  • 100_1225.jpg
    100_1225.jpg
    301.4 KB · Views: 104
  • 100_1224.jpg
    100_1224.jpg
    305.3 KB · Views: 117
No, those things are filthy. Scape and clean as much of the rust out as possible, especially in the seal and dust cover grooves. I use the wire wheels in a Dremel after scraping with dental picks. If you have no picks, go to the auto parts store and get one of the little 4 pc. pick and hook tool sets they sell. That's why these things stick in the 1st place - rust, corrosion, and dried brake fluid gunk build up in the grooves and force the seals out more. Then they bind up on the pistons, causing them to stick.
 
Okay, twins... off to the store. If I have to use a dremel, do I need to worry too much about deforming any surfaces trying to remove rust? In other words, what (visually) is an acceptable degree of clean before installing the new seals?

Off to the store.

TC
 
You needn't worry, the caliper is cast iron. You're not going to deform it with a Dremel wire wheel. I clean the later aluminum alloy ones the same way with no problems. The seal is square sectioned and the seal groove is square sided. Make sure you scrape the corners of the groove out good.
 
Okay, dudes...

I have been going at them with a little fine dremel emery wheel (about as big around as a quarter or so), a flat dremel wire brush, and a more conical dremel wire brush, as well as a dental pick. They're like night and day now, I think. But even now, as I think I may be done cleaning, I go into the corners of the seal troughs and I can still see more fine rust particulate coming out... like dust, it's so fine. So, I'm tired now, but tomorrow after work, I'll keep going at it like that until the pick "slides" - feels like it doesn't "catch" on any particulate residue, then hit them with the brushes again, and then start to think about assembly.

Here are some pics so you have an idea of where I am.

TC
 

Attachments

  • 100_1229.jpg
    100_1229.jpg
    313.7 KB · Views: 99
  • 100_1230.jpg
    100_1230.jpg
    311 KB · Views: 99
  • 100_1231.jpg
    100_1231.jpg
    310.7 KB · Views: 115
  • 100_1232.jpg
    100_1232.jpg
    313.4 KB · Views: 119
Last edited:
Glad you got them out! About cleaning the seal grooves: I keep several of those cheap giveaway pocket screwdrivers around as sacrificial tools. One can easily be bent and the tip ground to make a groove cleaning tool, done it several times.

The reason there's rust in the grooves in the first place is that water gets trapped. Girling makes a red 'rubber grease' (their P/N PFG102) which is great for smearing in the grooves to cut down on this. Regular grease will NOT do, it will make the rubber soften and swell. I think some of the parts stores have the same stuff under a different brand in those little packets they sell at the counter.
 
Now you've got the hang of it. Yes, keep going at it until the pick "slides" and no more rust particles are generated.
 
Your doing great! As twins stated, they are cast iron, so get them as clean as you can. The inside seal, the one that seals the piston from the fluid, that groove is the more important one, as far as clenliness goe's. It has to seal the fluid from leaking out of the caliper, under pressure. The dust boot is there to keep water and dirt out of the inner seal.The corner's of that groove gotta be pretty clean, Your almost there.:thumbsup::thumbsup::thumbsup:
 
Okay, guys! (And 1974, thanks for the tips, though I'm not sure I'll be able to find that stuff.)

Guys, the larger fluid seal trough is there, I think. The dust seal groove is the one I'll work on a little more tomorrow after work, then think about reassembly of the caliper.

Any info you care to share on how far I need to press the pistons in, and how far the pads go in (and get held in?) will be useful. Someone mentioned shims... I don't see any on the new pads and am not sure I'd even need them. Looks like the pads just sit in there loosely(?). The Haynes is sort of assumptive about those details. I really want this to be right the first time, since I have troubled you all this much with it. :p

I'll be rehearsing all of this in my head tomorrow at work all day... :p I would love to have the bike back on the road this coming week!

TC
 
The piston's push all the way to the bottom. Use the old shims, or you will have noise from the pads rocking . You should be riding real soon, depending on the amount of time you got to spend on them. It's not a race, at least yet, so a slower pace, going over what you need to do several times. and all will go well. I use brake fluid as a lube when re-assembling everything.
 
Thanks, guys. :)

Gordon, I have not looked at the shims closely, but I'll have to see how they come off the old pads and affix to the new ones. Been so busy with every other aspect of this job that I have only glanced at the shims!

Oh, did I mention how sweet it was to call the local shop and tell them how to do this, and that the caliper they said was toast was... NOT??!! :)

Back at it this afternoon after work...

TC
 
Thats so cool, to tell the "profesional" to go stuff it! Seams like all they wont to do nowadays is sell you new parts, lazy, money grubbing bastard's. Good luck on the re-assembly, it should go pretty easy for you.
 
Back
Top