what the hell did I do wrong with the brushes

Mikey

got muscles in his head that ain't never been used
Top Contributor
XS650.com Supporter
Messages
3,311
Reaction score
10,119
Points
513
Location
Waite Park MN.
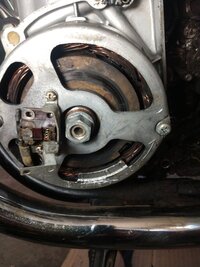
I just took the one brush out to determine if they needed to be replaced on my 73
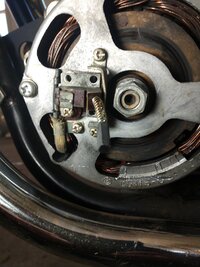
When I went to put it back the spring and brush are on the wrong side of the bracket???
I know it's not magic and it's not happy hour yet WTF
 

Attachments

  • IMG_20220207_162922572_BURST000_COVER.jpg
    IMG_20220207_162922572_BURST000_COVER.jpg
    260 KB · Views: 71
  • IMG_20220207_163007022_BURST000_COVER.jpg
    IMG_20220207_163007022_BURST000_COVER.jpg
    294.2 KB · Views: 69
  • altenator.png
    altenator.png
    6.6 KB · Views: 68
I went to check on the 75 but that's a pamco setup so no luck with that
the brush is on the proud side of the bracket if you can tell by the pictures
 
The brush wire is soldered to the top of it's bracket. You have to fold it under the bracket.

1644274834330.png


Fold it under like I show here Mikey. The wire folds away from the solder joint. Keep in mind the brush itself is not square, it's rectangular. It will only fit (correctly anyway) into the holder in two positions... 180° from each other.


1644274861136.png
 
I went to check on the 75 but that's a pamco setup so no luck with that
A Pamco won't change the charging system and it's brushes. You mean a PMA charging system?
 
A Pamco won't change the charging system and it's brushes. You mean a PMA charging system?
Yep the PMA system is on the 75
I kinda wished I would have left the old system on the bike I just can't seem to get it to charge any better than 12.9 volts
Another problem another day
 
... and the brush on the left isn't installed correctly either. The metal bracket is supposed to set down flush into the phenolic holder. There's even a slot for the wire (green arrow).
You'll need to take it back off and bend it back straight.


Untitled.png
 
...and this terminal goes over (on top of) the brush tab, not under like you have it in the pic.


Untitled.png
 
Here's that before pic you were looking for. :geek:
View attachment 206999
If I would have paid attention I wouldn't have try to reassemble it wrong
I just assumed once I had it apart that I didn't need to fold the wires over to reassemble it
And that wasn't going to work
Thanks !!
 
But, original pics aren't always correct, lol. Here's how my '78 came to me. I ran it this way for years, not even realizing something was wrong. The wire on the left brush is routed wrong, up over the top instead of wrapped around the left side as it should be .....

EarlyBrushMountLabeled.jpg


Also of note - the insulator part is rectangular shaped, not square. It only fits under the metal bracket correctly if you orient it with the long sides running up and down.

EarlyBrushes.jpg
 
Get this thread into the tech section if possible. I know at least one other old guy (me) is going to need this info and pics in the future.
 
I’ll throw this out here too. If you remove all the brackets that hold your brush assembly on. Be careful when you reinstall it. There are different length screws for different locations. I accidentally swapped a long screw with a short one and when I tightened it , it was pressing against my rotor. Which ruined it.
4DB01E1D-E601-4641-AF8A-80A91D84BE2C.jpeg
73FFD6DC-373B-47EE-A156-86B2D1F71A00.jpeg
 
I'll have to pay close attention
I take it if the long screw is in the wrong hole you should be able hear and or feel it rubbing on the rotor
Do it once and do it right
Thanks !!
 
To be sure, and to avoid doing any damage, just pull the stator off, it's only two screws, and look inside it.
 
I take it if the long screw is in the wrong hole you should be able hear and or feel it rubbing on the rotor
If you hear/feel it rubbing, it's too late... you've already damaged the slip ring(s). Hang on, I'll put up a pic....
 
I've got to take the stator off to clean the rotor
 
Well, there you go then .....

To clean the rotor slip rings, I simply polish them clean and shiny with a rag dipped in a little chrome cleaner. I follow that by wiping them down with some electrical contact cleaner to remove any polish residue. Here's one done the other not .....

Slip Ring Cleaning.jpg


..... and both done .....

Slip Rings Clean.jpg
 
The parts books are all over the place as far as screws go. So I took an 'A' and 'B' system brush block apart to measure. Both looked un-molested, and both used the same screws. All 4 of the brush screws are the long ones. The shorts are used for the rotor nut guard and the wire clamp.


Brush screws.png
 
Back
Top