WTX's First Bike Build

WTX_XS650

XS650 Enthusiast
Messages
36
Reaction score
0
Points
6
Location
Texas
Hello All!

I have been lurking around XS650.com for quite some time. This is a great site that has provided me with an incredible amount of knowledge and ideas! It is a awesome resource!

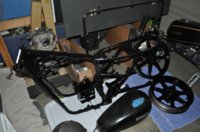
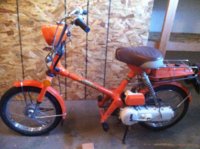
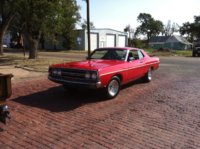
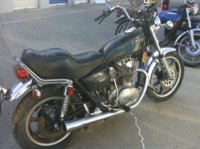
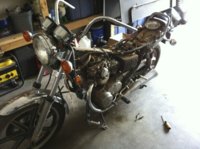
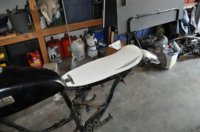
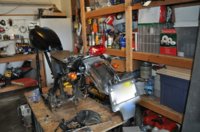
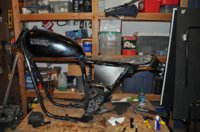
Let me introduce myself. I have been working around cars, trucks, tractors, and just about anything else with wheels and a motor since I was a young boy. My father has a knack for anything mechanical and was always willing to teach me along the way. I remember rebuilding my first motor with him when I was around 5. Over the years I have helped overall/rebuild/refurbish everything from a 1953 Allis Chalmers Tractor to 1992 Mercury Capri. Along the way I have owned a couple of scooters (mid 70's KTM with a Sachs Motor and a 1978 Honda Express) but never a motorcycle. I sold my last muscle car (1968 Ford Fairlane - see pic below) a while back and had been itching for a new project. Due to space limitations, I settled on building a motorcycle. After talking to a few buddies, I stumbled across a 1979 (2F0) XS650 Special with 16000 miles. This Thread will chronicle the build of this bike. In an effort to catch up I will post the progress so far then update as more work is done.
 

Attachments

  • Honda Express.jpg
    Honda Express.jpg
    232.8 KB · Views: 180
  • 1968 Fairlane.jpg
    1968 Fairlane.jpg
    267.1 KB · Views: 184
  • XS650 As Purchased - Side.jpg
    XS650 As Purchased - Side.jpg
    201.4 KB · Views: 208
  • XS650 As Purchased Cluster.jpg
    XS650 As Purchased Cluster.jpg
    185.1 KB · Views: 177
Teardown

I got the bike home and began tearing it down. I removed each part and bagged/tagged it. I kept everything from the tear down and will get rid of the unneeded parts once it is finished and back on the road.
 

Attachments

  • XS650 Tear Down 4.jpg
    XS650 Tear Down 4.jpg
    192.6 KB · Views: 177
  • XS650 Tear Down 3.jpg
    XS650 Tear Down 3.jpg
    205.9 KB · Views: 181
  • XS650 Tear Down 2.jpg
    XS650 Tear Down 2.jpg
    205.9 KB · Views: 182
  • XS650 Tear Down 1.jpg
    XS650 Tear Down 1.jpg
    161.5 KB · Views: 184
Seat Build - Part 1

After reviewing posts on this site, I began working on a new seat for the bike. First, I removed the original supports and closure mechanism from the rear hoop. I did maintain the front mount to assist in positive location of the seat on the bike. Next, I formed the desired seat shape out of foam-backed poster board. After getting the design the way I wanted, I transferred it to 16 gauge sheet. After cutting out the template, I formed the new seat pan to accommodate the stock rear fender. After getting it shaped, i tack welded the pan up. Based on other posts, I salvaged the front mount and rubber supports from the stock seat pan. I mounted them to the new seat pan in locations to provide support from the frame. I also incorporated a mounting location for the rear of the seat pan to be secured with. I will finish the welding/cleanup and upholstery later in the build.
 

Attachments

  • XS650 Seat Build 1.jpg
    XS650 Seat Build 1.jpg
    154.9 KB · Views: 199
  • XS650 Seat Build 2.jpg
    XS650 Seat Build 2.jpg
    104.2 KB · Views: 204
  • XS650 Seat Build 3.jpg
    XS650 Seat Build 3.jpg
    178.6 KB · Views: 198
  • XS650 Seat Build 4.jpg
    XS650 Seat Build 4.jpg
    120.5 KB · Views: 195
Side Cover Build

With the new seat pan fabricated, I decided that the stock side covers just weren't going to cut it. They were too bulbous and broke up the flow of the bike. Again, after reviewing posts on the site I settled on a path forward.

I started by removing the stock mounts for the side covers. I then welded in mounting tabs for new sheet side covers. The new covers were formed out of 18 gauge sheet and are intended to follow the curves of the bike while covering the battery box and other equipment/wiring/components in the central portion of the bike. After getting the side covers formed up, I drilled and tapped the new mounting tabs. I used wing nuts in the photos to assist during the fabrication process. The final mounting will use stainless hardware with rubber isolators, etc. The final profile of the leading edge of the side cover will be finalized when the carbs are in place with new UNI filters installed. Overall I think the new covers will be a nice look for the bike.
 

Attachments

  • XS650 Side Covers 1.jpg
    XS650 Side Covers 1.jpg
    114.1 KB · Views: 180
  • XS650 Side Covers 3.jpg
    XS650 Side Covers 3.jpg
    133.7 KB · Views: 180
  • XS650 Side Covers 2.jpg
    XS650 Side Covers 2.jpg
    117.2 KB · Views: 178
Mock Up

At this point I wanted to get an idea of how the bike would look with the new seat pan and side covers. Here are a couple of pictures from the mock up. In general I am pleased with the look!
 

Attachments

  • XS650 Mock Up 1.jpg
    XS650 Mock Up 1.jpg
    191.2 KB · Views: 203
  • XS650 Mock Up 2.jpg
    XS650 Mock Up 2.jpg
    191.2 KB · Views: 195
  • XS650 Mock Up 3.jpg
    XS650 Mock Up 3.jpg
    187.2 KB · Views: 229
Fork Rebuild Part I

The bike was stored outside under a tarp for several years by a previous owner. This, in combination with the bikes age, called for a fork teardown and rebuild. I disassembled the forks (the guide from Hugh was a great reference) and began cleaning up the internals. While the forks are apart, I am going to work on the lowers and dress them up a bit (they need it bad!). I have new seals on order from All Balls. Once they come in and I get finished with the lowers, the forks will go back together. I am planning on installing fork gaiters (already in hand) as well.

That brings me up to the current. I haven't made much progress since it has been so dang cold. Hopefully the weather will warm up so I can get back to it!
 

Attachments

  • XS650 Forks 1.jpg
    XS650 Forks 1.jpg
    154.6 KB · Views: 188
  • XS650 Forks 2.jpg
    XS650 Forks 2.jpg
    143 KB · Views: 177
Made a little progress today. The weather has finally warmed up a little to where it is nice to work in the garage. I am still waiting on parts to arrive so I went back to work on the frame. I built a makeshift paint booth in my garage to control overspray and dust. Took me about an hour to get it assembled and ready to use. Hung the frame and sprayed it with gloss black and clear enamel. The set-up actually works pretty well. Kept all of the overspray inside the enclosure and keeps the dust off. Sorry for the poor picture quality - cell phone specials!:doh:

I'll get some better pictures of the frame once it is dry and out of the booth.
 

Attachments

  • XS650 Paint 2.jpg
    XS650 Paint 2.jpg
    131.3 KB · Views: 204
  • XS650 Paint 3.jpg
    XS650 Paint 3.jpg
    160.5 KB · Views: 199
  • XS650 Paint 1.jpg
    XS650 Paint 1.jpg
    161.6 KB · Views: 203
Thanks Johnt3! I ran across similar ideas on YouTube where people had used PVC to build a frame. I went with with wood because of its ease of connection and strength. I think it will make it easier and cleaner as I paint the remainder of my parts.
 
Just ordered my new carbs on eBay! After reading all the reviews on the EX500 carb swap, I decided to take the plunge. Carbs, needles, pilots and mains for about $125. If it works out, it will be a heck of a deal! Now just to get to the point of trying them out. :)
 
Spent a little time in the garage tonight prepping more parts for paint. Going to spray the wheels, swing arm, and battery box tomorrow if all goes as planned. The wheels aren't in too bad of shape but could use some freshening up.

Pictures coming tomorrow.
 
The last couple of days have been very productive. I was able to get the rims, battery box and swing arm sprayed yesterday evening. Very pleased with how they turned out. Spent some time today prepping the next batch of parts for paint. Have the center stand, side stand, upper and lower triple clamps, instrument bracket, rear caliper bracket and support and the seat pan loaded into the paint booth. Hopefully the weather will warm up in the next couple of days so that I can shoot them. It is my plan to work through all of the paint (at least the majority of it) while the booth is set up.

As a side note - It is always good when the UPS guy comes. Got my new wheel bearings, steering stem tapered roller bearing set, and fork seals from All Balls Racing. I also received my EX500 carbs i purchased on eBay. Can't wait to start putting back together!:thumbsup:
 

Attachments

  • XS650 Paint 4.jpg
    XS650 Paint 4.jpg
    162.3 KB · Views: 190
  • XS650 Paint 5.jpg
    XS650 Paint 5.jpg
    154.4 KB · Views: 224
  • XS650 Paint 6.jpg
    XS650 Paint 6.jpg
    104.8 KB · Views: 173
  • XS650 Paint 7.jpg
    XS650 Paint 7.jpg
    107 KB · Views: 187
Doing a really a really great job on the bike. Like the seat pan. The EX500 carbs should work very well no problem. I really like them on my bike. Hard to beat the price and performance. Will be watching your build. :thumbsup:
 
Johnt3 - Thanks for the kind words. That's no joke on the wheels! There are so many nooks, crannies, and crevices on the mag wheels. Took a lot of prep time to get ready and took longer to spray than I expected. Seemed like I had to vary my spray angle on every stroke to get full, even coverage. A visit from the man in brown always helps though!:D

scabber - Thanks for the kind words as well. I have really enjoyed the project so far. I read through the thread on here about the EX500 carb swap and just couldn't resist. Improved performance and ability to tune? Please and thank you! My BS34s had a couple of galled pilots anyway. I ordered 38 pilots, 138 mains and JJJ needles from Jets-r-us. Based on what I have read, this should be a good starting point.

Still toying around with the Aprilia hydraulic clutch conversion that has been discussed on the board. Any new attempts or successes?:shrug:
 
I have done both the ex500 carbs and the Aprilia hydraulic slave cylinder mod and I really do like them both. My current set up on the ex500 carbs is 40 pilots (1 1/2 turns out on the mixture screws), 140 mains and GFH needles in the 2nd slot. It runs very well but I think I may be a little rich across the board with this set up. I am also now using an ex500 harness (slightly modded) and ex500 hand controls with custom cables from Motion Pro so that I have a fully functional hand choke on the bars and also the push/pull throttle cables. On the Aprilia clutch slave cylinder if you have access to a lathe or a friend with a lathe it is very easy to cut down the piston retainer, just measure the smaller inner hole and the outer hole where the dust cover for the worm screw was and cut down the piston retainer to fit. I don't remember who did it but someone also used a Ducati slave cylinder for this conversion. If I remember correctly where the cylinder goes into the cover it was slighlty under sized so it may be a little more difficult to get it centered properly which could cause some misalignent/binding. Once you get the Aprilia piston retainer sized correctly it is a simple place, mark, drill and tap for the slave cylinder (it can be done with a hand drill and tap but I found that it is much easier to do with a drill press). I personally went ahead and drilled and tapped for a helicoil so that the bolts are not threaded directly into the aluminum (I loctited the helicoil in and I think it is better to have the bolts go into a steel thread). Then source your preferred master cylinder (I am using a 13mm bore master cylinder) and hose. When you go to mount the slave cylinder you may need to make some tapered nylon washers to go between the mounting tabs on the slave cylinder and the LH side cover so that it doesn't pull the slave cylinder one direction or the other causing alignment issues. I have been running the clutch mod for about a year now (right at 3000 miles) and it has worked VERY well. I have not had to adjust anything on it what-so-ever. I have some left over hardened 8mm stainless rod for the push rod. If you go this route and would like a push rod made I will be more than willing to make you one at a very reasonable price.
 
ippytattoo - thanks for the information. I read through your thread multiple times to get the details on the carb and clutch swaps. Awesome work - a great resource! I am pretty sure I will go ahead and do the clutch swap. My wife may ride the bike some and the improved clutch pull/feel would be welcome. I think the helicoil is a good idea as well. Provides a lot of extra strength and reduces the likelihood of cross threading or stripping. Definitely have to keep that in mind. When I pull the trigger on the swap I will message you on the 8mm clutch rod. After reading through the threads that was my biggest question. One made out of the correct material at the correct length would be awesome!
 
The weather warmed up today so I was able to get some more painting done today. Texas Panhandle weather is always interesting. Yesterday the high was in the 20's; today we hit 60. :doh:

Anyways, Got the batch of parts in the booth painted. Gradually narrowing the pile of parts to be painted down. :thumbsup:
 

Attachments

  • XS650 Paint 8.jpg
    XS650 Paint 8.jpg
    97.3 KB · Views: 160
Back
Top