CalsXS2
XS650 Guru
- Messages
- 1,006
- Reaction score
- 52
- Points
- 48
Well, I guess it's kinda late to ask now that it's all ready done. But, I seen a NOS switch on ebay. I may or may not have used the wrong color paint.
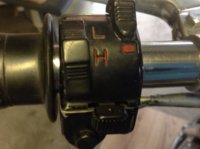
I used red for everything since I seen a picture of a NOS right side switch, and all the marking's were red.
Then I seen a NOS XS1 switch. The light on/off is red, so I'm ok there. But the turn signal switch has a white line. I made mine red. Also the H/L is black. Of course that won't work on my XS2 since my switch housing is black,,,so I made it red.
All in all I think it turned out pretty good. I used VHT epoxy roll bar and chassis paint for the black, and red auto touch up paint for the red. I also got lucky and found a source for the gray wire loom too. I think rebuilding the switch's was the most nerve racking thing I would have to do from start to finish on my complete resoration. I'll be happy if all I have to change is the turn signal switch color.
Can someone post a pic of what it's supposed to look like. Thanks.
Here's what I ended up with.

The gray wire loom.

The NOS XS1 on ebay

I used red for everything since I seen a picture of a NOS right side switch, and all the marking's were red.
Then I seen a NOS XS1 switch. The light on/off is red, so I'm ok there. But the turn signal switch has a white line. I made mine red. Also the H/L is black. Of course that won't work on my XS2 since my switch housing is black,,,so I made it red.
All in all I think it turned out pretty good. I used VHT epoxy roll bar and chassis paint for the black, and red auto touch up paint for the red. I also got lucky and found a source for the gray wire loom too. I think rebuilding the switch's was the most nerve racking thing I would have to do from start to finish on my complete resoration. I'll be happy if all I have to change is the turn signal switch color.
Can someone post a pic of what it's supposed to look like. Thanks.
Here's what I ended up with.
The gray wire loom.
The NOS XS1 on ebay