Hand me down Canadian XS650 build

Jaymichael

XS650 Addict
Messages
163
Reaction score
13
Points
18
Location
Calgary Alberta Canada
Greetings all. A couple years ago my father in law showed me a dirty old bike under a tarp in his garage. I honestly paid it little attention at first. The sissy bar and broken glass windjammer didn't inspire me much so I filed in my mind as "neat" and carried on. Some time passed at do to lack of space it moved out of the garage on to his sidewalk and there it sat for another year.

During casual conversation one day he mentioned a young guy had offered to buy it from him for 500 bucks. Thankfully due to some lingering nostalgia for the bike he refused the low ball offer and then he made me the offer, "Its yours if you want it" he said. Again I waffled on it a bit, more concerned for the lack of space at my place, where would I put it came to mind.

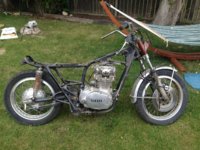
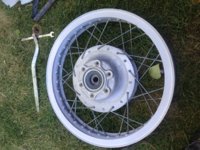
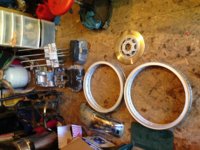
The next time I visited I took my first real close look at it. It would need much work, surface rust on most items, some broken bits here and there. Seat was torn, rubber items were cracked... Hmm...
A glance at the odometer showed just a hair over 6k original miles, wow low mileage I thought to myself. Perhaps I need to investigate this a bit. Was there even parts available for this unit any more? A quick google search put me at Mikesxs. Oh cool, seems like parts are quite available still, that's a start at least. Next I came across this forum and then a solid 6 hour internet session elapsed :laugh:

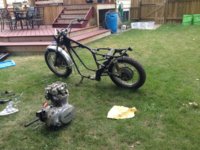
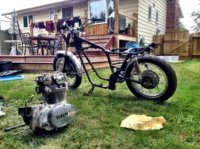
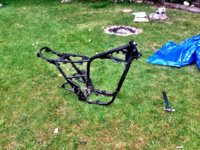
The next weekend this old XS was strapped on the back of my truck headed back to home for a new chapter in its life. It ended up under a tarp again for a season or so. Life was busy and other projects were taking priority. I was at the time working as a BMW master tech at a dealership in Calgary Alberta. Around june this year an old friend stopped by my work and asked If I was interested in a teaching position at our local college in the Automotive department. 2 weeks later I was rolling my tool box into my work shed and wondering what I was going to do with the rest of my summer while I waited for the start of my new position in the fall. I cracked a cold one, admired my tool box, then noticed the blue tarp.... Game on!!!

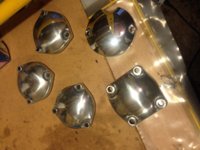
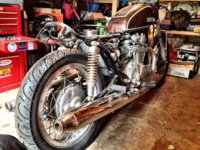
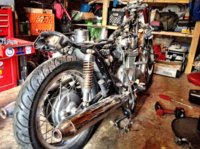
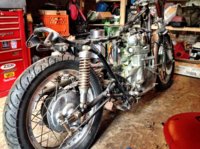
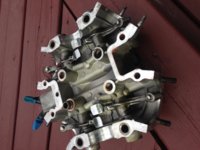
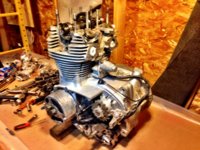
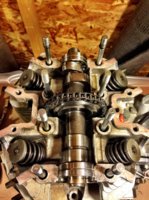
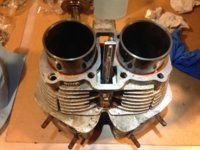
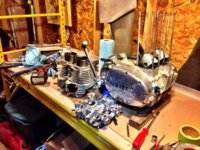
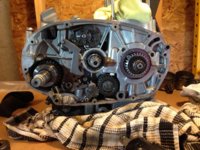
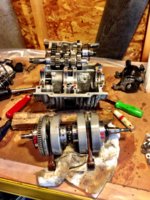
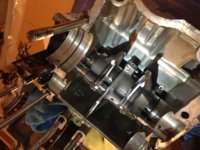
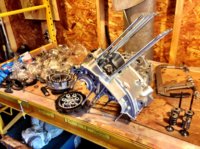
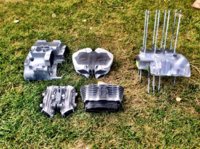
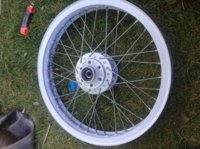
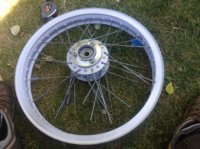
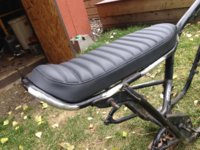
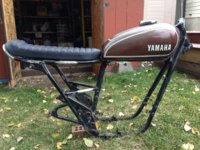
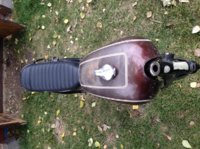
Sadly I should have taken a couple more before pictures, I think my wife may have a couple on her phone, Ill try to find them and update later. For now this is what I have.
 

Attachments

  • 1395843_10151962727955330_1785502452_n.jpg
    1395843_10151962727955330_1785502452_n.jpg
    161.3 KB · Views: 486
With nothing but clear sky and no work to go to I started tearing this bike down. Dreams of a slick bobber excited my thoughts but my wife also has nostalgic memories of riding this bike with her Dad. Room for two was her only request, anything else is fair game. Working at the college in the fall will give me access to virtually any engine building equipment and tools required to do this properly. It had been roughly 8 years since this xs has run, the currently condition basically required a complete tear down and over haul. And off we go.
 

Attachments

  • IMG_6303.jpg
    IMG_6303.jpg
    308.5 KB · Views: 394
  • IMG_6313.jpg
    IMG_6313.jpg
    310.9 KB · Views: 385
  • IMG_6332.jpg
    IMG_6332.jpg
    312.3 KB · Views: 368
During the evenings I spend a bit of time researching parts and getting build ideas. Growing up in the 80's I do have appreciation for the classic 70's and 80's bikes. The XS has a pretty classy look to it, I don't feel I want to mess with the basic's too much. The end goal at this point is to build something clean, stripped down a bit but have an end product that my father in law will recognize as his old bike... with some modern touches of course!
 

Attachments

  • IMG_6333.jpg
    IMG_6333.jpg
    311.6 KB · Views: 377
  • IMG_6338.jpg
    IMG_6338.jpg
    310.4 KB · Views: 341
  • IMG_6339.jpg
    IMG_6339.jpg
    320.8 KB · Views: 342
With the frame stripped down I've been able to take stock of most of the parts. Sadly much of it is not very workable. Seats torn, liking a look of some of the flat seats out there. Cluster and gauges are smashed, guess the bike fell over in a wind storm one day. Most trim pieces, plastics, rubbers, cables, levers etc have not held up so well over time.
Good news is the frame looks real solid. A bit of surface rust but the metal is in good shape over all. Ill be shaving down some brackets and prepping it for some powder coat.
 

Attachments

  • IMG_6354.jpg
    IMG_6354.jpg
    320.4 KB · Views: 275
Gave the block a reasonable cleaning and started pulling it down. Internals were pretty clean considering the age! Definitely seeing lots of potential here.
 

Attachments

  • IMG_6391.jpg
    IMG_6391.jpg
    165.8 KB · Views: 333
  • IMG_6392.jpg
    IMG_6392.jpg
    186.6 KB · Views: 335
  • IMG_6393.jpg
    IMG_6393.jpg
    285.2 KB · Views: 345
  • IMG_6395.jpg
    IMG_6395.jpg
    301.7 KB · Views: 329
The low mileage of this engine is pretty apparent. No big surprises so far.
Found one of the valve adjustment screws has some pitting on it, will have to sort out some new ones. Any thoughts on these? My local dealer says I can still order factory Yamaha ones but I'm curious if there is a better option. Pistons looks decent, cylinder walls are next to mint. If these measure up ok I think some new cross hatch and rings will be all that's required. Cam journals are mint, clean and free of markings of any kind. So far so good.
 

Attachments

  • IMG_6396.jpg
    IMG_6396.jpg
    194.1 KB · Views: 313
  • IMG_6398.jpg
    IMG_6398.jpg
    304.8 KB · Views: 287
  • IMG_6402.jpg
    IMG_6402.jpg
    306.4 KB · Views: 307
  • IMG_6407.jpg
    IMG_6407.jpg
    287.5 KB · Views: 300
Bottom end apart. Again, no bad surprises so far. Rod ends show full copper still, all working surfaces are free of markings. All in all I think I've got a good starting point here. I am at work now, its been pretty convenient actually. I've been placed in a second year class which starts with engine rebuilding. I've been bringing my engine components to school and using the facilities to clean, measure and test all the parts.
I've ordered up all the usual, gasket set, rings, new timing chain, chain guides, yamaha shaft seals, springs, any parts where there seems to be new improved parts available.
All clearances have measured up well withing factory spec, I've decided on a pair of new factory dimension pistons just for piece of mind. Also ordered a PMA kit from Hugh's and a pamco electric ignition. Having fun!
 

Attachments

  • IMG_6416.jpg
    IMG_6416.jpg
    279.6 KB · Views: 308
  • IMG_6420.jpg
    IMG_6420.jpg
    208.9 KB · Views: 331
  • IMG_6424.jpg
    IMG_6424.jpg
    310.2 KB · Views: 298
  • IMG_6502.jpg
    IMG_6502.jpg
    339.5 KB · Views: 299
A bit of a bummer here. The plating on the wheels was not workable. Otherwise the wheels are super straight and clean. Bearings out, new ones ordered, soda blasted and in line for some powder coating. Going with a semi gloss black, and likely some Buchanan's stainless spokes. Was excited to discover we have the equipment to true and balance motorcycle spoke rims at work, LOVE my new job!
 

Attachments

  • IMG_6513.jpg
    IMG_6513.jpg
    311.3 KB · Views: 313
  • IMG_6516.jpg
    IMG_6516.jpg
    311.1 KB · Views: 303
  • IMG_6519.jpg
    IMG_6519.jpg
    305.4 KB · Views: 304
  • IMG_6522.jpg
    IMG_6522.jpg
    272.1 KB · Views: 278
...Found one of the valve adjustment screws has some pitting on it, will have to sort out some new ones. Any thoughts on these? My local dealer says I can still order factory Yamaha ones but I'm curious if there is a better option...

Welcome to the forum, Jaymichael. Here's a thread that may interest you, about valve adjuster tips and options. Follow down thru the included links. If your valve tips are in fair/good condition, they could take a light resurfacing without too much disturbance to the stellite layer. Try a forum google searchbox on 'elephants foot adjuster' for more...

http://www.xs650.com/forum/showthread.php?t=38018
 
If there is one thing I'm not real confident with in my mechanics skills its carburetors. When I got my license fuel injection was already the norm, other than a few of my own vehicles I haven't spent much time tinkering with them. Sounds like a job for the pro's, off to Oldskoolcarbs you go!

Forks pulled down, everything looks workable here. Slight markings on the chrome tubes however, will try some polishing first but may need some replacements. Any body have opinions on Mikesxs replacement fork tubes? Valving has been sent to Hugh's for some custom lowering.
 

Attachments

  • IMG_6524.jpg
    IMG_6524.jpg
    263.9 KB · Views: 274
  • IMG_6544.jpg
    IMG_6544.jpg
    304.4 KB · Views: 248
If there is one thing I'm not real confident with in my mechanics skills its carburetors. When I got my license fuel injection was already the norm, other than a few of my own vehicles I haven't spent much time tinkering with them. Sounds like a job for the pro's, off to Oldskoolcarbs you go! ...

This should help: http://www.xs650.com/forum/showthread.php?t=43
 
Twomanyxs1b's, Thanks for the greeting and info about the adjusters. I will have to inspect mine and see how they relate to that service bulletin. Many thanks for the head up!
 
Frames getting cleaned up pretty good, still have a bit of polishing to do on the modifications before sending it out for powder. I've done away with some brackets and such, going for a nice clean stripped down look. New seat arrived as well from Counter Balance Cycles. Can't say enough good things about this seat, top notch construction, I would recommend this option to anyone going for this style.
 

Attachments

  • IMG_6640.jpg
    IMG_6640.jpg
    304.9 KB · Views: 402
  • IMG_6641.jpg
    IMG_6641.jpg
    313.4 KB · Views: 379
  • IMG_6544.jpg
    IMG_6544.jpg
    304.4 KB · Views: 360
  • IMG_6643.jpg
    IMG_6643.jpg
    317.3 KB · Views: 341
Ok, Frame, wheels, hubs, brackets, and various engine parts out for powder coating.
Just playing around with some of the left over bits in the mean time. Starting to polish up some of the shinny stuff, starting to see some results. Probably kidded myself at the start of this project figuring this would be a cheap build :)

Also starting to think about color for the tank. Always been a fan of Rootbeer, its sorta close to the factory color as well, example in pics. That decision will be down the road the a bit, will keep feeling into it.

Waiting on many parts to show up, wheel bearings, spokes, steering bearings, swing arm bushings etc. Researching best options for bars, controls, cables, gauges, fork brace, shocks, fender(s) etc. Will probably hold off on these later items for a bit until I get the engine, frame, wheels built to see how it all looks as a unit. Good times for sure. Can't thank this forum enough, what am amazing wealth of knowledge to draw from, bravo everyone! :thumbsup:
 

Attachments

  • IMG_6664.jpg
    IMG_6664.jpg
    177.6 KB · Views: 301
  • IMG_6665.jpg
    IMG_6665.jpg
    189.3 KB · Views: 285
  • IMG_6678.JPG
    IMG_6678.JPG
    104.4 KB · Views: 522
Oh Wild! I wasn't aware there were translucent powder coating options out there. One would suspect this would hold up better than paint no? I'm going to have to give my power coating guy a call and see if he offers this option. Thanks for the heads up!
 
Hi JM,
17 posts since noon? Wow.
WhyTF did you powdercoat those aluminum hubs & rims?
Yer polishing wheel broken?
And while I say nothing against a PMA/Pamco conversion, use the list's search function to count the number of posts saying "Help with my PMA/Pamco systems" and then count the number of posts saying "Help with my stock ignition and charging systems"
Then make your own decision.
 
Man that seat looks so good. Good luck with this build. I'm excited to see how it turns out!
 
Fredintoon. Yup, been meaning to build this thread as I worked but I didn't get around to start posting till today, new job's been keeping me busy in the evenings, consider the thread up to date :)
My personal tastes lean more towards a dark wheel, I'm thinking the black on stainless spokes are going to looks mint. If the wheel had been in better shape I may have considered keeping them shiny, but they would have been to much work as is. As far as the electrics go, I'll feel more confident with modern parts, my original harness went right into the garbage, lots of corrosion, repair splices and green science experiments going on with the connectors. I'll be fabricating a new wiring harness for this ride, the pma and pamco (keeping mechanical advance) will help keep that project clean and simple
Cheers
 
Back
Top