Quit
piddlin' and get to the top end....


Drumroll please.............
MAILMANS XS2 TOP END BUILD PART 1
Well I’ve been sneaking up on this for some time now, first time jitters I suppose, so let’s just dive in shall we?
I am not trying to write the definitive tech article here, just go to the tech section and read Jim’s excellent tutorial.
I just want to document my first time engine build, warts and all. I will also stray from his techniques periodically when I am trying to work with my available tools or to do things in a manner that’s easier for me.
I’m not going to go over all the prep that led up to this point, it’s all in the earlier pages of this thread.
The ring gaps have been checked, gaskets scraped, everything cleaned and prepped so this is just assembly time.
The first thing I did, and really I could write a whole article dedicated to this, but I shall condense, is install the front cam chain guide in the cylinder. I bought a NOS unit and while it bolted up nicely it was off center in the cam chain tunnel and was almost all the way over to one side in the tunnel. After much fooling around with it I realized it was due to the rough casting not having a square and level mounting surface. A little squaring up on a flat surface with some wet sandpaper and it bolted up nice and centered.
After that , I installed the rings in my pistons and oriented the gaps. Thank you to 5 Twins for posting so many useful reference images that I find myself constantly referring to, your contributions to this forum are beyond measure.
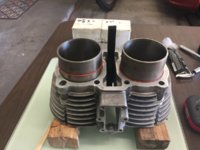
After getting all the rings in their proper order and gaps spaced I moved on to installing the pistons in the jugs. I have to say I was skeptical about this popsickle stick method, but it really works so easily and it is just simplicity itself. Less than a dollar at Walmart for a package of sticks.
With the pistons installed into the jugs I could turn my attention to getting everything ready to place the jugs onto the case. For this part I will be copying a technique that I learned from Robin C. I will be standing the case on its nose so that I can slide the jugs on horizontally, this accomplishes a few things. No need for any kind of wooden supports or rubber bands ( even though I had both on hand) it also allows me to spray copper gasket spray on the gasket and nothing will have to touch the gasket.
Push the positioning dowels in place.
Prep the gasket with copper spray.
And get everything in place to put together.
I pushed the jugs down until I could align the wrist pins, then after generously oiling all parts, I pushed the wrist pins into place and inserted the spring clips and checked them to make sure they were secure.
Full disclosure. I installed my base gasket upside down and it had to be flipped. Fortunately the gasket was still very pliable and the copper spray tacky, nothing had set up. Be careful! It can go on wrong and I failed to notice it right away.
The cylinder could now be pushed all the way down, and the whole engine uprighted for the rest of the build.
In the photo below I am applying very slight compression to the cylinder just to help seat everything. At this point I will also be rigging up my dial indicator to check for TDC and inspect my timing marks.
The timing marks were on the money, so all ahead full!
After determining that my timing marks are on the money, I sprayed my head gasket with copper spray , let it flash off and dropped the head into place. I didn’t show it but I remembered to insert my positioning dowels.
At this point I have the two opposing corners lightly snugged ( thats straight outa the Hans Pahl book ) , I also have the two bolts under the spark plug holes in, and the small bolt in the back of the head in all just lightly snugged.
So that’s where things stand for now, I ran out of time.
Up next will be the cam installation and the new cam chain buttoned up, the rocker cover going on and yadda yadda yadda........
It might be two or three days, gotta catch up on some honey do’s.
Till next time,
Bob