GLJ, that seems a nice first attempt. It is always difficult to get in around those stud holes, but your buffer has done well there. You have now gained access to a whole new dimension of bike restoration.
-
Enjoy XS650.com? Consider making a donation to help support the site.
XS650.com receives a small share of sales from some links on this page, but direct donations have a much greater impact on keeping this site going.
You are using an out of date browser. It may not display this or other websites correctly.
You should upgrade or use an alternative browser.
You should upgrade or use an alternative browser.
Is it my turn? Anything to do with lathes, mills and other shop tools
I meant to add that if you screw the buffer down to the bench you can then apply a whole lot more force. But beware, those valve covers must be held very tightly as they have a tendency to fly out of your hand when the wheel hits any of those 90 degree edges.
I should stay off of Amazon. I've been resisting getting a buffer, Ran across this one and weakened. Price was right.
https://www.amazon.com/gp/product/B01BW8UOHC/ref=ppx_yo_dt_b_asin_title_o00_s00?ie=UTF8&psc=1
View attachment 175921
It got here this morning. Took it for a test drive. I don't know much about buffers. It seems to work just fine. No vibration, doesn't try to walk around. I do need more practice. Got a lot to learn
View attachment 175922
Hi GLJ,
I did a poor boy's buffer by swapping my 8" bench grinder's left-side wheel for two 8" polishing wheels mounted back to back.
A genuine long spindle buffer allows better access.
First:- bolt that sucker down before it falls off the bench
Always wear eye protection and a breathing mask when polishing stuff
use finer & finer grades of buffing compound.
Put a big ol' backstop behind the polisher to avoid getting big black smears up the walls.
And finally, curb your enthusiasm. Not everything has to shine like a shithouse door on a frosty morning.
May have been posted before but this should be in your bookmarks?
http://vintagemachinery.org/
Lots of old manuals, a clessy section, he also does Utoob vids of old machines.
http://vintagemachinery.org/
Lots of old manuals, a clessy section, he also does Utoob vids of old machines.
Looks great!View attachment 176208 I built my own Buffer, 1 1/2 hp 3 phase motor running off my phase invertor.
My Seneca Falls lathe is 100+ years old as near as I can tell. Given that, it's in pretty good shape, but the 3 jaw chuck has horrible runout: .030+ with a precision ground pin chucked up, measured as close to the jaws as I dare.
Runout at the body of the chuck near the spindle is .002 give or take, so the problem is in the scroll/jaws. It has a somewhat oddball spindle nose both in diameter and thread pitch, so a new chuck would require machining a new back plate, which I have neither the tools, the experience nor the courage to attempt.
Watched a mrpete222 (tubalcain) video where he used a tool post grinder to true up the jaws with excellent results. The secret is mounting a ring over the jaws and replacing the outer jaw fasteners with bolts that butt on the ring. The idea is that when you tighten down the jaws the bolts hit the ring and the jaws tighten against that while still open far enough to get a grinding stone in there. That takes all the slop out of the scroll in the "tighten" direction.
Then you mount up a tool post grinder and work it in and out and backing it away from center a skoshie after each pass until all the jaws are shiny from nose to tail. I knew my #3 jaw was the loosest, so I worked it until it was just kissed all the way across. Runout now is ~ .008 which is still bad, but WAY better than it was. I'll set up and polish them a bit more as I can still see a dull spot on the #3 jaw. I quit at that point because I wanted to make sure I was making things better, not worse and I had to take the setup down to chuck up the pin and re-indicate.
There was a lot of "but first I gotta" involved. Big thing was, I didn't have a tool post grinder. Ran across one on Fee Bay at a not totally horrible price and sprung for that. I was a bit shocked (and a little pissed) to find that the "motor" was a Harbor Freight router! But, the adapter to mount it on my AXA tool holder was very nicely machined and the router was variable speed, so I figured for the price, what the hell. A Du-All it ain't, but it's good enough for a junkyard machinist. Had to order some 1/4" shank grinding stones to use as well.
Then I had to make a ring to lock the jaws with. Started with a nice piece of 4" Schedule 80 pipe. Ooops, doesn't let the jaws open wide enough to take the stone. Poop. Hey, here's a nice piece of 6"...cut a ring off that and....oooops, now the jaws don't open far enough to lock on the ring. Dammit. Rummage around in my cultch pile without much hope of finding anything when I came across a piece of 5 inch Schedule 80. Cut a ring off THAT and "Say, that should work!" Except that the thickness of the pipe wall blocked the outer bolt hole on the jaw. Fortunately, I have a mill, so I marked the spots on the ring that needed to be relieved and notched them with a 3/8" end mill (jaw bolts are 5/16")
Got everything mounted and aligned and very gingerly started kissing the jaws with the grinding stone and the chuck running in opposite directions (sure glad I took the time to wire up that reversing switch a couple of weeks ago...) Things seemed to be progressing okay until I started getting a LOT of vibration. What the...oh. The stone was mounted to the mandrel with a screw which had come loose, and the router was mounted to the tool post adapter with set screws, which had ALSO come loose. Put locktite on all the fasteners, realigned everything and went back to grinding. Slllooooooow and easy. Advance the stone a couple of thou, make several passes in and out, advance, rinse, repeat.
Overall, I'm pleased with the outcome, especially given my cheesy equipment and lack of experience. Turned a piece of 1" stock with nice results, faced it, bored a hole in it and even got my cutoff tool working like it should. Life is good...
Well done DE!My Seneca Falls lathe is 100+ years old as near as I can tell. Given that, it's in pretty good shape, but the 3 jaw chuck has horrible runout: .030+ with a precision ground pin chucked up, measured as close to the jaws as I dare.
Runout at the body of the chuck near the spindle is .002 give or take, so the problem is in the scroll/jaws. It has a somewhat oddball spindle nose both in diameter and thread pitch, so a new chuck would require machining a new back plate, which I have neither the tools, the experience nor the courage to attempt.
Watched a mrpete222 (tubalcain) video where he used a tool post grinder to true up the jaws with excellent results. The secret is mounting a ring over the jaws and replacing the outer jaw fasteners with bolts that butt on the ring. The idea is that when you tighten down the jaws the bolts hit the ring and the jaws tighten against that while still open far enough to get a grinding stone in there. That takes all the slop out of the scroll in the "tighten" direction.
Then you mount up a tool post grinder and work it in and out and backing it away from center a skoshie after each pass until all the jaws are shiny from nose to tail. I knew my #3 jaw was the loosest, so I worked it until it was just kissed all the way across. Runout now is ~ .008 which is still bad, but WAY better than it was. I'll set up and polish them a bit more as I can still see a dull spot on the #3 jaw. I quit at that point because I wanted to make sure I was making things better, not worse and I had to take the setup down to chuck up the pin and re-indicate.
There was a lot of "but first I gotta" involved. Big thing was, I didn't have a tool post grinder. Ran across one on Fee Bay at a not totally horrible price and sprung for that. I was a bit shocked (and a little pissed) to find that the "motor" was a Harbor Freight router! But, the adapter to mount it on my AXA tool holder was very nicely machined and the router was variable speed, so I figured for the price, what the hell. A Du-All it ain't, but it's good enough for a junkyard machinist. Had to order some 1/4" shank grinding stones to use as well.
Then I had to make a ring to lock the jaws with. Started with a nice piece of 4" Schedule 80 pipe. Ooops, doesn't let the jaws open wide enough to take the stone. Poop. Hey, here's a nice piece of 6"...cut a ring off that and....oooops, now the jaws don't open far enough to lock on the ring. Dammit. Rummage around in my cultch pile without much hope of finding anything when I came across a piece of 5 inch Schedule 80. Cut a ring off THAT and "Say, that should work!" Except that the thickness of the pipe wall blocked the outer bolt hole on the jaw. Fortunately, I have a mill, so I marked the spots on the ring that needed to be relieved and notched them with a 3/8" end mill (jaw bolts are 5/16")
Got everything mounted and aligned and very gingerly started kissing the jaws with the grinding stone and the chuck running in opposite directions (sure glad I took the time to wire up that reversing switch a couple of weeks ago...) Things seemed to be progressing okay until I started getting a LOT of vibration. What the...oh. The stone was mounted to the mandrel with a screw which had come loose, and the router was mounted to the tool post adapter with set screws, which had ALSO come loose. Put locktite on all the fasteners, realigned everything and went back to grinding. Slllooooooow and easy. Advance the stone a couple of thou, make several passes in and out, advance, rinse, repeat.
Overall, I'm pleased with the outcome, especially given my cheesy equipment and lack of experience. Turned a piece of 1" stock with nice results, faced it, bored a hole in it and even got my cutoff tool working like it should. Life is good...
My 70+ yr old Atlas 3 jaw was the same... worse actually... 'bout 50 thou out. Found a nice chuck that was plug and play with the original backplate. Some time later I ran across that Tubalcain video.... thought I'd give it a try. Looked for the old chuck... no joy. Guess I tossed it.

Jeepers, that would de-nut anyone.View attachment 176208 I built my own Buffer, 1 1/2 hp 3 phase motor running off my phase invertor.
Looks like you've been shaving your dog with it.
Not really what you would use a lathe for but.
Brass and wood. Two of my favorite mediums...
So how many recognize or have used the tool in the last pic?
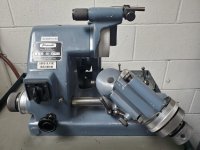
I've used a stone on a die grinder to reface valves. Close?So how many recognize or have used the tool in the last pic?
So how many recognize or have used the tool in the last pic?
Hi kop,
air powered die-grinder, eh?
Ya, in front of a very neglected lathe...air powered die-grinder, eh?
Love the tool post mount!I've used a stone on a die grinder to reface valves. Close?
View attachment 177255
View attachment 177256

Honda Engineering Ltd. GVS-27A. Valve seat tool.air powered die-grinder, eh?
The stone on that die grinder looks like the ones used on the Black and Decker valve seat grinder we had at the shop. Sad thing is the complete set up has not been used only once in the last 15 years. And the last time it was used by yours truly to face off the valves for the engine I assembled for the 1982 Heritage Special I assembled about 4 years ago!
It's always a shame when do to changes in upper management all kinds of tools end up just sitting or worse getting tossed in scrap bin. And if someone asks to buy the old tools all of a sudden they become gold plated.
It's always a shame when do to changes in upper management all kinds of tools end up just sitting or worse getting tossed in scrap bin. And if someone asks to buy the old tools all of a sudden they become gold plated.
 Tool grinding / resharpening is becoming a lost art. I've not even seen these grinders used in the almost 3 years in this shop.
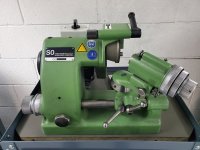
Similar threads
- Replies
- 9
- Views
- 942
- Replies
- 24
- Views
- 7K