1978 XS650E "Shakey" Build Log

Measurements updated to prior post:
Interesting ! the rings on the right cylinder are almost lined up if they came out of the cylinder that way that's probably SOME of the problem!
it looks to me as if those rings are passing compression, or at least some you can tell by the dark streaks down the piston toward the skirt.( this is a Matter of interpretation others will have different ideas on the coloration ,like too hot on one side)
I think I would measure the bore in a bunch of different places from top to bottom and write it down... see if there is tapered or oval to the cylinders.... it may need re-bored if so.
...I have also had excellent luck with copper-coat on head gaskets... even on warped heads I knew were bad and needed shaved !
....
do the rings stick to the piston in any places ? with all the carbon you had in the top end it's almost a given that the ring grooves will need cleaned too ( piston ring groove cleaner) that in it self could cure the low compression on the one side.
.....Also...stuff some clean rags under the piston to keep out things from falling in the bottom end !!!!! that's a MUST !!!!!!!.... piston pin clips can fall in there and you'll play hell getting them out again !
.....
Bob.......
 
...The pistons looks good. No scratches, nice and smooth.

Are you sure?
Closeup of your piston pic.
SimebonePiston.jpg


Measurments with digital caliper and bore gauge:
L mm R mm
Top F/B 74.96 74.93
Top L/R 74.72 74.90
Mid F/B 74.96 74.98
Mid L/R 74.94 74.95
Bottom F/B 74.96 74.95
Bottom L/R 74.92 74.93

I see too much variance in those measurements.
Recommend bore job.

(Rings)
...Any thoughts or reason for the variance in size?

Early 256 ring thicknesses were 1.5mm, 1.5mm, 2.8mm.
Later rings changed to thinner 1.2mm top ring.
More ring info in here:

http://www.xs650.com/threads/xs-rings.133/
 
Good eye 2M ! that piston has suffered big time....
I agree with 2M.... I think you need a Bore job, new pistons and rings and new gaskets....
that's an expensive endeavor but..... the problem will be Solved...
and of course replace BOTH cam chain guides....
that engine has had MANY MANY miles on it never seen a cylinder bore so smooth ! it's like a mirror finish in there LOL....
.....
while you have the cylinders off grab each rod and see if you can get any Play up and down ... use both hands and pull hard up...hard enough to lift the crank to see if there is any play in rod or crank bearings.
.....
2M can steer you right on piston ring end gap and piston fit to the cylinders which should be done to make absolutely sure their correct upon assembly.... I don't carry that info in my head ! LOL..... I think HE does he eats sleeps and dreams of XS650's....
if you want a thrill just listen to his bike run ! it's the best XS650 on the planet !
.....
Bob........
 
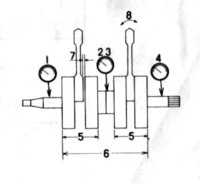
No advice is better than bad advice..............So...........No....... pulling on a con-rod is not the way to tell if it is out of spec........7 and 8 is all you need to do to test the rods without splitting the cases..........
crank diagram.jpg tolerance table.jpg

No............ a good piston kit is not necessarily expensive............These have been bought, tried and tested by many on here.... .05, (second), over size would be what your after
http://stores.ebay.com/cruzinimage-...submit=Search&_fsub=1786787011&_sid=526414511
 
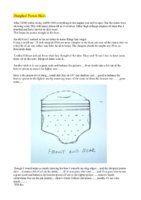
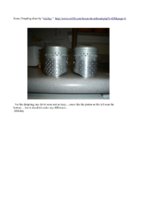
Something else worth thinking about...........I had heard of this being done before xsjohn, (RIP), posted this up, but i have never done it. Intend to on my build.
.........................................This is an example done by some "cheftay", commented on by xsjohn
Dimpled Piston Skirt 01.jpg Dimpled Piston Skirt 02.jpg
 
Anyway, if you pull on the Rod and find slop up and down you will have to split the cases....
its just a quick test that you weren't going to worry about anyway, because it was running....
however if your going to do a complete rebuild dig out the micrometers and manual and go for it !
......
Bob......
 
Back on the road with 1000km on the rebuld. (Since Sept. 20)
New rings, seals and chain guide.
I used a straw to install the valve stem seals and copper spray on the head gaskets.

I replaced the rubber washers on the valve cover with copper washers all rounds.

No leaks, no smoke, no oil consumption.

Thanks to everyone for all the help.
 
Hi Simebone: I just found this thread and read the entire saga - nice work indeed!

QUESTION: (and apologies if I missed something) - did you have the cylinder bored and use oversized piston & rings or stay with the original pistons?

Cheers,

Pete
 
Like Pete, I've been a watcher here at your thread and I appreciate your good work and detailed pictures and info.
Great to hear that it is running well.
Your diligent work is paying dividends.
 
I took the head, cylinders and pistons into machine shop and had them check the parts against the specs in the Yamaha shop manual. I was told that everything looked ok and that it'll be fine with just the new rings. I also had him hone the cylinders for me. $20.

I installed the rings myself using ring pliers from Princess Auto and managed not to break them.

I installed the pistons into the cylinders using the time honored popsicle stick method.


Hi Simebone: I just found this thread and read the entire saga - nice work indeed!

QUESTION: (and apologies if I missed something) - did you have the cylinder bored and use oversized piston & rings or stay with the original pistons?

Cheers,

Pete
 
Back
Top