1982 Yamaha from So Cal

On the bottom of the page there is a reply or leave a comment. He should answer you. Tell him your on here and your handle he might PM you. He was very active in the early days on here, his handle was/is INXS
 
Last edited:
question about the internal cam bushings. im swapping to a boyer ignition because of my pma kit. which bushings do i get. i see a brass one, i also see one that looks like it has threads, and last it seems there is a needle bearing style also. which one and where would you recommend me getting it from. if any body has specs or numbers i can get it in a day from mc master carr in a couple hours.
 
some mock up with the parts that arrived
 

Attachments

  • IMG_0375.jpg
    IMG_0375.jpg
    213.7 KB · Views: 183
  • IMG_0376.jpg
    IMG_0376.jpg
    204.4 KB · Views: 163
  • IMG_0377.jpg
    IMG_0377.jpg
    180.3 KB · Views: 163
  • IMG_0378.jpg
    IMG_0378.jpg
    94.8 KB · Views: 143
  • IMG_0379.jpg
    IMG_0379.jpg
    123.6 KB · Views: 162
Last edited:
ok got some parts and ordered some more. installed my boyer ignition and fired her up (will fine tune later) started to cut off and take off what i dont want. got a cake box for the templates i'll be making. started working on battery tray/ fuse holder/ registration holder. used some zip ties to mock my shock travel to set up the rear fender and trimmed down rear hoop. i cut the front fender and used the wide side of the fender. i wanted an aluminum but i like the look of the stock front fender. so im thinking of sanding to raw metal, polish it and then clear coat it. tank is at my buddies having the flush mount cap bung tig welded.
 

Attachments

  • IMG_0388.jpg
    IMG_0388.jpg
    262.6 KB · Views: 179
  • IMG_0392.jpg
    IMG_0392.jpg
    235.5 KB · Views: 164
  • IMG_0394.jpg
    IMG_0394.jpg
    144.8 KB · Views: 159
Last edited:
got some parts and still mocking up. filler cap bung silicon bronze welded by my buddy (now i can reposition the front tank mounts to get the tank to sit where i want it) he also took some measurements for the new shorter rear frame loop. need to pick up some 1/8" aluminum plate and start the battery box / electrical tray and splash guard.
 

Attachments

  • IMG_0402.jpg
    IMG_0402.jpg
    155.4 KB · Views: 162
  • IMG_0407.jpg
    IMG_0407.jpg
    261.2 KB · Views: 169
  • IMG_0405.jpg
    IMG_0405.jpg
    286.1 KB · Views: 152
  • IMG_0404.jpg
    IMG_0404.jpg
    251.7 KB · Views: 175
  • IMG_0403.jpg
    IMG_0403.jpg
    234.3 KB · Views: 180
so i get home and more parts have arrived. i got my one off exhaust from the folks at Pandemonium and this thing is a work of art. they went above and beyond on my packing/shipping with extreme care and a hand written note for me. ive been slow to getting over to the metal yard to get my aluminum. hopefully next post ill start to put all these parts that are arriving on. and i threw in some picks of the yamaha that came in for service at the shop.
 

Attachments

  • IMG_0408.jpg
    IMG_0408.jpg
    180.8 KB · Views: 139
  • IMG_0409.jpg
    IMG_0409.jpg
    181.1 KB · Views: 163
  • IMG_0418.jpg
    IMG_0418.jpg
    239.9 KB · Views: 160
  • IMG_0417.jpg
    IMG_0417.jpg
    234.7 KB · Views: 143
  • IMG_0416.jpg
    IMG_0416.jpg
    244 KB · Views: 167
  • IMG_0415.jpg
    IMG_0415.jpg
    195.5 KB · Views: 162
started working on my fork legs. installed Hugh's lowering spacer. what a pain the fork seal was till i read a post on here. i guess i should have read up on it first. so finally i ended up using my carbide grinding bit and SLOWLY ground the metal inner ring down so i could pick it open with my pocket screw driver
 

Attachments

  • IMG_0434.jpg
    IMG_0434.jpg
    170.5 KB · Views: 157
  • IMG_0433.jpg
    IMG_0433.jpg
    190.6 KB · Views: 133
  • IMG_0438.jpg
    IMG_0438.jpg
    231.3 KB · Views: 149
  • IMG_0435.jpg
    IMG_0435.jpg
    220.8 KB · Views: 141
  • IMG_0423.jpg
    IMG_0423.jpg
    195 KB · Views: 144
  • IMG_0428.jpg
    IMG_0428.jpg
    198.3 KB · Views: 151
so i got a little bit of time today. im planning on doing aluminum side covers that match the frame. mounted with dzus fasteners. this will be a lot of trial and error as ive seen them on some cars but never attempted it. i attached pics of my first attempt on some scrap sheet metal pieces.
 

Attachments

  • IMG_0452.jpg
    IMG_0452.jpg
    175.4 KB · Views: 140
  • IMG_0453.jpg
    IMG_0453.jpg
    159.8 KB · Views: 155
ok some input from the PROS please. my thinking is to add a little bit of extra oil, add a better filter, and have a slight cooling effect by remote mounting it. i was thinking of interrupting the oil feed to the rockers and divert it through the filter. i plan on tucking it down just on top of the front motor mount. still trying to figure an inexpensive way to spread the frame open, frame sprung closer when i pulled the factory mount out (the new mount doesnt fit) i would be willing to possibly ditch the filter if there was an oil cooler that fit in the triangle portion of the frame.
 

Attachments

  • IMG_0457.jpg
    IMG_0457.jpg
    197.9 KB · Views: 142
  • IMG_0456.jpg
    IMG_0456.jpg
    217.5 KB · Views: 158
Last edited:
got some aluminum and my banjo fittings for my oil lines. ive been setting up the garage and organizing tools/parts. getting ready for my alpha tig. i got a cart from HF and married part of my old cart so i can have both welders on one. had to clean up my palmgren cross slide vise (rusted stuck) and a new to me drill press. as my craftsman bench top drill press was in worse shape than my vise. started working on a mount that ill weld to the remote oil filter ( banjo bolts to big to use the original set up)
 

Attachments

  • IMG_0464.jpg
    IMG_0464.jpg
    237.7 KB · Views: 136
  • IMG_0480.jpg
    IMG_0480.jpg
    292.7 KB · Views: 152
  • IMG_0475.jpg
    IMG_0475.jpg
    194.3 KB · Views: 152
so im thoroughly confused. i want to add extra filtered/cool oil to the bike. i am getting some mixed reviews. i see the mikes xs oil filter/cooler in the side cover, a spin on filter kit from 650 central, and last i see the drilled holes in the side cover for an external filter (dont really like the look of it) as you can see in my post i was planning a filter/ cooler combo off the feed to the top end. am i just barking up the wrong tree by trying to do this mod. i will be riding the bike to work (LA freeway) and a some around town trips. last what are these two spots on my right side cover?
 

Attachments

  • IMG_0481.jpg
    IMG_0481.jpg
    133.3 KB · Views: 135
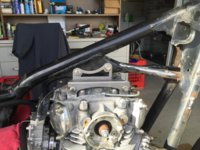
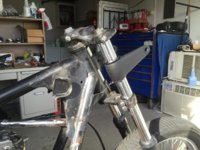
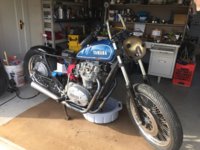
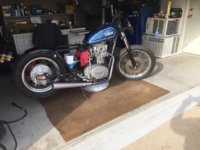
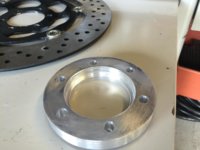
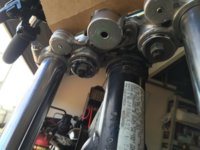
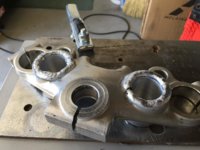
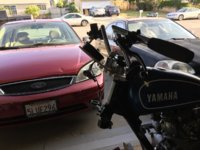
been slowly working on the bike. had to do a motor re seal on one daughters car, a timing belt on the other daughters car, 4 wheel brake job on the wifes car, and then a water pump on my silverado. i machined a custom ignition switch housing, also machined inserts for my arlen ness riser bushings. today i machined a rotor spacer for my brembo caliper/mikes floating rotor.
 

Attachments

  • IMG_0539.jpg
    IMG_0539.jpg
    131.1 KB · Views: 151
  • IMG_0538.jpg
    IMG_0538.jpg
    135.5 KB · Views: 138
  • IMG_0554.jpg
    IMG_0554.jpg
    172.2 KB · Views: 132
  • IMG_0551.jpg
    IMG_0551.jpg
    173.1 KB · Views: 127
  • IMG_0514.jpg
    IMG_0514.jpg
    187.7 KB · Views: 139
gps speedo with tach. still playing with my new alpha tig 200.
 

Attachments

  • IMG_0515.jpg
    IMG_0515.jpg
    175.6 KB · Views: 130
  • IMG_0519.jpg
    IMG_0519.jpg
    212.5 KB · Views: 140
so a little progress on mounting the gas tank and petcock relocation.
 

Attachments

  • IMG_0562.jpg
    IMG_0562.jpg
    224.8 KB · Views: 135
  • IMG_0561.jpg
    IMG_0561.jpg
    228.5 KB · Views: 140
  • IMG_0560.jpg
    IMG_0560.jpg
    200.1 KB · Views: 124
  • IMG_0559.jpg
    IMG_0559.jpg
    224.2 KB · Views: 121
  • IMG_0558.jpg
    IMG_0558.jpg
    222.5 KB · Views: 133
  • IMG_0563.jpg
    IMG_0563.jpg
    209.1 KB · Views: 128
Back
Top