79 Special II RestoCustom "Doomy"

Still happy about hearing "Doomy" run nicely today and remembering something which is likely contributing to my turn signals and maybe starter too barely trying go work. My handlebars are "Black Chrome" and I never did file a contact for the switch ground.
And about the fuse box.. the wiring diagram isn't clear as to which fuse is for which but those look quite old.
So, fix the oil filter cover leak, Set the points/Rt cyl timing better. Resolve electrical issues. Need a nice small tail light.
Get the tank on and figure out the custom seat mounting, side panels...
Having a runner is inspiring to commit to more of this.
Thankfully I work in the morning still.
Will be back on the XS soon
-R
 
20200329_124224.jpg

Couple steps backwards to get to the eventual goal. Testing the 79 running was with 77 carb boots, no vacuum pipes. Well, I figured I'd cross that hurdle sometime, so now is that time. I had to steal the vacuum pipe equipped boots off of my Donor 78E lol. Yup it's been very generous. So the 79 got stripped down to the head too. I must say all this parts swapping is crazy fun. Now I'm actually going to round file the relief in the 77 shroud tins for the vacuum pipes.
This "liquid tape" continues to be useful in new fun applications such as sticking used intake gaskets to the head where they should stay!
Yamabond, Liquid Tape, and Gorilla Tape, supplies to live by!
I did seal up the side oil filter cover leak. I think it was mostly a copper crush washer to blame. The filter itself was very clean! No surprises so far. The starter cable ? Ya I took a looksie and it is definitely a bad connection. I am not going under there yet, nope.
After I get these carbs back on there perhaps I'll reset the RT cylinder points. Cant wait to start it back up soon but hey, it's cold, wet, and rainy out there till next weekend.
By the way, we are having a fine time "social ditching" in the condo, my gal and I ..
Stay well , I'll get some more done here
-R
 

Attachments

  • 20200328_134017.jpg
    20200328_134017.jpg
    154.3 KB · Views: 154
  • 20200327_194941.jpg
    20200327_194941.jpg
    174.3 KB · Views: 137
  • 20200329_130805.jpg
    20200329_130805.jpg
    126.4 KB · Views: 145
  • 20200329_131240.jpg
    20200329_131240.jpg
    107.4 KB · Views: 167
  • 20200329_131252.jpg
    20200329_131252.jpg
    140.8 KB · Views: 127
  • 20200327_191304.jpg
    20200327_191304.jpg
    164.6 KB · Views: 135
I actually prefer that the intake manifold gaskets stay stuck to and come off with the manifolds. I use a little Yamabond there to make it so. You'll prefer it as well if you ever have to clean off stuck ones on the head - NOT a fun job.
 
I actually prefer that the intake manifold gaskets stay stuck to and come off with the manifolds. I use a little Yamabond there to make it so. You'll prefer it as well if you ever have to clean off stuck ones on the head - NOT a fun job.
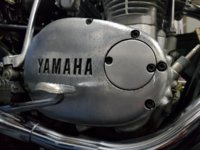
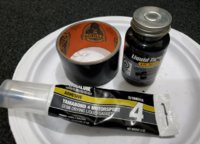
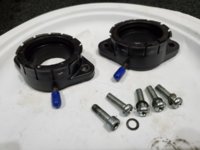
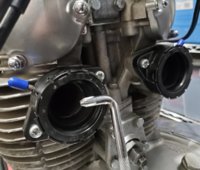
Same here. Also the side filter cover and sump cover. Always try and bond gaskets to the part you can lay on the bench to clean up.
 
On the XS's I've owned the gaskets have all been stuck to the head. So I just dab grease on the manifold surface. Habit now I guess.
I will say one thing tho. After removing the BS38's from my 78E which still has the type D cam chain adjuster and switching the 79 to the type E adjuster.
It is very noticeably more difficult to twist and squeeze BS38'S out of this 79 Special frame.
On the 78E the carbs come off real easily compared.
 
20200329_152641.jpg

So once the precision filing of the 77 manifold tins were modified for the 78 vacuum pipe equipped ones. I completed that install with a smidge of grease on the mating surfaces. Here I changed out hardware from the original allen socket head style to some.. dreaded and designed by the devil himself.. Philips head screws. Low profile head. Yes, I would use low profile Allen head fasteners but I just do not have any. And honestly, Philips head screws just do not wreak the havoc to me personally which shows up in threads occasionally.
I have a great assortment of screw drivers of course.
I did this just so the carburetor clamps could be used with the clamp on the bottom, underneath the carb bodies. They look So much nicer out of sight. And I am still going for a very clean look.
 

Attachments

  • 20200329_145707.jpg
    20200329_145707.jpg
    96.1 KB · Views: 116
  • 20200329_151058.jpg
    20200329_151058.jpg
    151.8 KB · Views: 155
20200329_155317.jpg

And I've been testing this strange line being used as fuel line now for a couple weeks. Gasoline seems to have no effect on it yet so I spliced in the fuel line "Y" fitting to reach over to the left side vacuum petcock.
This line is perfect in diameter and fit. No clamps necessary. It is semi transparent, flexible yet firm, testing continues.
I would prefer to have a nicely painted Standard tank with dual petcocks some day but for now the Silver Special tank will do..
 
You may have issues trying to put the carb clamp screws on the bottom. They may hit the angle bracket that goes across the bottoms of the carbs. But I guess you'll find out when you stick the carbs in. Best spot I've found for them is on top rolled in slightly. I also switch out the shit stock screws for Allens. They tighten better and easier.

Fn05nzC.jpg
 
Yes, those original screws are about as hard as lead. Gone. The screws I used have permanent on there washers which helps.
 
20200329_170003.jpg

Points setting, Take two. Sure enough the top set which is the right cylinder was a little "loose" by gauge feel as compared to the other set. Lighting is so critical to do this. I'll just anxiously wait for the next test run with a more finished set up bike and more tuning coming.
-R
20200329_170019.jpg
 
@ work :thumbsup: 
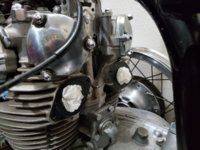
! Yes, stewing over my "adjustment" to the rt side points setting. To narrow the points gap would in effect "retard" that side ignition ? That's what I'm thinking
(hoping) as the right cyl was proven with a timing to be slightly more advanced than preferred
:umm:
 
20200330_193719.jpg
Have you ran out of plate adjustment?
Hello Jim, well was just looking in there. At work I was reading threads and think I need to rotate that plate CCW to retard the RT side cylinder. And look at that adjustment notch, it's way CW looking? But I did like what I saw for timing on the LFT side so that bottom half would have to rotate opposite.
I'm hoping for some Irish red head luck that I opened the top points too far and It might just work out now that I pinched em back to about .012"
Otherwise, gulp, it's full on re-do which is also fine.. remember I'm kinda lazy sometimes?
Sometimes it's better to be lucky than good :lmao:
A "buzz box" or old dwell meter is recommended in old threads but I've gotten by with a timing light a few times..
 
Yeah... looks like you're about fully advanced. Been a day or two since I did an XS.. but points is points. Best way is with a timing light and a dwell meter. The point gap is what sets the dwell (dwell is the amount of time the coil is charged (points closed)). I don't remember what the dwell should be. Maybe 5twins will chime in here... I'm sure he knows it off the top of his head. So set the gaps to what the book calls for and then tweak 'em to get the dwell correct.... then set the timing. Time the right side first 'cause that's the big plate. Once you got that, set the timing on the left. If you have to resort to opening or closing the point gap to adjust the timing, sumpin's wrong... stretched cam chain type wrong.

EDIT: If you don't have a dwell meter, just set the gap to the book and call it good.
 
Appreciate the look over and advice. Ya, looking at it I guess I should just rotate the plate base CCW and be ready to rotate the bottom half back the other way. I've found in the past that moving the plate also changes the point gap a guy just tried to set so it's quite that time to play all that again lol.. I luckily hit that 79 Standard in about one try.. but that was then ..
Now is now.
o_O

I admire you guys that have the patience for sorting out points. I don’t know why but for some reason that’s where I draw the line! :laugh2: I remember Robin telling me how much he enjoyed the process, kinda like knowing a secret I guess. :shrug:
 
I remember Robin telling me how much he enjoyed the process, kinda like knowing a secret I guess.
I've got the TCI iggy now so I don't have to mess with 'em. Think I'm gonna use 'em on the speed twin though. I agree with Robin. seein' the dwell come in and the timing light lining the marks up has a Zen feel to it. Ahhh... the good ol' days before solid state stuff. :rolleyes:
 
I've got the TCI iggy now so I don't have to mess with 'em. Think I'm gonna use 'em on the speed twin though. I agree with Robin. seein' the dwell come in and the timing light lining the marks up has a Zen feel to it. Ahhh... the good ol' days before solid state stuff. :rolleyes:
I'm gona need the TCI box and stuff for the 81 engine if I ever want to get it running. ( could go points but...) Oh, Jim, Got the honda charging. Just cleaned everything and put it back. Everything tested good but the slightly high stator resistance so...I think I'll try a solid state regulator. ( The Rectifier does get warmish but the power has to go someplace.) Thanks for the suggestions! :)
 
Back
Top