Allison's 81 "Ole Paint"

How many XS's is too many?


  • Total voters
    44
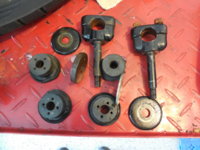
Been getting stuff done here and there. Forks got new seals, oil, stripped and buffed "a bit", tapered steering bearings, harness replaced. Chased down a bunch of electrical issues, nearly done with that, just finishing up the front brake overhaul.
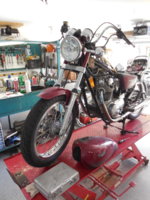
Headlight came from the swap meet at rocker box. still need to swap bars, riser bushings, and do some work on the controls.
DSCN7487.JPG

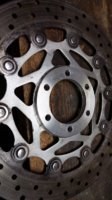
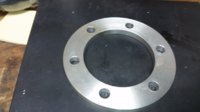
Rotor is from an FZR600 with a spacer to match the XS caliper
20170603_121913 (1).jpg

20170603_121938.jpg

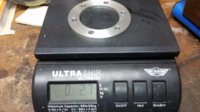
Nice way to drop 3 POUNDS of unsprung rotating weight! rotor is cleaned up now.
 
Last edited:
I see those discs are pretty reasonably priced on eBay. So what's the details on the spacer needed?
 
Thought you'd never ask!
I'm buying "blanks" from a guy I found on ebay that has access to aluminum rod drops from a manufacturer then turning them to final size on a lathe. I will need to recheck but about 6.5mm thick had it centered in the stock caliper. Then drill the holes using a hub and old rotor as guides. with the spacer less than 7mm thick, the hub flange is deep enough so it still centers the rotor, so the spacer doesn't need to get all complicated with a Z shape. Yes the used rotors are quite reasonable, oftentimes $25 will get one to your door. I stocked up before letting the cat out of the bag.... Yamaha specs a 3.5mm minimum thickness with about 4.5mm initial so there is room to get the rotors flat and looking good. I'll probably roast in hell but i bolt the rotor to a hub put a sanding disc on the angle grinder
0507267-23.jpg

and have at it. The disc spins freely so the material removal stays "pretty even". I've run several rotors I've "fixed" this way with good results. Anyone doing this is on their own, it's not an "approved process".
 

Attachments

  • 20170603_122008.jpg
    20170603_122008.jpg
    155.9 KB · Views: 179
  • 20170603_121951 (1).jpg
    20170603_121951 (1).jpg
    112.5 KB · Views: 199
  • 20170603_121944.jpg
    20170603_121944.jpg
    67 KB · Views: 184
Last edited:
Hmmm ..... 6.5mm is close enough to 7mm that I'll bet, for us lathe-less guys, an old bad 7mm stock disc could be "sacrificed" to make a spacer, even a rear one.
 
An old engineering prof of mine once explained that 1 + 1 = 3 for large values of 1. That is the difference between engineers and scientists.

And so 5T, as an engineer I can assure you that 6.5 mm IS EQUAL to 7 mm - for large values of 6.5 mm....;)
 
MaxPete I'll call it 7mm :lmao: and that gets the rotor pretty close to centered in the caliper bracket. Probably need to do a range of motion study to be sure there are no issues when pads are quite worn. the pads (box pictured) are from cruisinimage and included the little screw, SS bracket tab covers, and the spring that holds the pads in place. Used them before they seem to work well. I've posted before M8 x 10mm ss button heads make the unused rotor flange look nice no cover needed. The FZR rotor bolts are a bit longer than some stockers and the button heads look good once polished.
DSCN7511.JPG
DSCN7510.JPG
DSCN7505.JPG
DSCN7494.JPG
 
I would think you'd want/need longer rotor bolts because you're going through a spacer now. I think the originals were about 30mm long.
 
Gary this "range of motion study" is worth following up on. Clearly you likely have a very popular modification going on here ! The thin disc idea has brought up the farther caliper piston travel before in my mind. Though likely there will no concern, It is worth the input about this regarding the brake pad thickness at acceptable minimum. Very nice work you have done and posted to us ! Thanks -RT
 
Hmmm ..... 6.5mm is close enough to 7mm that I'll bet, for us lathe-less guys, an old bad 7mm stock disc could be "sacrificed" to make a spacer, even a rear one.
yeah but they are frikk'n IRON........ kinda defeats the light rotor idea. You could drill holes between the mount holes or chop an aluminum early rotor hub but that seems like sacrilege and they are 10.4mm thick.
Racer Dave that's your front wheel on this bike.
Rotor bolt length, yeah long is good, early wheel hubs have steel rotor bolt inserts so length is less critical on those, long as bolts take the correct torque without any threads distorting it should be good. the bolts apply the pressure needed so the flat plates won't move against each other. They shouldn't act in shear.
Billy bob reefed the crap out of the handle bar riser nuts, and added some fat washers at the bottom, trying to keep the bars from flopping LOL. I put in a better set of bushings and added a washer between the bushings so they squeeze to fit a bit better. This has worked for me on several XS's I've been riding for years, but I haven't kept tiller bars, we'll see.
 

Attachments

  • DSCN7507.JPG
    DSCN7507.JPG
    203.7 KB · Views: 151
Last edited:
Gary this "range of motion study" is worth following up on. ... The thin disc idea has brought up the farther caliper piston travel before in my mind. Though likely there will no concern, .... brake pad thickness at acceptable minimum. ....
Did some measuring and what ifff'n
Piston travel seems to be no problem; with the pads both grinding metal and a 3.5mm rotor the piston still fully covers the rubber seal with about a mm to spare. After looking for a bit, it's clear the piston gets no side loading, the stainless covered tabs on the bracket take all the stopping force. So If the 3.5 mm rotor is centered in the slot you are probably good running pads down to about 1/3 left. It starts getting dicey if the rotor is offset much in the slot. At some point one pad's backing plate will travel in past contact with the "torque resisting" bracket tab, and be could be spit out of the caliper. So centering any rotor in the slot is good, with a thin rotor it's fairly critical and pads should not be allowed to get thin before changes. I going out take another look at the resto-mod, that's running a "thin" mikesXS rotor, and see how the pads with about 8K of enthusiastic use are wearing.
 
I've been running a thinner 5mm thick SR500 disc for years no problem (yet, lol).
 
Very cool adaption Gary. Nice write up too. Btw I've been doing the angle grinder/soft wheel rotor re surfacing for years and never had an issue, ( I thought I was the only person doing this Rube Goldberg repair! Haha)
 
Should probably do a separate thread on this but I set up some parts for direct viewing of the pad backing vs, bracket tangs. flipped the pads to show Zero lining left alignment. if the 3.80mm rotor is centered you are just OK right down to metal. I would suggest pad changes at 1/3 thickness will leave a decent safety margin. For reference the resto-mod with 8K ish miles on ferodo pads and a mikesXS 3.9mm rotor are still at about 80% I changed that set up from mikes "included caliper spacers" to a rotor spacer last year IMHO a better solution. My spacers are at about 6.85mm I'd say 7mm is about perfect. If you add a LH rotor you may have to check that spacers best thickness.
I seem to recall guys doing rotor conversions with brembo calipers having issues getting the rotors centered in the slot. This is a big deal. If the rotor is over at one side of the slot spitting out a half worn pad could happen and be real ugly.
Some pics of pads, spacing and the rotor grinding set up. I got 2 more spacers and rotors done today for the FZR 600 front end swap coming "soon" to a garage near me.
DSCN7523.JPG
DSCN7521.JPG
DSCN7519.JPG
DSCN7518.JPG
DSCN7514.JPG
DSCN7512.JPG
 
Rotor is mounted. Did a thread about BS34 float height and testing, so mounted up cammando mufflers on early stock headers changed, the wiring harness for a better one, and got everything electrical working, There's some posts about the scraped pick up wire problem fix. Period Piece is on the road! Got that cool retro headlight lit, just found an intake manifold leak this morning, so gotta swap that out, will change the jetting a bit and reinstall the stock airboxes. Front brake was fully over hauled, no parts needed, except new pads. Bleeding was a snap literally 20 minutes first fluid pour, to a hard lever. It's so easy when the parts are overhauled. I did not change brake lines but will order and install a one piece SS line. Need to finish bedding in the pads to the "turned" rotor.
Still need to get a petcock overhauled, and check out the inside of the tank, see if it's gas n go. Bike is nearly wife ready. Gotta do an E starter wishbone squeeze and other minor details. charging is OK (ish) but need to check a few things there, I have a good charging rotor installed will test the regulator.
 

Attachments

  • DSCN7658.JPG
    DSCN7658.JPG
    231.2 KB · Views: 160
the backward facing blinker, that way you can tell they're on!
:D
Yer really lookin' MM, the little retaining pin was MIA. Have a screw in it now but needs a bit of epoxy to keep it steady.
Carbs back on the bench, hopefully for the last time, Rebuilt key switch, while tracking down "poor spark" issues.
 
She lives. 50 miles tonight for the test ride. Allison's taking it to work tomorrow. Woot! few little nigglies, natch, Dropped the mains back to 135 left the pilots at 45 found the choke orifices both were plugged, again? Starts when my thumb gets NEAR the button now. May drop them back to 42.5 yet shes a bit rich down low But I'll work the idle mixture down first. Rebuilt the vacuum petcock with a new Yamaha "valve", works perfect. Tank was clean inside, just put in gas and went. Might be just a little snug on my clutch push rod, clutch slipped at 5K coming up the hill at full throttle when it was good and hot.
20170711_194112.jpg
20170711_194200.jpg


Nice to have the lift open again. Now for the next project?????
 
Back
Top