another short ride, but a couple of probs

emzdogz

Aunty Em
Messages
1,034
Reaction score
7
Points
38
Location
Tampa, FL
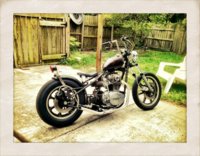
Rode it again today after figuring a way to relocate the foot pegs to about where they need to be. Makes a huge difference in rideability. These mirrors I just stuck on for safety - will be using others.

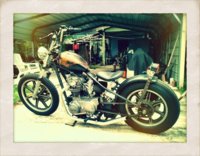
Might be time to start taking this thing apart for paint and motor work! It runs great, but the top end is a little noisier than I like and it has a couple of places where it seeps oil. (see pic)

With the pegs in the right place it really begs to be ridden fast, but the brakes need re-bleeding...so I didn't feel ok ripping around too much. I kept thinking 'what if a dog runs out in the road, etc'. That would suck ANYTIME, but with bad brakes, even worse.

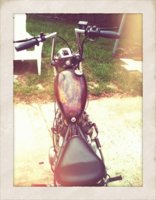
Also the front end OR the handlebars are tweaked. When the bike goes straight, the bars are not straight. LOL! having major deja vu on this. I think I had these same bars on my last XS650 and it was the same deal. I was plagued by crooked bars. Ended up changing to lower bars anyway. Might have to turn fork tubes some too, or bang the front wheel sideways against a pole (gently). <<not a pretty sight

Thinking all the stuff I need to accomplish can and should be done with the bike apart, at this point.

It has really nice power, can't wait to make this thing a rider.
I've done pretty many paintings in my life. This feels like the basic thing has been sketched onto the canvas or whatever, and blocked in, and now it's time to make it all work.
anyway.....

oh, what I used to move the pegs forward and up a little are some left over bits from highway pegs for my Sportsters. So they are like KuryAkyn adjustable adapters.
If I choose to keep these, I will have to REALLY reinforce the mounting point. But what I'd rather do is, with bike disassembled, weld on a bracket so I can use the Monstercraftsman mid mounts and pegs. Although, I have to say, I like where this set-up put the pegs A LOT. Plus it's adjustable and the pegs fold. So if I ever have to use the kicker, the right peg folds forward. Before, the pegs were father back and lower, so I'd have to remove my foot to switch gears. Now that part is perfect.

Still LOTS of details to work out.
 

Attachments

  • bike-6.2.12.jpg
    bike-6.2.12.jpg
    204.1 KB · Views: 312
I would re-route your plug wires 1st thing before the pipes burn through them. Oil leaks that high up are usually from the points/advance housing. Take the chrome cover off. If there's oil inside, it's the cam seal in there. If it's dry then the oil is coming from behind the housing where it attaches to the head. There's a gasket and o-ring used to seal that. I'd call that more than a seep, lol.
 
yeah plug wire should not be that way, for sure. It's farther away from the pipe than it looks though. Already changed it back, thanks.

as for that oil, must be coming from where you mentioned, behind the housing. It's dry when I take off that chrome cover. It is a 'seep', though! there's never enough drip beyond the fin.

If it were a large oil amount it would go ahead drip off the fin, right? (this is the low side of the bike when on stand) No evidence of it going beyond the fin at all. Can't call it a "drip", can't call it a "gush" - so how about just a "leak"? or maybe an "attempted drip". Not enough comes out to even drip off the fin, and the fins under it are dry. :shrug:


thanks, as always, for your helpful input.
 
there's oil on top of the rubber carb boot on that side too, by the seep, drip, gush, whatever. I think it might be coming from that valve cover. It's a little oily under there. Rubber o-rings seem ok, but I think it may be coming from there. Anyway, that's stuff that will be taken care of when the engine comes out. I realize now it would probably be best to take the top end apart and do new valve guides, and also probably replace the cam chain tensioner part which the rubber or plastic comes off of, and maybe the guide too.
I want to hire someone to do that work for me, I think.

I'm so happy with the result of the carb work oldskoolcarbs did for me - now I'm thinking I'd really like to have the top end of the engine gone over by someone who knows what they're doing, too.

I've put enough blood sweat & tears onto this to sense it is "mine" - I feel like maybe it's time to hire someone to do the engine work.
 
Getting there and good to hear, cool. ('bout time!)
Some lower bars aren't a bad idea, give you a stock hardtail look. Looks like your clutch cable is at it's limit in stretch with them high risers.
 
i've got some real old z-bars that are a little too tall (really they are about as high as these I've got on now) so while the engine is getting done I want to buy some slugs that will fit inside tubing of the z-bars. And cut them and remove about 2 inches from each upright. Then turn them just a little more inward (pullback), and
weld them in sweet position.
 
here's a pic with z-bars.
 

Attachments

  • Photo1(8).jpg
    Photo1(8).jpg
    134 KB · Views: 220
  • Photo1(6).jpg
    Photo1(6).jpg
    93.8 KB · Views: 216
  • photo 1 (7).jpg
    photo 1 (7).jpg
    120.7 KB · Views: 260
1/2 blackpipe pipe is pretty close. I cut a set of the Special bars off in the same way. Use a plumbers pipe cutter to cut the bars. A nice clean cut with out loosing any steel. Brazed the black pipe in as the slug, then lightly brazed the cut off part back on. With the torch adding a little heat I just moved the end of the bar till it felt good then held it till it cooled. Finished brazing it on. Measured from the center of the bars to the tip of the one already done. 18 5/16 inch. Brazed the other on to the same measurement.
Look pretty good with the black discoloration cleaned of there is a 1/32 to 1/16 inch brass band around the bars to show the brazing.
I tried welding a practice set first. With the torch and a coat hanger. Worked ok but the more heat to weld distorted the bars more and will need more work to get them looking as good.
If I used a wire welder they would have looked better. Only have the torch.
They are now about 30.5 inches tip to tip, before about 28 inches or so, should have measured.
They are soooo much better than stock. More like mini apes than buckhorns.
I say go for it.
Leo
 
It raining out there so I'll try to get a pic up in a couple days.
Leo
 
Rode it again today. Brakes are better, but the front still is not up to what I consider acceptable. I had gotten one of the smaller bore MCs, thinking I wanted good "feel" - but I've come to realize I think I prefer the "wooden" feel that the bigger MC gives. My other bike being a stock Sportster, I am used to "wooden". Bled the heck out of the front brake yesterday and even though it is much better, I can still pull it almost back to the grip. That may be good for road racing, but I think I need my wooden lever back.

Also I believe as far as top end noise, I think one reason it's so noticeable is this tiny gas tank. The stock tank covers the top of the engine, where as this tiny tank, I'm pretty much sitting right on top of the intake valves with nothing in between them and my ears except air.

I like the Z-bars A LOT. The bike is getting fun to ride now. I even went out on a main street a little ways til I remembered, doh, I haven't got a license plate on.

So It is seriously getting to be "tear down for paint" time. In the meantime, it has gotten INCREDIBLY hot and humid here - really unpleasant to work on it in the carport.

My real goal is to have it painted and together and the engine worked on, if it needs it, by April, and ride it up to Leesburg Bikefest.

We shall see!
 
For valve cover leaks check the sealing surface on the back of the cover often there is a glob of the factory clear coat on there. I always razor blade the seal surface when I polish them. Also remove and clean the O-ring.
 
Here is a pic of my welded up bars and the brazed set. The upper set is the welded set. A bit rougher and will take a bit more to smooth out to get a good finish.
The brazed set came out smoother and won't take as much to get a good finish.
As I said I did this with a oxy/acetylene torch. If I had a wire welder the welded one would have come out better looking.
Leo
 

Attachments

  • weld vs braze 001 (640x480).jpg
    weld vs braze 001 (640x480).jpg
    272.8 KB · Views: 236
Back
Top