alfredo
1978 xs650 Special
Thanks Leo.
Spent the past two days in the garage trying to sort this out. Here is what I have done so far...
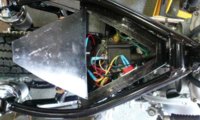
I have it wired as shown in this drawing I whipped up. The Green and Brown wires were already in place (factory wiring) coming from the brushes (factory wiring Green/Black. i drew it brown for easy reading). I replaced the three screws with Nylon ones (shown in light yellow) and left the Green and Black wires in place. Then I cut the harness clip off, removed the blue wire (neutral light), wired the white wires up and connected the Green regulator wire to the Green inner bushing wire. Then connected the Brown regulator wire to the Black outer bushing wire. After that was done I patched in a line from my fuse panel so that I could have a 7.5a fuse as explained.
I am not sure if I am doing that 7.5a fuse right, so let me know.
Also, does everything else look ok? I am going to do the headlights and such after I confirm that I can get it started. But wanted to have someone look at what I am doing before I even try to start it or wire any more.
thanks!
Spent the past two days in the garage trying to sort this out. Here is what I have done so far...
I have it wired as shown in this drawing I whipped up. The Green and Brown wires were already in place (factory wiring) coming from the brushes (factory wiring Green/Black. i drew it brown for easy reading). I replaced the three screws with Nylon ones (shown in light yellow) and left the Green and Black wires in place. Then I cut the harness clip off, removed the blue wire (neutral light), wired the white wires up and connected the Green regulator wire to the Green inner bushing wire. Then connected the Brown regulator wire to the Black outer bushing wire. After that was done I patched in a line from my fuse panel so that I could have a 7.5a fuse as explained.
I am not sure if I am doing that 7.5a fuse right, so let me know.
Also, does everything else look ok? I am going to do the headlights and such after I confirm that I can get it started. But wanted to have someone look at what I am doing before I even try to start it or wire any more.
thanks!
Attachments

Last edited:

")