Broken Sprockets, Voodoo and Burnt rubber

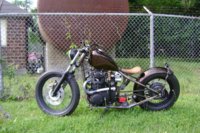
Made some progress today. Shop is closed for the holidays! Wife bought me some fab'n parts and a new R.H.C.P. CD for Christmas. Thanks babe!
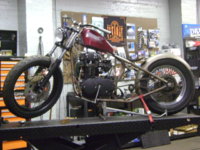
So, today I rubber mounted the fuel tank. Had a small burn through when mounting the first tab. DAMN IT! Adjusted the welder down and the other two tabs went on without any damage.
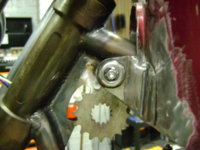
A couple weeks ago, I made a drive chain tensioner from a Murray mower spindle brake, Mcmaster-Carr sprocket, and a shift pawl spring from a Honda TRX350 ATV.
Rear fender is tacked in place and I am continually shaping it.

What should I do for fender support struts?

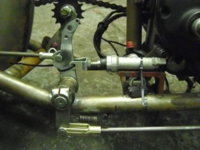
Up next on build list is the foot brake set up.
 

Attachments

  • 001.JPG
    001.JPG
    137.4 KB · Views: 181
  • 005.JPG
    005.JPG
    91.7 KB · Views: 184
  • 013.JPG
    013.JPG
    149 KB · Views: 141
  • 015.JPG
    015.JPG
    146.2 KB · Views: 176
  • 016.JPG
    016.JPG
    136.9 KB · Views: 162
  • 019.JPG
    019.JPG
    145.1 KB · Views: 166
Tonights play list at the Broken Sprocket Garage:
Red Hot Chili Peppers
Rage Against the Machine
Life of Agony- River Runs Red
Biohazard -Urban Discipline
 

Attachments

  • 026.JPG
    026.JPG
    145 KB · Views: 155
  • 025.JPG
    025.JPG
    99.3 KB · Views: 137
  • 022.JPG
    022.JPG
    139.3 KB · Views: 169
  • 021.JPG
    021.JPG
    138.4 KB · Views: 150
I made my left foot controls today. Basically done!
Kids made a snowman.
hard to choose between snowboarding today and fab'n on the bike.
left side profile looking good. I think I am going to bend the pipes down to follow the contours of the engine side covers
 

Attachments

  • 005.JPG
    005.JPG
    148.3 KB · Views: 178
  • 004.JPG
    004.JPG
    100.3 KB · Views: 148
  • 003.JPG
    003.JPG
    89.9 KB · Views: 120
  • 002.JPG
    002.JPG
    90.9 KB · Views: 190
  • 001.JPG
    001.JPG
    86.8 KB · Views: 147
Nice looking bike. The clutch turned out great. Hope that worm gear holds up. I think the pipes would look better if you just cut them off some. In your last group of pictures the side shot of the bike. I would cut them right where the inside of the rear fender curve is. I would slash cut them horizonal facing doun so the pipe came to a point. This would balance the look and length of the pipe. Now it is too long and doesn't work well with rear frame section pointing down as it is now. And saves not bending the pipe. :thumbsup:
 
THANKS scabber for your input. I am a little worried about that worm gear. I do have a backup plan though, and there is always the Blacksmith billy mod. That cast iron clutch pedal is heavy:shrug:

As for the pipes, I think I will cut them as you suggested. I am leaning more towards bending them, but to cut them first is a good idea. If I still don't like the lines with them cut, I can bend them:shrug:
 
Spent a bunch of time working out the right foot brake set up. Still have to fab and weld a bracket for the master cylinder. Basically though it is done. Like the way it looks and works too. Made a coil bracket, tucked in behind carbs. Made a kickstand tab. Stole a kickstand from an xs400, just the right length.
Had to cut the left pipe cuz I dented it while trying to bend it with a HF hydraulic bender.:banghead::yikes: 
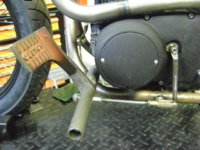
Kind of like the short pipe though. Opinions? I wanted it to follow the contours of the engine side cases. Going to try again with some scrap tube.
 

Attachments

  • 001.JPG
    001.JPG
    147.1 KB · Views: 137
  • 009.JPG
    009.JPG
    96.2 KB · Views: 133
  • 012.JPG
    012.JPG
    84.6 KB · Views: 148
  • 004.JPG
    004.JPG
    82.4 KB · Views: 128
  • 005.JPG
    005.JPG
    86.7 KB · Views: 126
  • 003.JPG
    003.JPG
    86.5 KB · Views: 140
Finalized the hydraulic front brake master cylinder mounting. Looks to be about a 1/2' of travel. Hoping that is enough to pump that 4 piston Brembo.
Also finished the kickstand spring and mount. Wow it actually works! Seriously about 3 hours into making a kckstand. Never under estimate the amount of time it takes to engineer just one component. No less a whole motorcycle
 

Attachments

  • 005.JPG
    005.JPG
    144.1 KB · Views: 120
  • 006.JPG
    006.JPG
    143.6 KB · Views: 109
  • 007.JPG
    007.JPG
    137.9 KB · Views: 125
After 2 plus years, it runs, rides and is basically finished. I kept up the thread a little better on ChopCult. As expected ther are little issues every time I ride it. Slight oil leak from tach plug, fixed with new o-ring and yamabond. Biggest issue is that upper part of chain is slapping the fender. The chain tensioner arm is not long enough to put enough tension on chain. Considering a couple options to remedy that. 520 chain conversion? Larger rear sprocket to take up chain slack? Monstercraftsman bolt on chain tensioner?
 

Attachments

  • 002.jpg
    002.jpg
    321.3 KB · Views: 169
  • 004.jpg
    004.jpg
    314.6 KB · Views: 118
  • 005.jpg
    005.jpg
    314 KB · Views: 122
  • 006.jpg
    006.jpg
    315.3 KB · Views: 142
Kinda hard to tell form the pics but how much adjustment do you have at the rear axle? Do you have enough slack to remove a full link form the chain?
 
Shouldn't the clip on your master link be facing the other direction? Nice bike, I like you forward controls.
 

Attachments

  • attachment7REMIRH0.jpg
    attachment7REMIRH0.jpg
    137.4 KB · Views: 121
There are a couple of cheats on the foot clutch set up... Ive been trying to find some time to build one...

But there are ways and mechanisms to lock the foot clutch in the down position... To free up your left foot. That way you can keep the bike in gear... roll up to a stop on a grade... lock the foot clutch with the bike in gear.. Its still tricky to get your right foot off the brake and left foot on the clutch to disengage and start letting it out..

If its not dangerous its not a chopper... hah
 
There are no axle adjusters, hence the need for a chain tensioner. If I remove one link the chain will be too short, and I don't want to use a half link.
Master link clip is backwards in photo. That was only for mock up.
Rocker clutch, hmmm.....
 
Back
Top