BS38 carb overflow leak

cbuckle

XS650 Enthusiast
Messages
40
Reaction score
4
Points
8
Location
Ontario, Canada
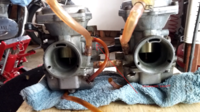
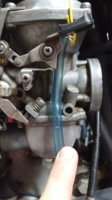
Another carb question unfortunately. I recently bought carb kit (http://www.xs650direct.com/products-36.html) for my 74’ BS38 carbs Part #48-1919.

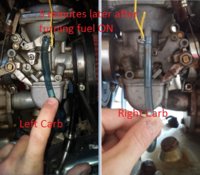
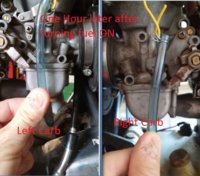
Can someone please tell me if the ‘Float needle assy 2.5’ is correct for my carbs. As before my bike stinks of fuel, and I can see the odd time fuel coming out the overflow. Did a lot of reading. Floats are both level and set to 24mm. Bike leaks whether on center or side stand.

If these are not quality float valves can someone just tell me that and where in Canada I should be buying these. Also rubber tips or not

I keep on returning to the Addendum on page 8 of the carb guide http://www.amckayltd.com/carbguide.pdf but don’t understand if this is a design flaw of the carb, or my problem

I will be doing the M8-1.0 grease fitting/ clear tub test to check my fuel level shortly

Sorry for yet another carb question, thanks
 
Wife is away so i get to play. Got some mothers aluminum polish and cleaned up the original float valves and seat. With bike on center stand with fuel off, and ran it till it quit. Took bowls off the bike. Notice about 1/4" of fuel in right bowl, 1/2" in left bowl. Did the bubble test as mentioned above with no bubbles. Shook the left float and heard a little shloching.. (not good) but the right side was dry. Put original/shinned float valve and seat back in and put it all back together... This spring i replaced the needle jet o ring on the right carb and it still has not seated. Hope i get a picture tomorrow and see if fuel is seeping by. Also need to see where my fuel level is but i guess that is pointless untill i fix or replace the brass float. Thoughts?
 
Sometimes, but you have to be careful not to add too much solder to the float or you make it too heavy. Honestly, the best "fix" is to replace it. And the best source to be assured of the quality is, again, right from Yamaha. It may seem expensive but it should be a one time expenditure and last the rest of your or the bike's lifetime.
 
I really don't like answering questions because for the most part, I'm more lucky than good at this stuff. BUT......

I have to agree 100% with 5twins on this one. You could add to much solder AND....you need to get whats ever in there out first. I've tried soldering and got the darn thing too hot and the air trapped inside expanded and the thing popped apart.....duh. I've also (with pretty good luck) completely covered the float in superglue (not my idea, but it worked). Not sure that would work with the gas today...it's ever changing around here.

A new float doesn't cost that much and for the peace of mind that's what I'd do today.

Save cutting corners on something that's not as important as the carbs....a man has to pick his fights.

I need to get back to carb (38's X 3 sets) rebuilding........the bench is covered with them right now.

Enjoy the summer.........Gordon in NC..... with more projects than good sense.
 
Good advice, Gordon! Soldering floats is a ticklish job that never ends well. In addition to creating a little bomb, you can hit the float with enough heat for the original solder joints to fail. You can heat the float nice and slow, apply your patch, and watch the float collapse as the hot air in it contracts. If you do succeed in repairing the float, you can count on this: the corrosion that made the hole you just sealed has made two or three more weak spots that are waiting for the right moment to fail.
 
Thanks for all the advise. Looks like I will be buying a float. Against advice though I'm going to try one of Mike's float. $40 from boat.net, I don't know if I can justify it. Picture attached with current fuel level with a damaged float and gas on. Left the fuel on over night and ended up with about 1/4 cup of fuel out each carb overflow.. Thoughts are always welcome
 

Attachments

  • left.jpg
    left.jpg
    100.9 KB · Views: 604
  • right.jpg
    right.jpg
    136.2 KB · Views: 890
So.. I must.. I got all the fuel out, confirmed dry, soldered leak and resoldered the ‘service hole’ in the middle/inside of the float. Submerged float in ISO alcohol for 2 days… still dry inside. Re-installed the float and below are the results. I’m using original valve and seat. Floats were set to 24mm. Turn the fuel on and fuel level goes to a proper level. Leave the fuel on for 1 hour and back to rising fuel levels…

Is it time to isolate the carb (Plug or cap off the connecting tube/ tubes)??
As I’m tying this I realized the inside diameter is 3/16” or 4.5mm. How important is it that the fuel sight tube be 2.5mm ID (as mentioned in the manual)

Every time I read the carb guide I am lost on the addendum 3/9/2009 below. Can someone please help me with what this mean? I have attached a older photo where you can see the inner side of the carb. Is this the vent Stevesemti is referring to?

Member "stevesemti" has identified another potential float system defect. In pre-'78
carbs, the float chamber is vented at the bottom of the float bowl through a brass pipe
seated in the float bowl, which opens above the correct fuel level. It prevents vacuum
from forming as fuel level drops and drains off excess fuel in the event of overflow.
Steve traced a fuel leak through the vent (usually caused by float level or float valve
problems) to the seat of the vent pipe (below fuel level in the float bowl). He reports that
attempted repair with JB Weld slowed the leak but didn't stop it. Any fuel leak is a
dangerous condition. It might be possible to use a micro torch to sweat the pipe to the
seat with solder. Failing that, the float bowl should be replaced. Thanks for the headsup,
Steve!
 

Attachments

  • 5 minutes after turning fuel on.JPG
    5 minutes after turning fuel on.JPG
    164.2 KB · Views: 4,208
  • 1 hour after turning fuel on.JPG
    1 hour after turning fuel on.JPG
    159.7 KB · Views: 515
  • old pic.png
    old pic.png
    1.2 MB · Views: 519
Looks like your float valves have a slow weep. A good reason to turn off petcocks when shutdown and parked. The float level spec for your 74-75 carbs is 24mm +/-1mm. You could set them to 25mm, it'll apply a little more pressure on the float valves.

You've already done the bowl vent "bubbling" test (actually, those are the overflow tubes). The vent tubes identified in your pic, midway up the carb body, are the "true" float chamber vents, and aren't part of the float system defect in that paragraph.

Comments on the tube diameter for the "clear tube method" are in here:

http://www.xs650.com/threads/float-...te-on-how-to-use-the-clear-tube-method.27182/
 
Idolated the carbs by blocking the interconnecting fuel line. Problem isolated the rising fuel to the right carb. After 15 minutes i had fuel coning out the overflow. So i guess i need to change both float levels to 25. Can't just do the one? I feel like this is not going to resolve my issue. Also jet needle 4mm o-ring still not seated. Replaced and try again. Any thoughts always welcome
 

Attachments

  • 20170701_215750.jpg
    20170701_215750.jpg
    123 KB · Views: 352
  • 20170701_215731.jpg
    20170701_215731.jpg
    93.1 KB · Views: 373
One thing you might try, a steel wool Q-tip. Take a Q-tip, remove most of cotton on one end. Use 4-0 steel wool, wrap a bit of steel wool around the Q-tip till about the same size as the cotton end.
Use this steel wool Q-tip to clean and polish the float valve seat. This will clean out all the varnish and any small burrs in the seat. This fixed my leaky valve seats. I think I got this tip from XSJohn, RIP.
Leo
 
I totally agree with 5twins in regards to getting parts right from Yamaha. I spent a full year chasing down an issue, spend hundreds trying to resolve. It ended up being a poor replacement par for my choke.
 
I have done the q-tip and polish trick. Even put a litttle between the valve and seat and twisted to get a good seat. I have been careful not to mix the left and the right but im gonna put the orginal left valve and seat in the right carb. Maybe there is a barb inside the carb im not seeing. Maybe polish that too? Im fully gonna buy new valve and seats. Its just hard to give up
 
Let just start with… your right, you told me so

I've buttoned up the carbs and was riding the past couple of days putting on a few 100 miles with no issue, just using the fuel shut off at the end of the ride... (accidentally stalled the bike.. coincidence ) and now issues. ... looks like you guys were right! The bike feels like it is running on one cylinder, and I want to attribute this to the carb issue.. but want to be sure before I make my shopping order. If you check my video
I am got getting any real arcing any more as seen in previous thread http://www.xs650.com/threads/74-bs38-fuel-mixture-screw.49163/#post-504266 5twin, you gave me some good notes on gap space

Could this excessive temperature be related too large of a points gap? Not enough spark? You can hear the engine do something funny at the 19 second mark. I think I’ve got to go make the gap smaller, then re check the timing. Probably pull the carbs off..
Thoughts? 2 new float? 2 new float valves? From boat.net … PACMO…

Values below:
Left cylinder: 115 C or 239 F with dwell 20 deg
Right cylinder : 103 C or 217 F with dwell 18 deg

Still ongoing issues.
-Right o-ring on emulsion tube replaced, but when I take carb bowl out it falls out of place
-Left o-ring on emulsion tube not replaced – cannot get out
-Left needle and seat has slow weep
-left float soldered
-unable to use choke, assume it floods the engine, will not start
 

Attachments

  • Dwell reading.JPG
    Dwell reading.JPG
    103.7 KB · Views: 349
Last edited:
I don't know if points gap would affect running temp, it probably could. But, both your gaps are too big. I would re-set them to the proper range. These are pretty wimpy ignitions to start with, no sense stressing it. A bigger points gap could be harder to fire and produce a weaker spark. Your coil charges up for the next spark while the points are closed. Your larger than spec gaps means your points are closed for a shorter period of time and that means less time to build up energy for the next spark. That could make the spark weaker.
 
Back
Top