Clutch coming out of adjustment

That little tang just keeps the cable from slipping out during assembly. When the system is properly adjusted, there's very little chance it'll slip out. I've run without that tang for decades. After a few bend/unbend cycles it simply breaks off.

On the slot width, during assembly, you want to slip the cable part thru that, not the larger shoulder of the cable end. If it is too narrow, you could screwdriver/wedge it open a little, then squeeze it back down after the cable is in there. That'll also help it to retain the cable, reduce slip-out risk during install...
 
First of all, I would like to thank everyone for helping me with this little project! I'm still kinda new to this and it all helps. This one was actually kinda fun and cool to figure out and see myself how this stuff works, really the reason that I decided to study engineering.

Anyway, I have two more quick questions. The attached picture shows about how much free play I have at the clutch lever, as well as the adjustment at the lever. Does this look about normal before doing any amount of riding with the new cable (I know it will stretch)? It seems like kind of a lot to me, but I guess maybe the lever is a little tight anyway?

Also, was I correct in getting rid of the little 45 degree elbow thing where the cable goes into the side cover? Pretty sure I read that with the ez pull cable from 650central that was not needed.

Thanks!
 

Attachments

  • 20150622_224830.jpg
    20150622_224830.jpg
    231.5 KB · Views: 127
Yeah, that's about the right amount of lever free-play. And, yes, the ez-pull cable doesn't use the elbow. But, it does have a longer inner cable length, to get the worm actuator arm at a better angle.

As such, I don't like having the cable adjuster sticking that far out. It means that the worm actuator lever may be over-rotated, and you loose leverage.

Try running that cable adjuster all the way in, and then set your lever free-play using the lower worm adjuster screw. If the worm adjuster screw bottoms before you get to your desired lever free-play, then back-out the worm adjuster screw just a slight tad, maybe a 1/8 of a turn.

Then lock it down, and set your lever free-play with the cable adjuster.

More info in here:

Clutch cable experiment and tidbits
 
I'll check that link out. I did what the clymer manual said, loosen the lock nut behind the plug in the side cover and turn the screw in until it slightly bottoms, then back out 1/4 turn. So maybe turning it out 1/4 turn is a little much?
 
You might try 1/8th off at the worm gear and free play of a pennies width at the lever.
 
...So maybe turning it out 1/4 turn is a little much?

It is for me. See if this makes sense.

Clutch actuator service and adjustment

Before reinstalling the left side cover, cleaning and regreasing things in there will help. Do the clutch cable service, especially lubing the cable elbow area. Clean (I use old toothbrushes) the worm and worm body screw ramps thoroughly, inspect the worm screw endpoints for burrs and bent/sharp edges that may gouge into the plastic body, followed by a good greasing (I use a teflon based grease there). Then, cleaning and regreasing the shift shaft and the support hole in the cover may help shifter action.

The method I use for adjusting the clutch cable is a little different from the traditional method.

Starting with a cold engine:
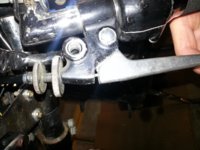
First, adjust the handlebar cable adjuster all the way in, gets maximum slack, lengthens cable.
Then adjust the sidecover pushrod adjuster screw to get the desired handlebar lever free-play, about 1/4" - 1/2" at the lever end.
Snug down the lock nut, not hard, just snug, maybe 2-3 ft-lbs. Doesn't take much to hold it, and want to avoid having a stuck adjuster nut.

With other ball/ramp type actuators, there is a definite beginning-to-end zone of operation, and the proper adjustment for these match the factory XS adjustment method.

However, the XS650 clutch worm doesn't have this type of range restriction. The worm does have a 'bottom' of its travel, but that position usually is with the actuator arm so far forward that the stock clutch cable will never reach, it's too short for that. Plus, you want the worm's lever travel zone to be at the better leverage angles, starting just a bit (about 3/8") before where the worm's actuator arm and the cable form a right (90°) angle. The stock clutch cable is a little short, and having the handlebar adjuster run all the way in will allow you to be in this ideal zone.

The original adjustment method is to run the pushrod screw adjuster in until resistance is felt (all pushrod slack removed), then back out about 1/4 turn, presumably to remove compressive load on the pushrod group (adjuster, pushrod, balls, mushroom rod, pressure plate), so that the clutch can achieve full lockup, avoiding the 'foot riding the clutch' scenario that wears out car clutches.

However, the second half of the factory adjustment method has you adjusting the handlebar lever cable adjuster to get proper lever slack. This not only moves the worm lever arm to a less advantageous leverage zone, but removes the slack that you established at the worm adjuster.

Try it yourself. Adjust the clutch per factory method. Then return to the lower worm adjuster and see how much slack is left there. I've found it to be virtually nonexistent. So, to regain the lost cable length, came up with this revised method to maximize clutch actuation.

Try this method, and make note of your clutch 'feathering' zone (between where it just starts to grab and achieves full lockup), for both cold and hot conditions. An ideal feathering zone would be at the last 1/3rd of lever travel, and a tolerable zone occurring at the last half of lever travel.

If your cable attach point is at the outer of the long-type worm lever, or if you've installed the MikesXS replacement actuator assembly (which has a different/gentler screw ramp), this feathering zone will widen a bit. Desirable for some (softer engagement), not so for others (too mushy).

Bottom line is that to ensure good clutch disengagement, it's best to have the feathering zone occur only in the last half of lever release. Otherwise, you may not get enough clutch separation to find that elusive neutral.
 
So I've been riding the bike a bit and the clutch cable seems to have stretched (as expected). I readjusted it at the side cover like TwoMany said (turn the adjustment screw in until it slightly bottoms, then back out 1/8 turn, as opposed to 1/4 turn like the clymer manual says) but this still seemed to leave me with a bunch of slack at the lever. I ended up turning it in a little farther past where it "slightly" bottoms, and the attached picture is where that leaves me at the lever. Do I have an issue somewhere?
 

Attachments

  • 20150625_162035.jpg
    20150625_162035.jpg
    172.8 KB · Views: 139
Maybe. You'll want the worm return spring in good shape, so that it positively pulls the worm lever arm so that it pulls the slack out of the cable.

On the other hand, that EZ-pull cable was a bit too long for me, and I had to adjust the cable at the handlebar like yours.

A way to know for sure is to pull the cover, actuate the handlebar lever, and observe the action of the clutch worm. See that the worm's lever is staying within its 'best leverage' zone...
 
Ok, I'll take a look when I get some time. When I was still replacing the cable, I did check to make sure that the spring returned the worm lever arm all the way.
 
Back
Top