Crank Main Bearing removal...what am I missing?

davem222

davem222
Messages
431
Reaction score
20
Points
18
Location
Los Angeles
Hey guys,
So I FINALLY split the cases (with minor damage...of course) and for the life of me can not determine how to get the crank main bearing off of the crankshaft. Is there some sort of trick to it? All of the other bearings (the ones I DIDN'T open up the entire engine to examine) seem to slide right off. How do I remove the crank main bearing so I can inspect it? Any thoughts are gratefully appreciated :)

Dave
 
Two piece crank is pressed together, if bearing feels good on the crank then go for it. If not your going to have to pull it apart, if your going to rephase of the crank then it will be checked then if you have Hugh do it.
 
Heya Street Tracker,
Thanks, all good advice I'm sure, but my question was how to remove the main bearing from the shaft. I hope I'm not saying it incorrectly lol. Any idea how to get that darn thing off there?
 
Dave I don't really know I had assumed the outer ones were just slip fit like the cams, I do those slide right off, I have not had mine apart yet, do a little search here and you may find something. One of the very helpful members will come along with your answer.
 
The crankshaft is essentially:

5 pins,
4 flywheels,
3 roller bearings,
2 connecting rods (plus bearings),
1 ball bearing,
and a cam chain gear,

all pressed together.

They can be disassembled/reassembled using a hydraulic press and a die set, and hopefully a fair amount of experience:thumbsup:
 
Hmm, maybe I'm not being clear. My question is HOW to get the bearing off the crank. I need to inspect it. Unless I can inspect it while ON the crank, if that's the case, let me know. Thanks.

Dave
 
Maybe this post from mrriggs helps?

I did my crank using stock wedges and step blocks. It was unbelievably easy. The wedges multiply the down force over ten times and convert it to a spreading force. I started using a press but it took so little force to get things moving that I realized the press was unnecessary. I finished it by simply smacking the wedges alternately with a little 16oz ball peen hammer. Quick, easy, and cheap.

RPcrank01.jpg


A press was used to put it back together. This was just a cheap Chinese "12 Ton" press. The stock wedges were used as spacers between the crank webs so it could be pressed together from the ends without disturbing the rod pins. I made clamps to hold the wedges but later realized that these are unnecessary. Simply tapping the wedges into place would have worked fine.

RPcrank02.jpg


If you are just building a street motor then this should be all you need to do. If you plan to rev the shit out of it, like Punkskalar, then you should probably have him weld one up for you.
 
You need a bearing separator tool, or a hydraulic press / wedges etc. They are pressed on - not simply slid on. So you need like a 20 ton shop press and know how to use it in order to remove the bearing and press it back into place.

You can go ahead with a big ass screwdriver and a hammer and work around the bearing to pop it off, but you'll damage it.

But here's the thing - you don't need to remove the bearing to inspect it. What part of it are you trying to see that you can't with it on the crank?

If it turns smoothly and feels good, then that's that. If you want to be 100% sure, you need to buy new bearings and replace them regardless of the current condition of the originals.

Also keep in mind the bearings on either side of the cam sprocket cannot be removed of course without pressing the entire crank apart. So again, if the bearings feel good, then leave things alone. If you want to replace all of them, then the entire crank needs to come apart. In which case call Hugh up and buy yourself a rephased crank.
 
Hey, Dave. I see you are trying to pull the "suspect" right drive side ball bearing.

Ref: Original thread - whirring sound:

http://www.xs650.com/forum/showthread.php?t=23162

You can set the crank on the bench, ball bearing side hanging over edge, catch pan below on floor, spray liberally with carb cleaner while spinning it, feel for looseness, grittiness, grinding, noise, ...etc. If you need to replace it, use a bearing puller or 2 wedges behind it. Did you receive a new one? Might as well replace it anyway then...
 
Last edited:
I see, thanks for the clarification Tim, TwoMany, thank you as always :) Yes, that's the thing Im looking to inspect, so I guess I can inspect it right on the crank. It feels fine on there but maybe once I strip off the oil with carb cleaner it'll become apparent that it's the problem. I never thought I could have such a mystery lol. I feel like a very stupid Sherlock Holmes.
 
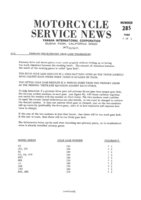
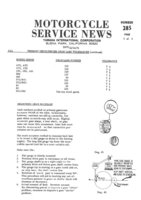
Oh, Dave, it gets worse. Just finished reading a post on thexscafe that talks about proper sizing and selection of Yamaha primary drive gear and driven clutch basket gear combos. Never dealt with this on H*ndas. Never heard of it on Yamahas, till now. Apparently, this was std proc on Yamahas. However, the post shows that various sized gears were not made for xs650, just says to use standard factory gears (like H*ndas), but with possible mixing/matching, problems could arise. The post discusses the "whirring" (too little clearance) and "clatter" (too much clearance) sounds that occur from improperly matched gearsets. You can see where this is going. Do you know the origin and history of your current gearset? If that ball bearing is perfect, this could be the cause...
 
Wow lol, no I have zero clue as to the history. The good news thought is that I examined that suspicious bearing. It sounded fine and felt fine like all the others on the crank until I hit it with carb cleaner. Then it started to feel kinda gritty, like there was sand or something on the surfaces. Not a ton of sand, but that gritty feeling was definitely there. I'd never inspected a bearing before so just to be sure I tested the other crankshaft bearings by hitting them w/ Carb cleaner as well. They rolled smoothely. I'm assuming that that grittyness means the bearing is bad, yes?
 
YOU GOT IT! Now, to pull it off. Since it's a goner, could just double-wedge behind it to pop it off, or find a bearing puller. Just be careful around the shaft...
 
Already bought a bearing puller and pulled it! Woohoo! Ordered a new bearing and YAHOO! Now I just have to get the thing on the crank! lol.
 
Great! Needs to be pressed on, at the inner race, not the outer. Don't bang it on, could disrupt the flywheels and pins behind it. Could use carefully selected sleeves and crank it on using the primary gear nut.

Note for near future, want to check fit/clearance of clutch ring gear and primary gear before final assembly...
 
Awesomeness. Thanks TwoMany :) Hey, could you post that link you were reading about the primary gear stuff? Maybe I could edu-mo-cate myself so I'm not bugging everyone on here so much :)

Dave
 
Well, I can't post links, due to severe limitations of this tablet. But, if you go to the thexscafedotcom website, do the site search "primary gear" and select the second item about gear lash tolerances. In fact, take a week off work and soak-up everything there...

Edit: Attached the Primary gear backlash bulletins.
 

Attachments

  • 71-12-10_S285-01_PrimaryDriveGearLash.jpg
    71-12-10_S285-01_PrimaryDriveGearLash.jpg
    90.1 KB · Views: 276
  • 71-12-10_S285-02_PrimaryDriveGearLash.jpg
    71-12-10_S285-02_PrimaryDriveGearLash.jpg
    99.5 KB · Views: 265
Last edited:
So, not to change the point of the original thread, but TwoMany, I checked out that gear lash article (awesome btw, I had zero clue). I was thinking that if that were the case, wouldn't the squeal happen during idle as well? Also during non-load? Isn't the crank geared directly to the primary clutch basket?
 
Back
Top