Did I get these spokes right.

CalsXS2

XS650 Guru
Messages
1,006
Reaction score
52
Points
48
I don't know what all the fuss is about spokes. I got it right the first time. And I didn't even look at any pictures or anything.

I hope you figured out by now that I'm full of shit with that last statement. :laugh: I'm ashamed to admit how many tries it took me. Lets just say it was more than one. :shrug:

Please tell me I got it right.
 

Attachments

  • SPOKES 018.jpg
    SPOKES 018.jpg
    285.6 KB · Views: 128
  • SPOKES 014.jpg
    SPOKES 014.jpg
    308 KB · Views: 139
  • SPOKES 016.jpg
    SPOKES 016.jpg
    233.5 KB · Views: 133
The pattern looks good. I don't see any exposed threads, which is good, in its own way. Do the spoke threads protrude outside, beyond the nipple-nut heads?
 
Yes, it looks like you got it right. The proper start is all important and the key to the whole operation. It appears you "clocked" the spokes correctly at the start .....

RespokeStart.jpg


..... and your spacing around the rim looks correct as well .....

SpokePattern.jpg


Once tightened and trued, if any of the spokes protrude out from the bottom of the nipples, you just grind them flush.
 
Thanks Guys.

Trust me. I did not get it right the first time. :doh: 
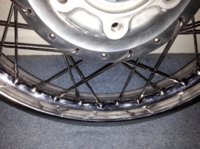
I was getting the spacing right. But I wasn't clocking it far enough around I guess. I kept ending up with what I thought were too long of spokes. And the outer spoke beauty mark on the hub was not matching up.
 
There's a trick to "clocking" the spokes around the rim correctly as well. The spoke on either side of the valve stem hole is an inner. The angle of the nipple hole will indicate which flange it runs to. Connect one of those spokes first, then the rest of the inners from that flange. Then do all the inners on the other flange, starting with the one next to the valve stem hole of course.

SpokesbyValveStem.jpg


Once both sides of the inners are connected up, insert one side of the outers and connect them. Then do the other side of outers .

OuterSpokeInstall.jpg
 
5twins,
Excellent pictorials (as usual) But can't help but laugh to myself thinking someone from the digital age has not a clue as to your reference points.
 
5t and weekend. Where are you guys getting that graphics program that you use. Is it free.

All I can do with my old version of photo shop is make squiggly lines and circles,,,,lol.
 
Can I get a confirmation that the front is correct also. :thumbsup:

According to my eyes it all looks good. But sometimes I don't see so good.

I did this one on the first try. God knows I had enough practice taking the rear apart. :shrug:
 

Attachments

  • SPOKES 022.jpg
    SPOKES 022.jpg
    303.6 KB · Views: 139
  • SPOKES 023.jpg
    SPOKES 023.jpg
    290.8 KB · Views: 137
The pattern looks good. Are the spokes loose? I think I see quite a bit of exposed thread on some of those spokes...

I just snugged them up with my fingers. I hope this front will tighten up enough to cover all the threads.

On the back, I ran those down to the end of the exposed threads and they were still wiggly.

I got it all from Mikesxs so I hope it all will work out.
 
In a perfect world, the threads would be just barely covered up, and the spoke tip would be just below flush with the screwdriver slot in the nipple-nuts. Doesn't always work thataway. A couple/three exposed threads is OK, a bit of protrusion above the nipple-nut is OK (grind off after truing). There is supposed to be ample thread on the spoke for the nipple-nut to safely engage (a minimum of 2 diameter's worth), and provide adjustability for truing, before bottoming out.

Always watched for this 'spoke length' issue, especially with custom spokes. Factory spokes (at Honda) always worked out fine, except for those odd times when the parts guys didn't keep their spoke inventory properly organized...
 
I just snugged the up with a screw driver. Now I'm ready to start moving the rim. I'll have roughly 1/2'' of threads in the nipple. Is that enough. With some thread still showing.

BTW. Do you guys use any oil on the threads. I seen a lot of bicycle videos where they oiled the threads.
 
Back then, the factory didn't oil the threads, we didn't oil the threads. Once snugged-up, the nipple-nuts would take on a kind of a 'set', not easily loosening-up in service, and would have that trademark '*tink*' sound when turned for adjusting later, as though they were semi-locked in place.

Myself, a Rip-Van-Winkle mechanic, wouldn't oil them.

But, times are a-changin', new chemicals/techniques/methods being used. A viable question...
 
I anti-seize the threads on all mine, especially the stainless ones.
 
I thought about using some light oil. Like air tool oil. Will that be ok. Its just what i have on hand.

Posted via Mobile
 
Back
Top