First time rehab of a 1976ish basket case

Should I cut down front fender or leave it?


  • Total voters
    7
So, one step forward two steps back today. Installed my 11” shocks, need to find a smaller bushing to fit the lower mount but that shouldn’t be too hard. My problem is that with my flat seat pan, I only have about an inch of clearance. I’ll be removing the upholstery and foam, carving a negative in some wood, and “massaging” a big hump into the pan with a torch and hammer.
91D536B0-E952-4459-8B80-AEE32CE7AF33.jpeg
FFBDDECB-70C5-43A6-9B42-D8EB75ABB5C0.jpeg
I also threw on the ‘79 center stand I got and have a couple of issues. The big one being that at rest, it will interfere with my exhaust tips
318020C6-92D9-4A47-BFA2-020F7305AD41.jpeg
the second being that while up, there’s nothing to stop it from bouncing upwards and potentially disengaging the spring from its mounting tabs. My simple solution might be to weld on a piece of tube with a rubber cap to act as a stop up against the bottom of the frame. This would fix my exhaust clearance and bouncing problem, but I’d like to see how they worked when installed properly, anyone? Below is a photo with my fingers showing where the tube would go
D7008A2F-0D5D-4A91-BDCD-BAF45C3489E6.jpeg
 
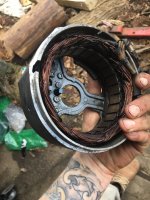
Well fellas, i f*cked up pretty good yesterday. Replaced plug wires, gapped plugs, 3rd kick fired her up and she sounded great. The low end missing/sputtering was gone, and all was well. I swung a leg over for fun and daydreamed of riding as she cut out, and started billowing smoke from under the seat. My weight on the seat pushed the pan into the positive battery terminal, hard shorted and fried the ground wire on my alternator all the way to it’s brush terminal. I pulled it, and traced it to where it enters the stator but it’s in there pretty good and i don’t want to start yanking. What should my next step be? All white/yellow/green are good, blue wire is long gone (no neutral switch) should I just rewire my ground from the outside and leave the dead wire inside of the stator? Seems like a hack job but I’m afraid to start digging around in there... at least it happened here and not on the road? Being a rookie sucks. Picture shows green circle outlining where wires enter stator and appear to be cooked/gunked fastly in place
4844B501-8D24-4D6B-8F74-9C578A59E4C0.jpeg
 

Attachments

  • FE7B1027-DF90-4D0F-8F13-B774EB1C7B87.jpeg
    FE7B1027-DF90-4D0F-8F13-B774EB1C7B87.jpeg
    199.7 KB · Views: 148
@Jim perhaps a rewind is in order? Maybe with alittle extra coin to run a fresh ground wire back behind the coils where it currently resides? Or would it be a good idea to give it a kerosene bath to dislodge all the gunk?
 
The black wire (gnd.) just ties in with the rest of the grounds. You could even make a short jumper and ground it to to one of the stator mount screws. If the insulation is melted on it.... yeah, I'd remove as much as I could access. A good kerosene bath is a good idea..
 
Question for some of the smarter ones here Would the stator off a 1972 be the same as "a 1976ish" engine? If so I might have the one off the 1972 in that picture over to the left. Would need to do some digging around to be sure it's still out there in the barn!
 
The black wire (gnd.) just ties in with the rest of the grounds. You could even make a short jumper and ground it to to one of the stator mount screws. If the insulation is melted on it.... yeah, I'd remove as much as I could access. A good kerosene bath is a good idea..
Hey thanks jim! So the ground could just bolt to the ground terminal then out to the frame via the mounting bolt?
 
Sweet. It’s gonna get a bath this weekend. That was your write up about kerosene and then hot water blowing it out right? I’m kind of worried about the kero eating through the old insulation on the wires, but if it’s been done before I’ll take the plunge
 
I’m kind of worried about the kero eating through the old insulation on the wires,
It's the same epoxy or varnish used on the rotors. I haven't found anything yet that will soften it on the rotors I rebuild.... acetone, MEK, stripper.... you name it, it doesn't do anything to it. If you do find anything that softens it, let me know.... it would make rebuilding the rotors much easier.
 
Now the bike is lowered will the travel on the rear let the tyre hit the no plate bracket ...........:yikes:
Fortunately it will not, the bracket is getting cut down a bunch and there will be 1/2” thick rubber isolator bushings between the license plate and bracket,but until I reconfigure the rear seat pan she’s unrideable. But she’s unrideable anyway so it’s no biggie. One thing at a time
 
Last edited:
Quick update for anyone still bored enough to be following along. If your read back a few posts, i fried some wires the other day, and lost all power to bike. Working my way through my wiring I noticed something that I can only say is on par for this bike. The battery is grounded to one of the mounting studs on the box, which of course, is suspended on rubber isolators from the frame (no ground) so my loss off power appeared to come from lack of circuit continuity (alternator still not wired in). Ran a jumper from from negative battery terminal to frame for testing, and not only did it come back to life but lights were brighter and starter motor turned faster. One step forward, two back, 3 ahead... I’ll take it. New 4ga battery cables and inline fuse will arrive tomorrow. During replacement I’ll be cleaning and looking over the alternator stator, here’s hoping she’s still serviceable. That’s all for now, folks
 
You are having fun with it , maybe just dont know it yet.. Ya dont catch a fish the first day right ?
Well, I see you catch about all the fish.
Your XS time will get better too !
Haha, exactly. Still all new to me, but when I get too frustrated, I just fo fishing.. probably why it’s taken me this long to get the bike where it is
 
About the front end lowering and the bike lowering as a whole.
Perhaps a smaller front wheel is a good fit for your bike ? Im thinking 17" or 18" ?
Could be Cool !
I agree, would look great and help recenter the original suspension geometry. For now my budget is just about spent so it’ll have to wait but that’s a great idea
 
Back
Top