-
Enjoy XS650.com? Consider making a donation to help support the site.
XS650.com receives a small share of sales from some links on this page, but direct donations have a much greater impact on keeping this site going.
You are using an out of date browser. It may not display this or other websites correctly.
You should upgrade or use an alternative browser.
You should upgrade or use an alternative browser.
Flattrack racer build
- Thread starter Champion750
- Start date
-
- Tags
- tracker
Street Tracker
Dirt Track Mentality
Looking real good Champ!
650performance
XS650 Addict
Champ, the taper on your end cone is not as steep as was typically used "in the day." Of course, the return wave is influenced by a ton of things, but one option you will have once you've run it and have a sense of the engine's characteristics is to steepen the end cone and thereby modify the effect of the return wave.
By now you've probably already fully welded the cone, but if not you might consider just tacking it on; run and dyno it and then tack on a steeper cone and assess the difference.
The difference may be noticeable or not, because its always all about the combination and the effect of a single change is often difficult to predict.
FYI, the Shell exhaust specs in the manual are with the #1 cam, which is noticeably softer than, say, the Megacycle 40 that many of the Yams ran. Nevertheless, the pipe lengths and diameter were amazingly similar between the Yams, Trumpets, BSAs, etc.
Great looking project and nice workmanship.
Champion750
XS650 Addict
650,
You know the problem I face is getting cones (megaphones or reverse cones) of a specific size and shape. Cone Engineering says they make custom cones and they are a little pricey but not too bad. I just decided to get as close as I could with pre made units for now since this is my first build. I understand what you are saying and I agree so hopefully in the future I'll be able to come up with a system that's closer to things that work better. I like your tack welding idea and I'll probably utilize that. Let's see what happens with what I have and go from there. And thanks for the info.
You know the problem I face is getting cones (megaphones or reverse cones) of a specific size and shape. Cone Engineering says they make custom cones and they are a little pricey but not too bad. I just decided to get as close as I could with pre made units for now since this is my first build. I understand what you are saying and I agree so hopefully in the future I'll be able to come up with a system that's closer to things that work better. I like your tack welding idea and I'll probably utilize that. Let's see what happens with what I have and go from there. And thanks for the info.
coma13
übermensch
Loving this thread! Great fabrication.
Champion750
XS650 Addict
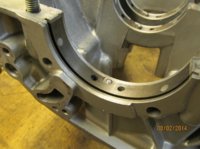
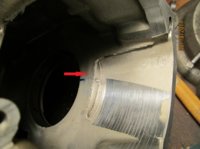
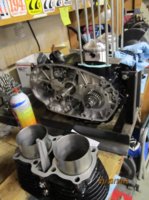
Wow, its been a long time. I came to a point in the build where I was ready to start assembling the engine so I started the painting process. Once that was done it all came to a stand still when I needed to solve a problem with one of the crank bearing locating pins (I posted a thread on this in the "engine" section of this forum). Using some of the advice I got from that thread I drilled the back side of the bearing boss so I could tap the pin back out. Then I ended up with a hole and some cracks (see pics). So I took the engine to a guy I trust for welding on engine cases. As you can see he fixed 'er right up. I'm confident this will stand up to the riggers of racing duty.
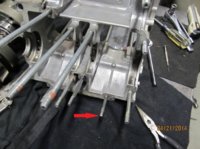
Now I need to solve a problem on this one engine case stud that has boogered threads. Once I get that solved I can start getting the cases buttoned up.
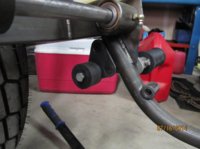
I have one thing left to do on the chassis and that is to weld up a coil mount. I'll wait 'til the engine is in the frame to see where I want to put it.
More to come....
Now I need to solve a problem on this one engine case stud that has boogered threads. Once I get that solved I can start getting the cases buttoned up.
I have one thing left to do on the chassis and that is to weld up a coil mount. I'll wait 'til the engine is in the frame to see where I want to put it.
More to come....
Attachments
-
 IMG_0912.jpg128.1 KB · Views: 390
 -
 IMG_0909.jpg141.6 KB · Views: 394
 -
 IMG_0896.jpg152.2 KB · Views: 423
 -
 IMG_0902.jpg201.3 KB · Views: 424
 -
 IMG_0900.jpg200.7 KB · Views: 410
 -
 IMG_0892.jpg194.3 KB · Views: 422
 -
 IMG_0915.jpg160.9 KB · Views: 426
 -
 IMG_1017.jpg136.8 KB · Views: 387
 -
 IMG_1018.jpg148.4 KB · Views: 418
 -
 IMG_0727.jpg207.4 KB · Views: 416
 -
 IMG_1056.jpg154.8 KB · Views: 411
bt24
XS650 Addict
Champion, I see that Corbin made your seat pad and it looks great. What style seat pad did you ask them to make for you? That seat pad looks a little bit different from the original Champion seat pad, I like it and I need two of those pads. Do you have any contact info at Corbin?
Thanks,
Bryan
Thanks,
Bryan
Last edited:
Champion750
XS650 Addict
Hey bt thanks for the compliment.
Well, Corbin doesn't have any flat track seat designs all ready made. This was a total custom. I just took the pan to them and tried to give them an idea of what I was looking for and left the rest up to them. I had to trust that they would do what I asked and I was confident they would as this is the second time I've used them for a custom seat pad. The pic shows the first one I had them do for my stock framed TT500 flat tracker.
If you can save and maybe print the pics of my seat pad and show it to them I'm sure they can reproduce it perfectly. Both times I went there I dealt with a guy named Julio. I don't know his last name but he usually handles most of the walk-ins. Corbin is only an hour from my house so it was easy for me to drive over there and talk to Julio as Corbin has a walk-in (ride-in) service for custom fitting.
If you want bt, I can cruise over there and get Julio's business card and tell him you'd like to contact him for the same work. I can also post (or email) more pics of the seat if you need them.
Hope this helps
Attachments

Champion750
XS650 Addict
bt24
XS650 Addict
Thank you for the info, if you could post a few more pictures that would be great. Thanks for the link also, no need to get his card I will give him a call. That seat is most likely around $100.- 120. bucks but Corbin does great work.
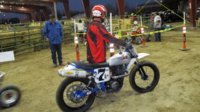
I finished my 750 a few months back and it made the 2015 Calendar, now can't wait to race it this season. If your located in CA.
We started racing there in the 70s at Freemont, Valejo, Hayward and the Cow Palace. The Cow Palace was my very first race at the age of 10 riding a Honda CT70. Kenny Roberts was there wearing the number plate 80y. Fun times!
Thanks BT
PS: Good looking TT500, ran one of those for many years, loads of fun!
Flattracker94
Flattracker94
Looks great, Glad to see someone building a real race bike...!!!!! Curtis
Champion750
XS650 Addict
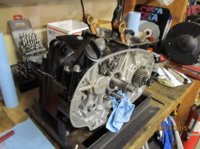
Started putting the engine together (finally) and just keep running into problem after problem. Some of it is because I don't know these engines, others are due to damage or missing parts. Here is where I'm at with the engine right now. This engine is from an '82 Special II and I'm told I should convert to a 7 disc clutch. I'm working on that. I need a head gasket and some other odds and ends before the top end can go on.
Work continues but there's just too much waiting/delays between times. It's frustrating....
Work continues but there's just too much waiting/delays between times. It's frustrating....
Attachments

650performance
XS650 Addict
When the bottom end is assembled and ready to go, use the old head gasket to check the squish. You're looking for .035" (minimum) - .040". Then tele Michael Morse and get a new copper head gasket of an appropriate thickness to obtain the desired squish clearance.
Also, use the Alto clutch friction plates. They're thinner than stock so you can get 8 with the right stock basket, etc. Add stronger Barnett or other clutch springs and you will have no slippage.
Also, use the Alto clutch friction plates. They're thinner than stock so you can get 8 with the right stock basket, etc. Add stronger Barnett or other clutch springs and you will have no slippage.
Just found your build, I put together several Shell frames over the years, Shell recommended 30" pipes. Fun stuff. On the pipes I put a dyno on a power thread. Roger Johnson builds races a fast Champion. 70hp with 53+ torque where you need it on the tacky 1/2mile and miles. Roger used my 1/2 mile pipe 30" and my 12" megs. Gary
Attachments

Last edited:
Champion750
XS650 Addict
THE Gary Hoos?!
Champion750
XS650 Addict
Hey Gary your famous!
I know a guy that uses the exhaust setup you have pictured on your web site. Very similar to what you have pictured. I can barely hear his bike as he's going around the track. Really quiet. I chose to go with megs with no mufflers. We'll see if that ends up being a mistake.
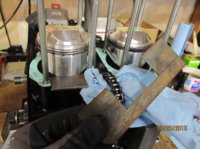
Here's where I'm at on my engine currently. I made a piston "rest" so they would stay in place as I lower the cylinder block. I need a ring compressor to continue. Never needed one on my SR500's.
I know a guy that uses the exhaust setup you have pictured on your web site. Very similar to what you have pictured. I can barely hear his bike as he's going around the track. Really quiet. I chose to go with megs with no mufflers. We'll see if that ends up being a mistake.
Here's where I'm at on my engine currently. I made a piston "rest" so they would stay in place as I lower the cylinder block. I need a ring compressor to continue. Never needed one on my SR500's.
Attachments
Airwolfie
XS650 Guru
No meed for a compressor, just use a pop sickle stick, the bevel at the bottom of the sleeve will help with getting the rings snug. Start exactly opposite the open end, and work your way round, it takes a few minutes and is super easy! I am Carbon did a video on how to somewhere.........
Champion750
XS650 Addict
Ya Airwolfe, I ended up putting the pistons in the cylinders first then the cylinder block on the cases. These pistons are long rod pistons so the pin is a little closer to the top than stock and it made this type of installation an adventure. Lowering the piston in the cylinder far enough to expose the pin hole actually made the bottom oil rail pop out. I guess that's what the pop stick is for eh?
Next is setting up the head for clearance checking.
Next is setting up the head for clearance checking.
Attachments


Champion750
XS650 Addict
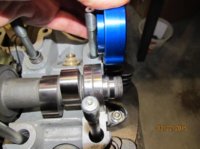
Anyone ever install a set of these? The guy that gave these to me is an idiot and I'd rather not call him but I don't see how they go in with out modifying them. That shoulder on the inside would only fit if you removed the outside cam bearing. Doesn't seem right.
Attachments


Similar threads
- Replies
- 46
- Views
- 6K