Getting the ‘57 beetle back on the road in 2024

Well, after a one month hiatus, I did some work on the beetle again. Tried to figure out the seized or frozen LF suspension. Thought if lucky it would be a seized shock but no such luck. It’s highly unlikely it’s the spring leaves in the front beam so it’s probably frozen link pins in the front knuckle. That can wait.

Decided to install the left swing axle boot. This required raising the trailing arm to get clearance to get the boot in. I removed the shock, raised the arm with a jack and installed a 14” piece of 5/16“ chain to keep the suspension “loaded” so I could remove the jack. It looked a bit sketchy, but seemed safe so I went ahead with the install. It’s a split boot and one needs to be careful to not overtighten the small screws.

For this corner of the car, all I need to install brake lines and drums and it’s done, until I need to bleed the system.

Big day today - I got my container of red rubber grease at last!

After dinner I put the first hard and flex line in.
 
Last edited:
IMG_3242.jpeg
IMG_3324.jpeg
IMG_3647.jpeg
IMG_3645.jpeg
IMG_3648.jpeg
IMG_3649.jpeg
IMG_3644.jpeg
IMG_3652.jpeg
IMG_3654.jpeg
 
Last edited:
I tried to assemble the brake drum over the new brake assembly and it wouldn’t go on. The “OD“ of the shoes was slightly larger than the ID of the drum.
- drums already machined / turned
- parking brake backed off
- no contact of bar at “C”
- shoes are bottomed out against wheel cylinder and adjusters at top
- all new components match dimensions of parts removed
The shoe lining appears to be a bit too thick, but not by much. I don’t think I can evenly remove a bit of lining material so to reduce the OD of the shoe assembly, I have a couple of options:
1. Remove shoes and remove an equal amount of material from 4 points “A”
or
2. Remove star adjusters and machine maybe 1 mm off the face of each adjuster at “B”. I have spares of this adjuster so maybe this would be the easiest solution?

#1 is more work but maybe be best?

Ant thoughts? Am I missing something?
 
Do your self a favor and rotate that axle boot seam to the top. Trust me, it'll weep. Also, if you ever pull the heads off, remember to turn all of the push rod tubes where the welded seam is at the top. If they ever crack, that's where they do it. Could mean the difference between replacing a tube or replacing a motor. Lookin' good!
 
I think I'd take it from the adjusters
 
Do your self a favor and rotate that axle boot seam to the top. Trust me, it'll weep. Also, if you ever pull the heads off, remember to turn all of the push rod tubes where the welded seam is at the top. If they ever crack, that's where they do it. Could mean the difference between replacing a tube or replacing a motor. Lookin' good!
Thx. I installed the seam at 2:00 as I was advised with the seam at 12:00, the boot can’t flex properly at the seam and will fail prematurely. With that said, I would have thought the seam was better placed at 3:00 but was advised 2:00 was the better spot. I will research this further. Rotation of the bolt is still easy - just loosen two gear clamps.
Thanks for the heads up - appreciated.
Yes for the push rod tube seams👍

Edit - just watched a quick YouTube vid advising to point the seam at 10:00 ‘ish (45 degrees). At 2:00, sloshing oil on acceleration will weep from the seam. I’ll keep looking. lol
 
Last edited:
I think I'd take it from the adjusters
Thx. As mentioned I have spare adjusters and will try this on the left brake assembly. Now if I only had a lathe ☹️. I can gently beat the drum on about 50% of the way with persuasion from the end of a short 2x4, but once on that far it’s almost impossible to turn the drum by hand. Would you think 1mm of the face of each adjuster might be enough?
 
Thx. I installed the seam at 2:00 as I was advised with the seam at 12:00, the boot can’t flex properly at the seam and will fail prematurely. With that said, I would have thought the seam was better placed at 3:00 but was advised 2:00 was the better spot. I will research this further. Rotation of the bolt is still easy - just loosen two gear clamps.
Thanks for the heads up - appreciated.
Yes for the push rod tube seams👍

Edit - just watched a quick YouTube vid advising to point the seam at 10:00 ‘ish (45 degrees). At 2:00, sloshing oil on acceleration will weep from the seam. I’ll keep looking. lol
Actually, 10:00 is good. I had to think about it, it's been 30+ years.
 
I tried to assemble the brake drum over the new brake assembly and it wouldn’t go on. The “OD“ of the shoes was slightly larger than the ID of the drum.
- drums already machined / turned
- parking brake backed off
- no contact of bar at “C”
- shoes are bottomed out against wheel cylinder and adjusters at top
- all new components match dimensions of parts removed
The shoe lining appears to be a bit too thick, but not by much. I don’t think I can evenly remove a bit of lining material so to reduce the OD of the shoe assembly, I have a couple of options:
1. Remove shoes and remove an equal amount of material from 4 points “A”
or
2. Remove star adjusters and machine maybe 1 mm off the face of each adjuster at “B”. I have spares of this adjuster so maybe this would be the easiest solution?

#1 is more work but maybe be best?

Ant thoughts? Am I missing something?
Wouldn't be the first time I've had to file the ends of shoes or the adjusters to compensate for aftermarket parts being not quite right. Of course, the most common problem was the lip of rust on the inner edge of the drum that wouldn't go over the new shoes, but I assume that's no longer an issue here.
 
You might take the shoes off and see how well they fit the arc of the drum. You could check with the shop that turned your drums and see if they can arc the shoes.
I’ll check that this week. The drums were turned by a friend who is s general machinist and I’m not sure if he could do the shoes. I can check with him though.

Gave me a memory jog... yup, we used to just file the ends of the shoes where the adjusters slotted in and where the slave cylinder fits.
I’ll try that later this week. It will eliminate the need to see my friend with the lathe. I’m thinking if I get a marker and put a 1mm black line at the end of each shoe and sand/grind/file that off, it may provide sufficient clearance. I don’t think I need very much removed.
 
Well I spent a better part of this afternoon working on the beetle again. I ground off about 1mm from the ends of the brake shoes (steel part) to allow the drum to be installed. Fits like a glove now.

I rerouted the hard brake line from the flex hose to the wheel cylinder. Rather than re-bend the steel line I had already made, I bent a new one using Cupronickel brake line. If you’ve never used this stuff you’re in for a real treat. Really easy to bend without tools and flares very well. I did notice it does work harden after a couple of bends. It’s also will not rust so it’s a great product. Made and installed a short hard line from the “T” fitting to the other end of the flex line.

I re-clocked the rubber swing arm boot to 10:00 as per the recommendation from VW experts.

Greased the emergency brake cable and I think the LR corner is done (needs to be bled and brake shoes adjusted). Onto the RR next. That shouldn’t take long because most of the time consuming work had already been completed.

B4DC1285-4ADC-4C84-BDEE-99EBB4534600.jpeg
930188D5-B085-4CBE-9171-0AB97794E3A8.jpeg
84DC840D-B827-43EC-8843-9585D8A8AECA.jpeg
 
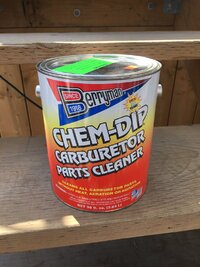
Well I’ve nearly taken a month off from working on the beetle, so back at it today. A friend just returned from the US and brought me back this. Can’t buy it in Canada, but not a big deal for the US guys. Figured I needed this (probably a lifetime supply) for future carb work. Thinking stubborn deposits can be loosened up with this, followed by a bath in the ultrasonic cleaner.

IMG_3928.jpeg
 
A relatively productive afternoon and evening working on the beetle:
- installed one tail light for fun. These lights are called snowflakes. A bit rare and not used on many years. This side went together ok. I need parts for the other side. The light wasn’t turned on, but the flash shows the lens design.
- installed the RH swing axle rubber boot
- removed the brake line from the T fitting to the RH flex line, made and installed a new line - pita - line was clipped to the body where it was inaccessible
- installed RR flex line and mounts
- reassembled RR brake assembly. Got it all together and found that similar to the LH side, the brake shoe lining was too thick and the drum wouldn’t go on. Took it all apart and ground a bit off the steel shoes, reassembled and drum fit ok
- made a new brake line from the RH wheel cylinder to the flex line. This one looks nicer than the LH side so I might do the LH side again 🤬

IMG_3936.jpeg
IMG_3935.jpeg
IMG_3941.jpeg
IMG_3940.jpeg
IMG_3939.jpeg
IMG_3931.jpeg
IMG_3933.jpeg
IMG_3942.jpeg
IMG_3943.jpeg
IMG_3944.jpeg
IMG_3946.jpeg
 
Back
Top