Help Please!!!! Stripped/broken fork drain screws

Docwits

XS650 Enthusiast
Messages
72
Reaction score
2
Points
8
Location
North Port, FL
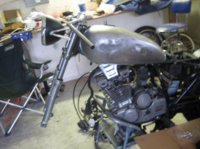
Well, finally had some time to start working on the build today, thought I would start with a little smoothing/polishing and some maintenance.

I knew the bike had taken a few "falls" but the damage is becoming more and more clear.

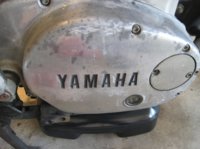
First I have attached a pick of the right side cover, not sure if I want to spend hours sanding and polishing to fix the deep scratches or look for a new one on Ebay.

But that is not the "emergency"

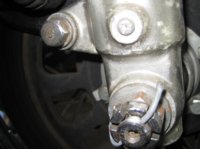
I went to drain the fork oil so that I could change it and put new progressive springs in, and found that one of them is stripped beyond repair and the other one is snapped clean off.

Is there another way to drain the oil? If I remove the top caps and turn the forks upside down will that work? I though of drilling out the drain screws, retapping and putting in new bolts but I'm worried about leaving burs in there (I really don't want to rebuild them right now, eventually I am going to shorten them but I wanted to ride with them up in the trees for awhile to determine how much to shorten them.)

Please, I hope someone who is on this site right now can help me so I can get on with the progress, I don't get a lot of time to work on it.

Thanks in advance for your help!
 

Attachments

  • IMG_0018.jpg
    IMG_0018.jpg
    165.5 KB · Views: 397
  • IMG_0019.jpg
    IMG_0019.jpg
    128.2 KB · Views: 199
  • IMG_0020.jpg
    IMG_0020.jpg
    167.2 KB · Views: 182
  • IMG_0021.jpg
    IMG_0021.jpg
    131 KB · Views: 231
if the screws are the way the pictures look rite now, they are still removeable. the last pic isn't broke off. its just ground flat. I would cut a slot in the head, and use a flat blade screw driver. Those screws are a little inset.
Is that a nail used as a cotter pin?
 
Good eye on the nail, now you see how much work I have ahead of me before I would trust it out on the road! Some f#%$! people should just not be allowed to work on bikes!
 
Angus, what isn't evident in the pics is there is a small patch on the side covert made of jb weld. Fortunately its small enough I am not worried about it and its not in a visible place.
 
On the drain screws, they seal by a gasket under the screw head. As long as the new screws thread in right they should seal ok.
Leo
 
mine don't have gaskets, it don't leak, but ive been pretty lucky with my build. But not to worry, a oil drip appears under the sump plate every third day.
as for the side cover, that work is up to you. the area I can see is pretty thick rite there. shouldn't worry about grinding thru.
 
Hard y d i tend to agree with you. I am going to empty them by turning them upside down and then put my progressive springs in.

When i am ready to rebuild them with new seals and hughs shortening kit i will drill them out and thread in some larger bolts so draining in the future will be easier.

Thank you all for your help
 
I never touched mine when i lowered them. Figured i get the fluid out in a hurry on teardown. Hope you get along alright with drilling and tapping. Maybe keep an eye out for new lowers.
 
I happen to have a beautiful set of fork lowers that i spent hour polishing from an 82 xs400 maxim. The 650 (1981) and the maxim both have the same upper tubes (35mm). Any chance they might be interchangeable? I have searched for hours on the web and cannot find part numbers for just the lower tubes, thougt someone on here might know.

Thanks
 

Attachments

  • IMG_1584.jpg
    IMG_1584.jpg
    174.5 KB · Views: 144
Looks like you have enough head left on the screws to use an extractor , you shouldn't have to drill the whole screw out . I think Mikes sells the replacement screws and gaskets for it.
 
Those screws shouldn't be in there that tight because of the fiber seal washer under them. A couple taps using a hand impact should break them free. The screws are very small (M4 x 8) so I'm not sure you could find an extractor small enough. I replace mine with stainless Allens, the cotter key with a hitch pin .....

HitchPinCotter.jpg
 
I agree with everyone's advise. Should be able to extract the one that still has a head on it, its the one ground flat with the fork that concerns me.

But the plan for now is to drain them upside down, put in my progressive springs, ride and enjoy with the forks sticking up above the yoke until I figure out how much I want to lower them. Then when I rebuild em and shorten em I will deal with the drain screws.

Again, thanks for all of your help
 
Docwits, You say you searched for part numbers for the lowers on the net and couldn't find them. It took just a few minutes on boats.net to find them.
They listed 3 XS400 that year.
J and RJ used a left side lower, part number 51R-231126-00-38, right side 51R321136-00-38. Upper tubes, 12R-321110-00-00
The SJ used part numbers 14V-321126-01-33 left, 14V-321136-01-33 right. Upper tube, 2LO-321110-00-00
The XS650 used lowers left, 2FO-321126-00-00, right 2FO-231-136-00-00, tubes 2FO-231110-00-00.
By these numbers I can't say the parts can be swapped around, but if you have the tubes that fit the XS400 lowers they should fit the XS650 trees.
Leo
 
Leo, I had thought of using the entire forks in the 650 trees but I plan using Hugh's lowering kit, emulators, and the progressive springs I already bought for the 650. I just don't plan on rebuilding the forks yet, just wanted to put the new springs in, raise the tubes in the trees and ride for awhile to determine how much I want to shorten them.

And I forgot about boats.net, whom I have ordered from before, should have checked there first. All the sights I checked said part no longer available so offered no part #
 
Those screws shouldn't be in there that tight because of the fiber seal washer under them. A couple taps using a hand impact should break them free. The screws are very small (M4 x 8) so I'm not sure you could find an extractor small enough. I replace mine with stainless Allens, the cotter key with a hitch pin .....

HitchPinCotter.jpg
Great idea on the Allen head bolts, I was thinking similar for when I drill out the old and tap em. Also great idea on the trailer hitch pin instead of cotter on the axle nut!
 
I use an even bigger one on the rear axle. The lower shock mount keeps it from popping out. Both are stainless of course .....

HitchPinCotter3.jpg
 
Back
Top