Here goes nothing

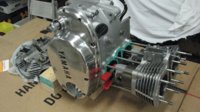
Blasted the cases, got them primed and painted. Also chased all the threads, with some help, on each case half to get ready for assembly this weekend.


0225141914_zpscc9c6485.jpg


0306141803_zps251d3176.jpg


0306141805b_zpsfa700bdf.jpg


0306141806a_zps227be7cb.jpg
 
Started putting the carbs back together, new gaskets and rubber seals, new float needle and set the float height. Still waiting on top covers from the powder coater.


0220141911_zps5f2cd05e.jpg


0220141952_zps90279e10.jpg


0321141542b_zps2f8156d0.jpg


0321141543_zps71fb5c8d.jpg


0321141545_zps63c8a43c.jpg
 
Started engine assembly today, going slow as I had to order some small parts I thought I had. Got the shifter forks and transmission in, new seals and a one piece clutch pushrod. No problems, didn't take the tranny apart, it was in great shape, so I just dropped the input and output shafts into place.
Also primed and painted the head, will put some clear on it tomorrow.


0304141751_zps8059b276.jpg


0304141839_zpsdc5c15b2.jpg


0304141839a_zps5c501d7c.jpg


0304141826a_zps347b9657.jpg


0304141826e_zpsd5923e9f.jpg


0306142115_zpsc8fad4b7.jpg


0306142116_zpsfa2c9811.jpg
 
PWIZL

Don't forget, when setting the shifter lever make sure engine is in neutral - that is with the 0 on the arm of the star that must point down to 6 o'clock. Slide your shifter shaft back through, reconnect gear lever, find neutral and set arms equidistant either side of the '0' finger of the star.

ANLAF
 
Picked up a nice set of used cylinders on the cheap, old ones would have to be bored out and the cost of that plus new oversized pistons and rings just didn't make sense. The original pistons are in great shape, so new rings and the new cylinders were much cheaper. - - -

Hi pwizl,
awesome job so far and I look forward to seeing the finished product.
OK, not to diss you but some folks do have gaps in their tech info.
New rings must be gapped before install and your post don't say you did so.
 
Hi pwizl,
awesome job so far and I look forward to seeing the finished product.
OK, not to diss you but some folks do have gaps in their tech info.
New rings must be gapped before install and your post don't say you did so.

True that!! Haven't done the pistons yet though. Actually planning on doing all the gaps tonight :D

I was just saying that getting new rings and a good set of used cylinders was cheaper than trying to save the originals after boring and having to buy oversized pistons and rings.

Thanks for keeping an eye on me though fredintoon :thumbsup:, I need all the help I can get!!
 
Last edited:
True that!! Haven't done the pistons yet though. Actually planning on doing all the gaps tonight :D

I was just saying that getting new rings and a good set of used cylinders was cheaper than trying to save that originals after boring and having to buy oversized pistons and rings.

Thanks for keeping an eye on me though fredintoon :thumbsup:, I need all the help I can get!!

Have you measured the bore diameter of the used cylinders you bought, to be sure they match up with your existing pistons. Piston to cylinder clearance is important, as is cylinder taper. Specs are in the Yamaha Service Manual.
 
Have you measured the bore diameter of the used cylinders you bought, to be sure they match up with your existing pistons. Piston to cylinder clearance is important, as is cylinder taper. Specs are in the Yamaha Service Manual.

First thing I did after getting them out of the box, all checked good
 
Got the carbs finished up tonight. Had to get some new screws for the throttle (butterfly) plate and get the plate installed, put the stacks on to see how they looked.


0326142004_zps9c178369.jpg


0326142008b_zpsd8094fbb.jpg


I was able to get the bottom end and cases put back together. Also got some replacement bolts for the sump filter to replace the ones I lost, thank you TwoManyXS1Bs for guidance on the bolt size.


0326141807a_zpseac6ef5c.jpg


I really like the contrast between the silver powder coat and the engine color.


0326141825b_zpsa8821fe8.jpg


0306141952_zps29ef9c9d.jpg


0306142031b_zps1e68dca7.jpg


0306142031d_zpsd0416f29.jpg


0306142032b_zps309d71a5.jpg


Hope to get the pistons and cylinders installed tomorrow.
 
You're doing a fine job on the engine re-build:thumbsup:

Here's a method I used a few years ago to install the cylinders and pistons:

The following method makes installing the cylinders/pistons very easy.

Place the cylinders upside down on the bench.Install the inner wrist pin circlips into both pistons at the same time you install rings and then put the pistons fully into the cylinders from the bottom. A popsicle stick works well to guide the rings past the chamfered edge on the cylinder bottom. No ring compressor needed.

Install cylinder base gasket. Rotate the engine to stand on its nose, so that the cylinders/pistons can slide onto the studs horizontally. Slide the cylinders/pistons down the studs,feeding cam chain as you go. I used a clamp to hold the conn rods just below the cylinder bottom. Tap the pistons down until holes line up for the wrist pins. Install the wrist pins and outer circ clips. Remove clamp and slide the cylinders fully into the crankcase. Rotate engine so cylinders are vertical again. Carry on with front camchain guide, camshaft/bearings etc.

With this method, you're not fighting with the weight of the cylinders and less chance of the camchain falling downward.
 

Attachments

  • Cyl  Piston install R1.JPG
    Cyl Piston install R1.JPG
    228.1 KB · Views: 178
You're doing a fine job on the engine re-build:thumbsup:

Here's a method I used a few years ago to install the cylinders and pistons:

The following method makes installing the cylinders/pistons very easy.

Place the cylinders upside down on the bench.Install the inner wrist pin circlips into both pistons at the same time you install rings and then put the pistons fully into the cylinders from the bottom. A popsicle stick works well to guide the rings past the chamfered edge on the cylinder bottom. No ring compressor needed.

Install cylinder base gasket. Rotate the engine to stand on its nose, so that the cylinders/pistons can slide onto the studs horizontally. Slide the cylinders/pistons down the studs,feeding cam chain as you go. I used a clamp to hold the conn rods just below the cylinder bottom. Tap the pistons down until holes line up for the wrist pins. Install the wrist pins and outer circ clips. Remove clamp and slide the cylinders fully into the crankcase. Rotate engine so cylinders are vertical again. Carry on with front camchain guide, camshaft/bearings etc.

With this method, you're not fighting with the weight of the cylinders and less chance of the camchain falling downward.


Thank you for the compliment and the advice retiredgentleman. I knew about putting pistons in through bottom and the popsicle stick trick, but I hadn't thought of, or heard about, rotating the engine and sliding the cylinders horizontally...that's brilliant!! Don't have to wrestle with the weight, and it would seem MUCH easier to deal with the cam chain that way. That's one reason I like this forum, great advice and people happy to help when they can.
 
Between soccer and birthday parties I was able to sneak into the garage for a bit today. I knew I wouldn't have time to finish up the top end, but I got things ready to make it a little easier tomorrow. Cleaned the cylinders, head, and head cover with brake cleaner, chased all the bolt holes and blew everything off real good with the compressor.


Put the tappets back on the head cover and put new o rings on the sleeves that go into the outer 4 stud holes on the cover


0329141345a_zps5b4f6ffd.jpg


Then I got ready to set the gaps on the new rings


0329141309_zps823dedf4.jpg


Gave the cylinders a light hone


0329141500_zpsba00863a.jpg


Squared up each ring in the cylinder and checked the gap, did the same with the other set of rings in the other cylinder


0329141337_zps47399822.jpg


Got the rings on the pistons, gaps aren't staggered yet..


0329141345_zps9ba7f625.jpg


Set the pistons in the cylinders, ready for tomorrow. Hope to get the top end buttoned up, we'll see how it goes


0329141740_zps9ce99938.jpg
 
Back
Top