-
Enjoy XS650.com? Consider making a donation to help support the site.
XS650.com receives a small share of sales from some links on this page, but direct donations have a much greater impact on keeping this site going.
You are using an out of date browser. It may not display this or other websites correctly.
You should upgrade or use an alternative browser.
You should upgrade or use an alternative browser.
Homemade and Unique Tools
Til you forget a nut or bolt................
LOL cuz that'd be me.
All kidding aside, brilliant!
LOL cuz that'd be me.
All kidding aside, brilliant!

I wish you weren’t a thousand miles away, so I could come over and borrow that! Nice work.When I built my little "flip" stand several years back, I got the idea that I might be able to split the cases using the power of hydraulics by placing a bottle jack at the front. All I'd need is a plate of some sort to attach to the motor stand on top .....

Well, I finally got around to making the plate .....

It has brackets on it so it locks onto the engine stand at the front and rear .....

Since the bottle jack will only lift and separate the front of the cases, I made the plate long enough so I could use a big rubber mallet at the rear to separate the back end .....

So, here it is all set up and ready to go .....

A couple of pumps on the bottle jack and ..... pop!! Success!! .....

Then a few good whacks with the rubber mallet upward on the overhanging plate at the rear, and it's a done deal .....


Wow, this was too easy, lol.
For those considering working on gages. Here is a tool I made to get the rings off. once you get a start on the ring this slips under it and has a built in lever. Work slowly until you can separate the bezel from the body. Gives you a nice edge that can be crimped without an ugly appearance. In made a jig to hold the ring tight during reassembly while I gently tapped around the edge with a large drift. Use your dremmel tool to cut the groove and then grind it to a sharp edge

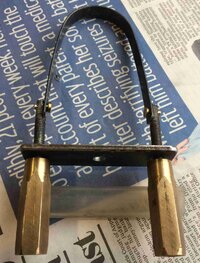
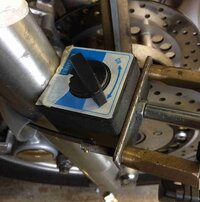
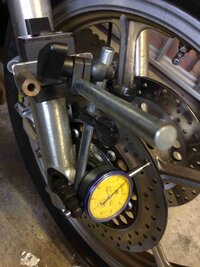
My Virago came with a badly worn right brake rotor/disc. I put a new rotor on and it too started to wear bady such that I could feel pulsing through the brake lever when braking. Finally decided to see what the issue really is so tried to fit a dial indicator to the fork and check both rotors but could not get a secure enough fit. Using some scrap I made a clamp to fit the forks:
The strap is some annealed spring steel from a mattress riveted to short lengths of M6 stud. The brass hex bar huts came from a discarded project.

A piece of clear tubing is placed on the clamp strap to prevent scratches.


The right machined mounting area on the cast wheel is slightly misaligned, but the left rotor was perfect. I had to insert a couple of 0.05mm and 0.10mm washers to get the right rotor true. Both rotors now have a runout of 0.05mm. I will continue to monitor the right rotor.
Note: Washers were punched out of Aluminium foil.
The strap is some annealed spring steel from a mattress riveted to short lengths of M6 stud. The brass hex bar huts came from a discarded project.

A piece of clear tubing is placed on the clamp strap to prevent scratches.


The right machined mounting area on the cast wheel is slightly misaligned, but the left rotor was perfect. I had to insert a couple of 0.05mm and 0.10mm washers to get the right rotor true. Both rotors now have a runout of 0.05mm. I will continue to monitor the right rotor.
Note: Washers were punched out of Aluminium foil.
I finally got my compressor set up and finished converting my HF cabinet to be a vapor blaster. Seems to work pretty good to me, gun is one I made with a 6mm c1 nozzle and a 3mm air jet. Test piece is an ATC cylinder I'm using for an 8mm stroked xr200.


Very nice!
Nice!
Can you provide pictures/machining details of the nozzle? I think I can figure out how you did it, but just to be sure...
Can you provide pictures/machining details of the nozzle? I think I can figure out how you did it, but just to be sure...
And what do you use a media? Glass beads and water or???Nice!
Can you provide pictures/machining details of the nozzle? I think I can figure out how you did it, but just to be sure...
I'll get some pics of the gun in a bit. It's below freezing in the garage right now.
Media is the 170-320 glass beads and water. You can use baking soda, but you have to mix the soda into the water until no more will disolve, then add more. Otherwise you don't have any abrasive.
On converting the cabinet I followed this guys video, he's a bit out there but the info is solid.
Media is the 170-320 glass beads and water. You can use baking soda, but you have to mix the soda into the water until no more will disolve, then add more. Otherwise you don't have any abrasive.
On converting the cabinet I followed this guys video, he's a bit out there but the info is solid.
Here's a couple pics of a second gun I'm working on. Started as a 2.5" round, drill a hole all the way through tap drill size for 5/8-18, counter bored one end to the ID of the c1 nozzle, and a second counter bore. At 1.13" for the nozzle to sit in. End is threaded 1 5/16-18. Air needle is turned out of steel hex, when finished it'll end 1/4" before the nozzle. Hole for the slurry was drilled at 55*.


Thanks. Bore of the air nozzle?
Perhaps a springtime project to build one of these. No substitute for the surface finish of the cleaned parts. Surprised these have not been built for sale at retail at an affordable price (not in Canada anyway). Does Harbour Freight sell such a unit?
It's a 1/4" about 1/2 way through, and the final diameter will start at 3mm, and might go up to get the best performance.
HF doesn't sell a vapor blast cabinet, as far as I know the commercially available ones start around $10k. But it's not a hard conversion, and if you shop around its not very spendy.
HF doesn't sell a vapor blast cabinet, as far as I know the commercially available ones start around $10k. But it's not a hard conversion, and if you shop around its not very spendy.
This one falls more into the "home-modded" rather than "homemade" category, but I thought I'd share it here anyway. An issue I've encountered with my type E cam chain adjusters is that when I try to remove the acorn nut to do a tension check, many times the lock nut comes loose with it. This pretty much makes checking no good because when the lock nut comes loose, there's a good chance it has moved the adjuster setting. A simple tension check now becomes a full re-adjustment operation.
The lock nut is pretty big (27mm) and all the wrenches I have are quite thick. When fitted onto the lock nut to hold it, they end up also covering most of the acorn nut so getting a wrench or socket on it is difficult. So, what I needed was a thinner wrench, something like the axle wrenches that come in tool kits .....

But unfortunately, a 6 point wrench won't fit over the acorn nut so a twelve point is needed. I found a 27mm flare nut wrench on eBay that looked to be a good candidate. Like all my others, it was too thick. There's only about 9mm of "flats" on the acorn nut and the thick wrench covers about half of them .....


The unmodded end of the wrench is about 16mm thick. So, I figured if I was to grind about 4mm off the top side, so it was flush with the handle, I could get the thickness down to about 12mm .....


So, I proceeded to do that, and now the wrench fits perfectly, exposing all of the acorn nut .....


I love it when a plan comes together so well, lol.
The lock nut is pretty big (27mm) and all the wrenches I have are quite thick. When fitted onto the lock nut to hold it, they end up also covering most of the acorn nut so getting a wrench or socket on it is difficult. So, what I needed was a thinner wrench, something like the axle wrenches that come in tool kits .....
But unfortunately, a 6 point wrench won't fit over the acorn nut so a twelve point is needed. I found a 27mm flare nut wrench on eBay that looked to be a good candidate. Like all my others, it was too thick. There's only about 9mm of "flats" on the acorn nut and the thick wrench covers about half of them .....
The unmodded end of the wrench is about 16mm thick. So, I figured if I was to grind about 4mm off the top side, so it was flush with the handle, I could get the thickness down to about 12mm .....
So, I proceeded to do that, and now the wrench fits perfectly, exposing all of the acorn nut .....
I love it when a plan comes together so well, lol.
Scottike
XS650 Member
I wanted to pull the engine from my frame today - I didn't have the back or the will to build a special jig. So this is what I was able to come up with.
 2
2
Scottike
XS650 Member
Pulled the top of the left side 2motor mount and flipped it, moved it to the right side, and used it to pull the engine. Just cleared the backbone and wiggle the engine out.

Pulled the top of the left side 2motor mount and flipped it, moved it to the right side, and used it to pull the engine. Just cleared the backbone and wiggle the engine out.View attachment 215289

Brilliant!
I think this qualifies as a tool…
Buddy came up with a pretty good idea.
Propped up the back end of his quad and gave it some gas.
I do know one thing for certain, I’m never shaking a gas tank again.

Buddy came up with a pretty good idea.
Propped up the back end of his quad and gave it some gas.
I do know one thing for certain, I’m never shaking a gas tank again.
Similar threads
- Replies
- 14
- Views
- 972
- Replies
- 40
- Views
- 11K
- Replies
- 29
- Views
- 4K
