Well, I checked the advance rod and the pins are aligned correctly. I did notice that the advance weights and slotted nut are worn and need to be replaced. If the odometer is correct, those parts have over 38k miles on them. Rechecked the timing with my meter and still right on. Only other thing I can think of would be the coil wires. It looks like the wiring harness under the top tube in the area of the coils has been molested. Can't think of a better word. So far this project has been an exercise in troubleshooting. Why so much stuff has been messed up is beyond me. Anyway, I'll check the coil wires with the meter tomorrow, then clean the carbs again and put the new parts in.
-
Enjoy XS650.com? Consider making a donation to help support the site.
XS650.com receives a small share of sales from some links on this page, but direct donations have a much greater impact on keeping this site going.
You are using an out of date browser. It may not display this or other websites correctly.
You should upgrade or use an alternative browser.
You should upgrade or use an alternative browser.
Later engine in older chassis
- Thread starter oldrider
- Start date
Well Sir, my advance unit was obviously badly worn. The tab that sits in the slotted nut was really bad on both. Even the slots in the nut were worn. I got lucky in that the weights and slotted nut from my parts bike appear as new. Put that back together with new springs. I went through the points, again, and they are set at .014 for both. I did get it running to check the timing with my light. It fires right where it's supposed to and the advance is correct.There are slash alignment marks on the little advance disc and the advance backing plate. They should point to one another if assembly is correct .....
View attachment 246100
This is where I really need help. It starts, but only runs on the right side until 3 or 4k rpm, then the left side kicks in. This is what I've done with the carbs. Disassembled both, removed pilot and main jets and slides. I cleaned thoroughly with carb cleaner, blew out all the passages with air. I did not remove the needle jet but I cleaned all the metering holes in both. (I have new needle jets but not the o-ring or needles.) Removed and cleaned the float needle and seat, checked and set the float level. Installed new #30 pilot jets and #140 main jets, I didn't change the needle clips. Set the air needle screw at 2 turns out. The PO had them turned all the way in.
The bike will start using the choke and will run without it after a bit. Only on the right side until I blip the throttle. The right cylinder runs hot, which makes me nervous. It's about 100° hotter than the left, using an infra-red thermometer.
I'm getting limited on time to work on this, but I would like to at least get it running decent.
I also discovered that the alternator isn't charging and the clutch plates are stuck together.
Ant suggestions will be greatly appreciated. You won't hurt my feelings by being honest.
Thanks.
did you check with timing light on both sides? spritz a bit of carb cleaner in the rh side while holding an idle does it speed up?Well Sir, my advance unit was obviously badly worn. The tab that sits in the slotted nut was really bad on both. Even the slots in the nut were worn. I got lucky in that the weights and slotted nut from my parts bike appear as new. Put that back together with new springs. I went through the points, again, and they are set at .014 for both. I did get it running to check the timing with my light. It fires right where it's supposed to and the advance is correct.
This is where I really need help. It starts, but only runs on the right side until 3 or 4k rpm, then the left side kicks in. This is what I've done with the carbs. Disassembled both, removed pilot and main jets and slides. I cleaned thoroughly with carb cleaner, blew out all the passages with air. I did not remove the needle jet but I cleaned all the metering holes in both. (I have new needle jets but not the o-ring or needles.) Removed and cleaned the float needle and seat, checked and set the float level. Installed new #30 pilot jets and #140 main jets, I didn't change the needle clips. Set the air needle screw at 2 turns out. The PO had them turned all the way in.
The bike will start using the choke and will run without it after a bit. Only on the right side until I blip the throttle. The right cylinder runs hot, which makes me nervous. It's about 100° hotter than the left, using an infra-red thermometer.
I'm getting limited on time to work on this, but I would like to at least get it running decent.
I also discovered that the alternator isn't charging and the clutch plates are stuck together.
Ant suggestions will be greatly appreciated. You won't hurt my feelings by being honest.
Thanks.
"I did not remove the needle jet but I cleaned all the metering holes"
the needle jets have cross holes that create "frothy mixture", they are essential to good running, gotta get em out to get at the holes.
air jet passages in intake bell clear and open?
carbs synced?
schimdt happens, vacuum port uncapped.
"clutch plates are stuck together."
Never had a set that wouldn't "unstick". Bike in high gear, clutch pulled in, roll it back n forth. clunk, clunk, clunk. They'll "prolly" free up.
Yes, needle jets, I did clean all the holes, used a filament from a stiff wire brush, tedious. Different size holes too.did you check with timing light on both sides? spritz a bit of carb cleaner in the rh side while holding an idle does it speed up?
"I did not remove the needle jet but I cleaned all the metering holes"
the needle jets have cross holes that create "frothy mixture", they are essential to good running, gotta get em out to get at the holes.
air jet passages in intake bell clear and open?
carbs synced?
schimdt happens, vacuum port uncapped.
"clutch plates are stuck together."
Never had a set that wouldn't "unstick". Bike in high gear, clutch pulled in, roll it back n forth. clunk, clunk, clunk. They'll "prolly" free up.
Carbs synced, as well as I could by checking throttle plate to make sure they opened together.
All the air passages in the intake bell are clear, made sure air passed through freely.
By vacuum port do you mean the tube in the carb mount that tubing connects to the vacuum petcock? Yes, capped with the blind plugs from XSDirect.
.....did you check with timing light on both sides? spritz a bit of carb cleaner in therhLH side while holding an idle does it speed up?
Yes, timing is good, both sides, much more stable after putting new parts in the advance unit. Have not sprites the left carb. Will try tomorrow if I can.
I'll try to free the clutch plates up per your suggestion. Rather not pull the cover off unless I have to. This engine has low miles but has been covered over in storage for a good 20 years. Probably some before I got it too.
What do you think about the right side running hot?
I'll try to free the clutch plates up per your suggestion. Rather not pull the cover off unless I have to. This engine has low miles but has been covered over in storage for a good 20 years. Probably some before I got it too.
What do you think about the right side running hot?
Off hand, I'd suspect it's the only one getting combustion. Thus far, it's sounding like the problem may be carburetion or compression lacking on the left sideWhat do you think about the right side running hot?

Sad, but I'm afraid you may be correct. It feels like the compression is pretty good when turning motor by hand. Have to get a decent tester and put this to rest. I think I've checked and changed about everything else. Not quite ready to give up yet, but this may ecome a winter project
Sounds like the idle circuit in the right carb may be plugged. That would explain why that right cylinder doesn't kick in and run until you rev it up. The mixture from the pilot jet is fed into the carb through a small inlet hole on the bottom of the body .....

The mix is then fed into the main bore through 4 tiny holes. Three are clustered together at the top of the bore about where the butterfly plate closes. The fourth is off to the side and comes from the mix screw .....

You need to blow carb cleaner into the little inlet hole and make sure it comes out all four of the little holes in the main bore. You'll need to have the mix screw removed and cover the outside of the hole it was in with a finger. You can "back flush" the circuit by blowing cleaner in the mix screw hole while covering all 4 holes in the main bore. The cleaner will come out the inlet hole on the carb bottom.
The mix is then fed into the main bore through 4 tiny holes. Three are clustered together at the top of the bore about where the butterfly plate closes. The fourth is off to the side and comes from the mix screw .....
You need to blow carb cleaner into the little inlet hole and make sure it comes out all four of the little holes in the main bore. You'll need to have the mix screw removed and cover the outside of the hole it was in with a finger. You can "back flush" the circuit by blowing cleaner in the mix screw hole while covering all 4 holes in the main bore. The cleaner will come out the inlet hole on the carb bottom.
Last edited:
OK, I went through the procedure and carb cleaner came out of all the passages you noted. I didn't otice any crud coming out, but I know they're clean now. Before I put the carbs back on, I did a compression test. The right side is 135# and the left side is 130#. Put it all together and got it started. It runs on both cylinders, not great, but better. It won't idle below about 1700 rpm and is slow return to that after I rev it. Right side still runs hot. When I started it, it was kind of farting in the exhaust, I turned the air screw out another half turn and after a minute or so it got better. I checked the timing again with the light and it's right on. So, I'm thinking that since the compression is good and the timing is good, any issues remaining are carb related. I was about ready to put this aside until winter, but I plan to keep going now. I still need to find out why the alternator isn't charging. I did the "slap test" and got no results. Also need to unstick the clutch plates, install the blade type fuse box, rewire the turn signals and sort out the rats nest of wires in the headlight. Still plenty to do.
Thanks for your help.
Thanks for your help.
Well, if it's not charging, it'll run off the charge in the battery until it gets too low. Then it will start running rough and eventually it'll die. So, your rough running may be due to the battery being low. Charge it up and see if it runs better for a while (until the battery gets low again).
Your compression readings aren't the best (about 150 is) but good enough for it to run. They may even come up as you put more miles on and the rings seat in good again. Did you hold the throttle wide open when testing, or do the tests with the carbs removed? If not, you can get low readings. Also, a warm motor usually tests better than a cold one.
I did the test with a cold motor and before I put the carbs back. The artery was fully charged, it's been on a trickle charger throughout.
Still not happy with the way it runs, but good enough to move on to solving the rest of the problems. I made no changes to the needles clip position. What location would you recommend?
Still not happy with the way it runs, but good enough to move on to solving the rest of the problems. I made no changes to the needles clip position. What location would you recommend?
Well, if all the rest of the jetting is stock then the needle should be in the stock position as well. That would be the middle or #3 slot (from the top). Normally, you don't need to change the needle position until you start increasing main jet size for mods. Eventually, as you keep stepping up the main jet size, bleed over into the upper midrange makes it too rich, and you need to lean the needles a step to fix that. It may not happen going up just one size, but by two or three you usually need to adjust the needles.
Still have a few more days until I can devote more time to finishing the bike. But, I did find out why the alternator wasn't charging. When moving the parts from the old motor to the new, I installed one of the brush holders wrong. Put it right and now slap test is good and system charging OK. Got the headlight working. Wiring left to do is rewire the turn signals, which PO had butchered while removing, and install the new fuse box. Also finish pod and breather install. Got the clutch plates more or less free as well.
So, getting closer to rolling this puppy out of the garage and do a road test. YAY!
Thanks for all the help and suggestions.
So, getting closer to rolling this puppy out of the garage and do a road test. YAY!
Thanks for all the help and suggestions.
Well, if anyone's interested, here's an update.
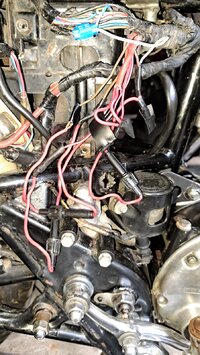
First photo is the worst of the wiring. Amazingly it seems to work. Note there are only 3 fuses. I have a 4 slot, blade type fuse holder to replace this mess.
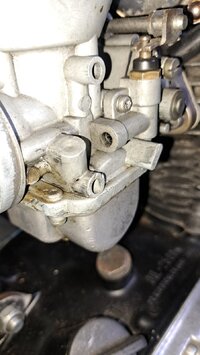
The second photo is what apparently is the cause of almost all of the carb issues. I have never worked on this type of carb before so I'm pleading ignorance. Note that the metal seal plug is missing from the choke plunger housing. Sure glad I bought that junker parts bike all those years ago.
Finally the bike runs and idles. Still a little backfiring in the exhaust. I need to get a new, deeper pair of snap ring pliers to get down inside the slide to pull the needles and change the clip position. I think the mixture is off in the transition from idle. Top end seems to be good.
I've been soaking the inside of the gas tank in white vinegar to take care of rust, seems to be working pretty well. As soon as that's good to go, I can take the beast for a road test.
I have all the wiring in the headlight shell accounted for except for 1 blue wire. It has no connector and I don't see where it might go. I also don't have instrument lights, but I haven't dug too deep yet.
What a project this has turned out to be. I think it's been a test. Once it's sorted, I want to keep it, but I think I'll go look at a 2 year old Royal Enfield interceptor.
First photo is the worst of the wiring. Amazingly it seems to work. Note there are only 3 fuses. I have a 4 slot, blade type fuse holder to replace this mess.
The second photo is what apparently is the cause of almost all of the carb issues. I have never worked on this type of carb before so I'm pleading ignorance. Note that the metal seal plug is missing from the choke plunger housing. Sure glad I bought that junker parts bike all those years ago.
Finally the bike runs and idles. Still a little backfiring in the exhaust. I need to get a new, deeper pair of snap ring pliers to get down inside the slide to pull the needles and change the clip position. I think the mixture is off in the transition from idle. Top end seems to be good.
I've been soaking the inside of the gas tank in white vinegar to take care of rust, seems to be working pretty well. As soon as that's good to go, I can take the beast for a road test.
I have all the wiring in the headlight shell accounted for except for 1 blue wire. It has no connector and I don't see where it might go. I also don't have instrument lights, but I haven't dug too deep yet.
What a project this has turned out to be. I think it's been a test. Once it's sorted, I want to keep it, but I think I'll go look at a 2 year old Royal Enfield interceptor.
Attachments
Blue wire most likely power to the instrument lights.....it's what I've always found. Thinking one goes to the rear tail lamp also along with a yellow.
Sounds like you're getting on well.
Sounds like you're getting on well.
OK, I removed the RLU and did the jumper as noted in another thread. Didn't notice any difference in lighting between with three RLU and without it, everything still seems to work OK. I still have one blue wire in the headlight shell that I can't find a use for. The blue is half way between the instrument wire blue and the neutral light blue, and there's no power in it. Also, I don't see any place to connect the instrument lights to so I think I'll just tap into a red/white wire for power. I have to replace all the bulbs in the instrument housings as the only one not burned out is the high beam indicator. I removed the RLU as thar looks like a good place for the new fuse box. It looks like the white vinegar is working well removing the rust in the tank, so I'm about ready to rattle some small stones around in it and flush it out really well. It's a "standard" tank with non vacuum petcocks.
Carbs seem to be working well, but I have yet to ride the bike. Throttle response seems good, no hiccups, and it idles well at around 1200 rpm. Besides a good cleaning I replaced the choke plunger housing on the right carb, see photo in an earlier post, and new pilot jet (#30), main jet (140), and dropped the needles one groove. Also new float valve seats an plungers and set float levels. Road test will tell if I got it close.
Hope to have it all back together in the next couple of days. Going to pick up a Royal Enfield 650 INT this weekend. Love those 650 twins.
Similar threads
- Replies
- 0
- Views
- 220
- Replies
- 22
- Views
- 521