-
Enjoy XS650.com? Consider making a donation to help support the site.
XS650.com receives a small share of sales from some links on this page, but direct donations have a much greater impact on keeping this site going.
You are using an out of date browser. It may not display this or other websites correctly.
You should upgrade or use an alternative browser.
You should upgrade or use an alternative browser.
Later engine in older chassis
- Thread starter oldrider
- Start date
The bike is a 1979 Special. PO had messed up the wiring, the headlight was missing, as well as any wiring for the turn signals, and every connector in the headlight shell was undone. Everything is back together again including turn signals and new headlight, and everything works, except the instrument lights. The instrument light wires are blue so I thought the "mystery wire" was the power source. This wire runs from the headlight shell toward the rear through the main harness. I haven't found the other end, but there is no power, either with just the key on or with the engine running. As I mentioned before, I think my best option now is to splice the instrument light wires into a red/white connector and call it good. Time to move on to cleaning the tank and wiring the new fuse box and installing the pod filters and breather hoses.
If you study a '79 Special wiring diagram, you'll see the blue power wire from the instrument lights runs back through the harness and ties into the L/B coming out of the headlight safety relay and running to the RLU. When the headlight relay is tripped and sends power on the L/B to the RLU, it also gets sent up the blue wire to light the instruments.
Thanks, the under seat wiring is another rats nest. I'll see if the blue mystery wire actually is connected to the headlight relay through the blue/black wire. I'm not sure it does though as I'm not getting any voltage at all at the end in the headlight shell. I've spliced the instrument lights into the brown wire in the connector with the wires for the neutral light. If I can get power through the blue wire, I can easily remove my splice.If you study a '79 Special wiring diagram, you'll see the blue power wire from the instrument lights runs back through the harness and ties into the L/B coming out of the headlight safety relay and running to the RLU. When the headlight relay is tripped and sends power on the L/B to the RLU, it also gets sent up the blue wire to light the instruments.
So, now on to finish cleaning out and mounting the gas tank.
OK, I think the easiest way would be to just run a new wire from the instrument wires back to the safety relay. I tried checking continuity on the mystery wire to the relays at the rear and no joy.If you study a '79 Special wiring diagram, you'll see the blue power wire from the instrument lights runs back through the harness and ties into the L/B coming out of the headlight safety relay and running to the RLU. When the headlight relay is tripped and sends power on the L/B to the RLU, it also gets sent up the blue wire to light the instruments.
Also have a question. Will the vacuum petcocks work without being connected to the carb inlets. The tank I will use has a crossover tubing between the vacuum inlets on the petcocks. I presently have rubber caps on the vacuum ports on the carb spacers.
Thanks
Vacuum petcocks without vacuum will only flow on 'Prime' position, which is the whole tank, including reserve, so is of little use out on the road, leaving you high and dry.
I don't see any reason why you can't T into the crossover tube and run it from the inlet vacuum ports on the spacers.
Or, just run each petcock vac port to its own carb vac port.
I don't see any reason why you can't T into the crossover tube and run it from the inlet vacuum ports on the spacers.
Or, just run each petcock vac port to its own carb vac port.
That's probably what I'll end up doing for now, that is running tube from the carb vac port to the carbs. I would rather have non vacuum petcocks, but since this is what I have, I'll use them. I got the tank clean using white vinegar, so I guess I should take the petcocks apart to make sure there's no gunk inside.Vacuum petcocks without vacuum will only flow on 'Prime' position, which is the whole tank, including reserve, so is of little use out on the road, leaving you high and dry.
I don't see any reason why you can't T into the crossover tube and run it from the inlet vacuum ports on the spacers.
Or, just run each petcock vac port to its own carb vac port.
I don't have a lot of money in this project, but I have invested a lot of hours, and I've learned a lot in the process. Thanks again for all the comments and information.
Well, I got the tank installed and I did clean and used the vacuum petcocks which seem to be functioning fine. Before the rain started today I took the old beastie out for a short ride up and down the street. I did discover an oil leak which is bad enough to require attention before I register the bike. The leak is inside the left cover and I suspect it's the shifter rod seal, the clutch rod seal or the transmission output shaft seal. Primary suspect is the clutch rod seal and maybe the bushing too. The short ride was very rewarding after all the work. Other than the oil leak the bike seems to run well, brakes, clutch and lights all work. Still some cleanup on the wiring but overall very pleased.
Thanks for the info. This motor was supposed to have around 6500 miles on it when I bought it, but I had it stored for 20+ years before I did this project. I had removed the left side cover to convert it back to points ignition and there was a lot of crud built up around the area of the clutch rod and front sprocket. I cleaned it but figured it was built up chain lube and dirt. I think now I should just get new seals and be done with it. I'm real close to having the bike ready to ride but it's now become a rainy day project as I just bought a Royal Enfirld INT650
Latest update.
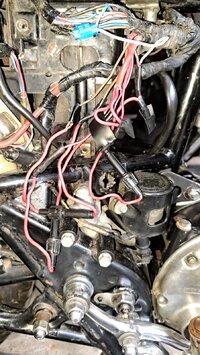
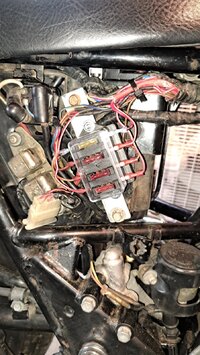
Well, bike is very close to being complete. Finally got the wiring cleaned up. 1st photo is the before and 2nd is with the new fuse box. I salvaged color matched wiring from my old junker to extend the wires that were too short. All splices were soldered and sealed with shrink tubing. Not perfect but serviceable. I installed the pod air filters today and modified the breather tubes with the brake booster one way valves, pretty neat. The bike starts, runs and responds to the throttle fine, when on the side or center stand. However, when I ride it, there's a hesitation and hiccup just off idle. Bike runs fine after that, goes up through the gears fine. Also when first starting using the choke, the first few seconds are fine, the engine speed goes up to around 3000 rpm. As soon as choke is opened rpm drops to around 1500 rpm.
This is how the carbs are jetted,
#140 main jet
#30 pilot jet
New stock needle jet
Jet needle clip in second groove down from top
New float valve and seat
Any ideas why there's the hiccup and hesitation when starting off under load? Throttle response is fine when on the stand.
From what I can see without removing the left side cover, the oil leak I have looks like it's coming from the clutch rod seal so I'll order the parts today.
Attachments
'79 carb set I presume? The jetting you've got in there is usually pretty good for the basic mods (exhaust and pods) but this carb set sometimes like another size up on the pilots (32.5). You can also fool with the mix screws. The factory recommended setting for this carb set is 2.25 turns out, but keep in mind, that is just a "ballpark" starting point. From there you need to fine tune the screws for best running. They should end up near that factory spec, but with larger pilots, maybe a little less (like 2 turns out).
Thanks 5twins. Yes, 79 carb set. I'll play with the mixture screws. Other than that, it seems to run OK. It's not registered yet so I can't do a plug check. Before I put it on the road, I need to fix the oil leak. What little I have ridden it though, I like it a lot.
Again, thanks for the help and comments you, and others on this forum, have given me.
Again, thanks for the help and comments you, and others on this forum, have given me.
You're more than welcome. This is a wonderful old bike and it's nice to see another one brought back to life. Granted, it is a little rough around the edges, but that just makes it a real motorcycle in my eyes.
I'd be interested in hearing more about your RE 650 and how you like it. I test drove one last year and am considering buying one myself.
I'd be interested in hearing more about your RE 650 and how you like it. I test drove one last year and am considering buying one myself.
Yes, bike is not the prettiest, but it has character. Chassis has 38k miles and shows it. Seat has no rips and it just feels right when I sit on it. The plan still is to get it fully functional this year. If I can get it on the road this fall, even better. I'm planning to paint the tank and side covers over the winter. Nothing fancy.
As I said, I just bought a 2021 Royal Enfield 650 Interceptor last week. It's used, but has less than 800 miles on it, just like new. Seems oil filters are hard to come by so I'm waiting for one to arrive. After I adjusted all the controls to suit me, I did about 50 miles and found the rear wheel to be badly out of balance. I removed 1 1/2 oz of weights and now it's fine. Got a wicked good deal on it and I'm very happy so far. Power is adequate, controls are light and it runs flawlessly, plus it will run on regular gas. It's the perfect 2 lane backroad bike.
I would update my profile with a list of bikes I have, but can't figure out how yet.
Here's a list of friends currently sharing the garage.
1994 Suzuki RF900
2007 Kawasaki 1600 Nomad (which I'll probably sell soon)
1969 Triumph Tiger 650
1973 Triumph T140 Bonneville
1979 Yamaha XS650 Special
1977 Yamaha XS650 Standard (the next project)
2021 Royal Enfield INT650
And sold last fall, original owner, 2001 Ducati 996
I would update my profile with a list of bikes I have, but can't figure out how yet.
Well, another day of 2 steps forward, 1+ steps back. I played with the mixture screws starting at 2 turns and worked 1/2 turn at a time. Still having issue with hesitation and hiccup until I got to 3 1/2 turns. Went up and down the road and bike ran really pretty well. Hesitation was barely noticeable and feeding the clutch out from a stop was fine. Put the bike back in the garage and this morning when I opened the door, gas was dripping out on the floor. The petcocks are the vacuum operated type and they were in good condition. Before I mounted the tank, I put gas in it, and let it sit. All seemed well until yesterday. Fortunately no harm done. I think possibly one of the float valves stuck also, but I didn't think the petcocks would allow gas flow without the engine running. Anyway, the vacuum stuff is going away. I have non vacuum petcocks and the seals I hope will stop the leaks coming.
I'm taking a break for a week and everything should be here when I get back.
I'm taking a break for a week and everything should be here when I get back.
Well, another day of 2 steps forward, 1+ steps back. I played with the mixture screws starting at 2 turns and worked 1/2 turn at a time. Still having issue with hesitation and hiccup until I got to 3 1/2 turns. Went up and down the road and bike ran really pretty well. Hesitation was barely noticeable and feeding the clutch out from a stop was fine. Put the bike back in the garage and this morning when I opened the door, gas was dripping out on the floor. The petcocks are the vacuum operated type and they were in good condition. Before I mounted the tank, I put gas in it, and let it sit. All seemed well until yesterday. Fortunately no harm done. I think possibly one of the float valves stuck also, but I didn't think the petcocks would allow gas flow without the engine running. Anyway, the vacuum stuff is going away. I have non vacuum petcocks and the seals I hope will stop the leaks coming.
I'm taking a break for a week and everything should be here when I get back.
Check the dipstick and make sure the gas didn't also fill up the engine sump. It happens.
Jim, thanks for that info. I was afraid that gas had gotten into the cylinders so I did pull the plugs and kick it through several times. There was a fair amount of vapor from the left side, none from the right. I'll leave myself a note to check the oil before I do anything else.
Thanks again.
Thanks again.
Well, I have a question for anyone. Do all xs650 gas caps have the 3 screws that retain the spring and gasket? The one I have in the best condition looks to have rivets instead of screws. Chrome is very good but it needs a gasket. Could this be an aftermarket flreplacement?
Thanks
Thanks
Similar threads
- Replies
- 0
- Views
- 222
- Replies
- 22
- Views
- 521