Ha! I was too fast! I should’ve shopped around! Thanks Jim
-
Enjoy XS650.com? Consider making a donation to help support the site.
XS650.com receives a small share of sales from some links on this page, but direct donations have a much greater impact on keeping this site going.
You are using an out of date browser. It may not display this or other websites correctly.
You should upgrade or use an alternative browser.
You should upgrade or use an alternative browser.
Mailman’s XS2 a full on restoration
- Thread starter Mailman
- Start date
One special feature that 5twins has warned to watch for, involving clones and counterfeits, is the unique Mikuni "square within a square" identifier. He knows that jets-r-us deals with only Mikuni parts, and warns to watch out for the other offerings...
Edit: Do a forum search on "mikuni square", posted by "5twins"...
Edit: Do a forum search on "mikuni square", posted by "5twins"...
Last edited:
Yeah... one thing I like about Niche Cycles is that they offer both Mikuni and brand X. They literally make you click on one or the other. If you choose brand X, you made a conscious decision to do it.One special feature that 5twins has warned to watch for, involving clones and counterfeits, is the unique Mikuni "square within a square" identifier. He knows that jets-r-us deals with only Mikuni parts, and warns to watch out for the other offerings...
One of 5twins' pics.

In this picture you can see a silhouette of the original gasket, showing where it was cut out in an arc linking two of the holes. Your new gasket isn’t. Is this relevant.Well, I went out to my shop this morning filled with fresh enthusiasm, determined to iron out my cranky carbs.
To begin, I reset my throttle stop screws and air mixture screws to baseline settings, then started my bike.
I got the idle set down low, around 1000 rpm, then tried to get the air mixture screws dialed in. All it wants to do is sputter, miss and pop and die. I tried and tried different settings but no joy. I have no interest in riding it in this condition, I want to figure out what is causing this. I am convinced it has an ongoing problem with the enrichening circuit or the idle circuit. Which leads me to this.
“Hello darkness my old friend, I’ve come to talk to you again.”
View attachment 139936
View attachment 139937
I am going to really get aggressive with cleaning out the air and fuel passageways this time. After removing all the jets and breaking down the carbs again. I shot an entire can of carb cleaner through all of the tiny passageways, paying particular attention to the air passages and the mixing screw passages. I would hold a blast of cleaner until I was seeing a liquid jet coming out the other end, then hold it some more.
I also wanted to take the opportunity to double check that all the jets were the correct size....they are.
View attachment 139943
I also sat down and really looked at my choke plunger, to assess the fit. I believe it fits like it should. It is a pretty close machine fit, you can just barely wiggle it, but if it were any tighter it wouldn’t move up and down easily.
View attachment 139939
I also wanted to give a close examination to the gasket I made for my choke assembly. Just to make sure I didn’t accidentally cover something I shouldn’t have.
View attachment 139941 View attachment 139942
Finally , I also wanted to be as accurate as possible with my bench set up, and make notes on how many turns I made on the throttle stop screws. Using 2Ms reference photo as a guide.
View attachment 139938
He said that he turned his throttle stop screw 1/2 turn past first contact to begin to expose the first transfer port.
For me to achieve that same exposure it took me 1 1/4 turns.
View attachment 139940
So the carbs are back together ( AGAIN ) on my bench, waiting to go back on.
I also got the petcocks installed in my XS2 tank today.
And one more thing. Remember when I painted my Motion Pro clutch cable silver, and said how nice it came out.
Well......something weird started happing, after days. The paint started becoming soft and sticky and rubbing off on anything it touched. The paint was clearly reacting to something in the cable sheath, so I removed the cable from the bike, took a rag and some lacquer thinner and cleaned it all off. It’s waiting to be re installed now.
So, I DO NOT RECOMMEND SPRAY PAINTING CABLES.
Until next time, hope springs eternal.
Bob
Wow lots of eyes on your restoration Mailman and it is nice to see the investigative work being helped out by all. I learned alot about plenty of topics in this one. Keep the knowledge and experience coming guys....I am just soaking it up!! 
You will be out in the wind shortly....its gonna be a beauty bike to see!!

You will be out in the wind shortly....its gonna be a beauty bike to see!!

Wow lots of eyes on your restoration Mailman and it is nice to see the investigative work being helped out by all.
You have no idea how many times I’ve hit a wall and was completely stumped until someone or a whole group of people helped me through it. I never would’ve attempted a restoration of this magnitude if I didn’t have confidence that the members of this forum could help me through it. It really is a great place.
WBacon
XS650 Member
Absolutely! By reading and following this thread I've learned so much about my own bike. The factory manual and this thread is about all a guy needsYou have no idea how many times I’ve hit a wall and was completely stumped until someone or a whole group of people helped me through it. I never would’ve attempted a restoration of this magnitude if I didn’t have confidence that the members of this forum could help me through it. It really is a great place.
So it seems you've discovered an error in the Carb Guide, or at least an area that could have been explained and clarified better. As mentioned above, the VM22/210 pilots used in the '76-'79 BS38s do not require the air holes, and as also mentioned, the BS30/96 pilots used in the '75 and older BS38s most likely do need them. I didn't have an early float bowl available back then to examine so I just assumed ..... and you see what often happens when you do that, lol.
I think the no-hole style BS30/96 jets you got are actually another pilot jet type, the N151.067. They look just like a BS30/96 with the metering orifice on the bottom but they have no bleed holes in the sides .....

So, the lack of bleed holes would explain your rich running and black plugs. Those pilots were most likely flowing all fuel and not a fuel/air mix like they are supposed to.
I think the no-hole style BS30/96 jets you got are actually another pilot jet type, the N151.067. They look just like a BS30/96 with the metering orifice on the bottom but they have no bleed holes in the sides .....
So, the lack of bleed holes would explain your rich running and black plugs. Those pilots were most likely flowing all fuel and not a fuel/air mix like they are supposed to.
So it seems you've discovered an error in the Carb Guide, or at least an area that could have been explained and clarified better. As mentioned above, the VM22/210 pilots used in the '76-'79 BS38s do not require the air holes, and as also mentioned, the BS30/96 pilots used in the '75 and older BS38s most likely do need them. I didn't have an early float bowl available back then to examine so I just assumed ..... and you see what often happens when you do that, lol.
I think the no-hole style BS30/96 jets you got are actually another pilot jet type, the N151.067. They look just like a BS30/96 with the metering orifice on the bottom but they have no bleed holes in the sides .....

So, the lack of bleed holes would explain your rich running and black plugs. Those pilots were most likely flowing all fuel and not a fuel/air mix like they are supposed to.
Perfect! Thanks for your thoughts on that. I have a new set of jets in the way! I’ve gotta say , this was a real head scratcher. I was driving myself crazy trying to figure out what I did wrong.
Oh my gosh you really stood your ground and got something sorted out !I’ve gotta say , this was a real head scratcher. I was driving myself crazy trying to figure out what I did wrong.
Another example of your determination .
Good work Bob and all those who've contributed with this mystery.
Thumbs crossed!
So it seems you've discovered an error in the Carb Guide, or at least an area that could have been explained and clarified better. As mentioned above, the VM22/210 pilots used in the '76-'79 BS38s do not require the air holes, and as also mentioned, the BS30/96 pilots used in the '75 and older BS38s most likely do need them. I didn't have an early float bowl available back then to examine so I just assumed ..... and you see what often happens when you do that, lol.
I think the no-hole style BS30/96 jets you got are actually another pilot jet type, the N151.067. They look just like a BS30/96 with the metering orifice on the bottom but they have no bleed holes in the sides .....

So, the lack of bleed holes would explain your rich running and black plugs. Those pilots were most likely flowing all fuel and not a fuel/air mix like they are supposed to.
OK - well, this the right time to find an error in the carb guide. Grizld1 and I were discussing it at the Rally on Saturday and he is about to make some revisions to suppliers etc. so he can add this note about pilot jets for early carbs.
Pete
Last edited:
THE THIRD TIME’s A CHARM. 
This morning I went out to my shop and went straight at my carburetors. Steve (2M) made an astute observation the other day. He was looking at photos of my carburetor parts and spotted a problem. He observed that my pilot jets were the wrong style.
So I went through my old parts and found my original jets, and sure enough, they looked like the ones that 2M showed me.
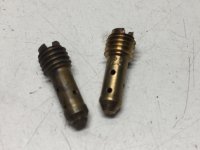
So I ordered some new, correct style jets, and in the meantime, I cleaned these up and installed them.
Before I re installed my carburetors and air boxes, I had a few loose ends to take care of first. One was to get a clutch cable back on my bike. I decided to give my new silver cable from Mikes another try. I absolutely greased the snot out of it and put it on. And well.......hell. I still don’t like it. So off it came and the Motion Pro cable went back on. Ahhh.....there it is......my butter smooth clutch is back.
Then I had to put the shifter lever and foot peg back on, And Then....another job that needed doing. Remember that metric thread repair kit I bought? I took a go at repairing the stripped out side cover mounting holes in my frame. The new repair kit is a real value item, and it worked great.
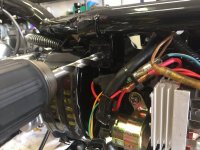
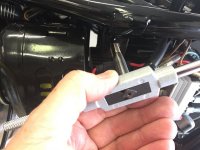
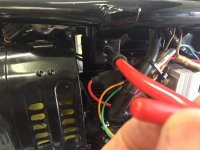
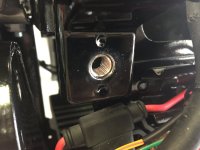
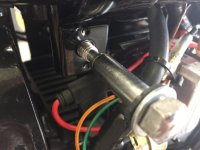
The repaired threads are nice and solid, I used red locktite on the thread inserts.
True confession time , I tried to cheap out on this repair first. I stirred up a little JB Weld and smeared into the worn out threads and then re tapped them after it set up. Yeah......FAIL.
So now my carburetors and air boxes can go back on!
Still using the white gas tank off of my other bike. I need to get some gas for my red tank, and I wanted to give the petcocks some time to seal.
Hooked up the gas lines, turned on the petcocks , hit the starter button, and well......see for yourself.
Right outa the box, as soon as I started it, I knew it was right. I have to tell you I was really beginning to doubt myself. I thought that maybe I had done something fundamentally wrong during my rebuild. I was beginning to think it may never run right.
A special shout out to 2M for getting me back on track! You rock brother!

Tomorrow, I have just a few details to get done. Get some gas in the tank, side covers on , license plates and mirrors and seat on. Then..........
MY BIKE WILL BACK ON THE ROAD FOR THE FIRST TIME SINCE 1985!!!
Arizona has these cool, solid copper historic plates.

So...will tomorrow be the happy culmination of over a years hard work, or will I be pushing a very pretty boat anchor back home?
Tune in tomorrow , same bat time, same bat channel!

Fingers crossed!!!
Bob

This morning I went out to my shop and went straight at my carburetors. Steve (2M) made an astute observation the other day. He was looking at photos of my carburetor parts and spotted a problem. He observed that my pilot jets were the wrong style.
Well, Bob. There it is!
It's your pilot jets.
You have the wrong type, missing the side aerator holes, like this.
View attachment 139948
So I went through my old parts and found my original jets, and sure enough, they looked like the ones that 2M showed me.

So I ordered some new, correct style jets, and in the meantime, I cleaned these up and installed them.
Before I re installed my carburetors and air boxes, I had a few loose ends to take care of first. One was to get a clutch cable back on my bike. I decided to give my new silver cable from Mikes another try. I absolutely greased the snot out of it and put it on. And well.......hell. I still don’t like it. So off it came and the Motion Pro cable went back on. Ahhh.....there it is......my butter smooth clutch is back.
Then I had to put the shifter lever and foot peg back on, And Then....another job that needed doing. Remember that metric thread repair kit I bought? I took a go at repairing the stripped out side cover mounting holes in my frame. The new repair kit is a real value item, and it worked great.


The repaired threads are nice and solid, I used red locktite on the thread inserts.
True confession time , I tried to cheap out on this repair first. I stirred up a little JB Weld and smeared into the worn out threads and then re tapped them after it set up. Yeah......FAIL.
So now my carburetors and air boxes can go back on!
Still using the white gas tank off of my other bike. I need to get some gas for my red tank, and I wanted to give the petcocks some time to seal.
Hooked up the gas lines, turned on the petcocks , hit the starter button, and well......see for yourself.
Right outa the box, as soon as I started it, I knew it was right. I have to tell you I was really beginning to doubt myself. I thought that maybe I had done something fundamentally wrong during my rebuild. I was beginning to think it may never run right.
A special shout out to 2M for getting me back on track! You rock brother!
Tomorrow, I have just a few details to get done. Get some gas in the tank, side covers on , license plates and mirrors and seat on. Then..........
MY BIKE WILL BACK ON THE ROAD FOR THE FIRST TIME SINCE 1985!!!

Arizona has these cool, solid copper historic plates.
So...will tomorrow be the happy culmination of over a years hard work, or will I be pushing a very pretty boat anchor back home?
Tune in tomorrow , same bat time, same bat channel!
Fingers crossed!!!
Bob

Thanks DoubleE ! 
Haha, absolutely well done, Bob. Sounds great!
You just made my day.
Glad that the helicoil kit worked in there. I bought the same kit a couple months ago, have yet to use it. Thanx for trailblazing.
Soon you'll be feeling thesand wind in yer face...
You just made my day.
Glad that the helicoil kit worked in there. I bought the same kit a couple months ago, have yet to use it. Thanx for trailblazing.
Soon you'll be feeling the
Haha, absolutely well done, Bob. Sounds great!
You just made my day.
Glad that the helicoil kit worked in there. I bought the same kit a couple months ago, have yet to use it. Thanx for trailblazing.
Soon you'll be feeling thesandwind in yer face...
Haha! Thanks 2M , something else funny I forgot to mention. While I had it running this morning, I was turning the handlebars back and forth to check for cable free play. The bike was idling nicely and every time I turned the handlebars VROOM! I didn’t leave any free play in my throttle cables when I first adjusted them. I’m happy I didn’t find that out on my first test ride!
