Miss November XS2 tribute

Drained the oil:


PICT2108.JPG


A downside of the spin-on filter - makes draining the oil very messy. Took out the gearbox drain plug and some of the oil exited into the pan. But there is no alternative to unscrewing the filter to drain the rest - after a few turns it firstly seeps and then gushes around the edge of the filter. Goes pretty much everywhere. Yech!
 
Since you are not reusing the filter couldn't you just punch a hole in the bottom of it?

And let it drain, leave for a while then spin it off? You know, I think you might be on to something there . . .

Today, knew I was in for at least some mess anyway 'coz I was gonna take the sump off.
 
This power switching kind of regulator is known as a "B" type. On your "new" later stator, the brushes are wired opposite. The inner brush is fed constant switched power, it's powered any time the key is on. The outer brush is fed a regulated ground from the regulator. This ground switching kind of regulator is known as an "A" type.

Bought this:

PICT2109.JPG


Followed the advice of Paul Sutton, 2M and others on this forum and searched for Fiat 4475112.

Surprised, now it has arrived, how small & neat the unit is - fingers give size comparison.

The next question is going to be how do I wire it up to the alternator and rectifier. But haven't got that far along just yet.
 
You needn't worry about the rectifier. It is a separate stand alone unit on your bike and not interconnected to or with the regulator at all. You will simply be swapping regulators. Your current regulator has 3 wires, a brown, a green, and a black. Brown is switched power into the unit, green is the regulated signal out to the brush, and black is a ground wire. Connect the Fiat green to your green and the red to your brown. The Fiat regulator doesn't have or need a ground wire run into it, it grounds through it's case when you mount it .....

0aV3UVK.jpg


However, keep in mind that mounting on the side of the battery box is not a suitable ground because the box hangs on rubber mounts. You would need to run a ground wire from one of the Fiat mounts to that black wire in the harness or to the main frame. Also keep in mind that you can't install this thing until you swap engines. It won't work with your current charging system.
 
5T, thank you for another helpful answer. Sounds like basically wire it in place of the old regulator - bit of a cinch. Will possibly make a small mounting plate and use the old reg's mounting holes while ensuring there's a good earth. Or ground as one might say.


Also keep in mind that you can't install this thing until you swap engines. It won't work with your current charging system.

I'm already onto that!

PICT2111.JPG


Chain pulley pressed into service again. Willing assistant - she insists she really is happy to help out in the garage, especially since I help her with the gardening - pulled the lifting chain while I controlled the swing as the engine came out of the frame.

With the 447 now sitting on the work table, it occurred to me that it has changed status. It is now the Spare.

The eagle eyed may spot that a Boyer Bransden rotor has found its way into the 2F0 camshaft . . .
 
Last edited:
The next question is going to be how do I wire it up to the alternator and rectifier. But haven't got that far along just yet.
Here's a schematic for the A type system Raymond. Link.
Edit: Just reread and noticed you're keeping your original rectifier. So never mind.:rolleyes:
 
You can also remove the stock electronic ignition pick-up and it's associated wiring from the later stator if you like. No need or use for it with your Boyer.

Intend to.

Fortunately, the wires leave the alternator housing as two bundles which makes it easy peasy. Almost as if the CDI pickup was an afterthought.
 
Quick look at the 2F0 engine.

Pulled the CDI off.

The 17mm rotor nut is too loose, haven't fitted a kicker yet, so didn't turn the engine very far. But able to place at tdc and checked the valve clearance on r/h cylinder. Inlet 2 thou feeler loose but 3 won't fit. Exhaust 4 was a tightish sliding fit. So call it 3 and 4 thou? Is that a bit tight?

Peering in with a torch, I can't see any sign at all of wear on the cams.

Did Yam ever apply silicone in the factory? Some has been applied to all four tappet covers.

Betcha if you bend that sprocket tab washer flat the sprocket nut is finger tight..
:pimp:

Hi Machine, either finger tight or done up so hard it takes extreme measures to remove it.
There don't seem to be any middle ground in undoing that nut.

Machine, you win the cigar. Without even loosening the tab washer, I can wiggle the sprocket nut coupla mm.
 
The eagle eyed may spot that a Boyer Bransden rotor has found its way into the 2F0 camshaft . . .
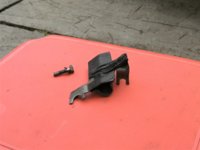
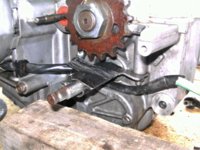
The eagle eyed will no doubt have spotted before I did that there is no gear change shaft guard.

Also, discovered one bolt missing from the starter motor cover - these are of course related issues.

No problemo, remove guard from Spare and clean it up a bit:


PICT2115.JPG


Clearly, it's had a hard life. Goes with the territory where it has lived for 40-plus years. Poor thing deserves a rest. But unfortunately, it's not going to get one:


PICT2117.JPG


Coated the gear change shaft with grease first and whanged the guard on. The bolt that secured it on the 447- replaces the missing one on the new engine. I assume that the alternator cable routes behind the tab that locates to the starter motor cover?

Nice to have time to mess about with these little issues. No real sense of urgency to get the bike back on the road . . .

If anybody reads that in a few years time, the significance will be lost?
 
Yes, do make sure to route that alternator wiring loom behind the shift shaft guard or you could end up with this .....

PT0A2JD.jpg


zPRZYsq.jpg


This is what caused my $200 Special's charging issues and why the owner stopped driving it. Of note, you also appear to be missing the wire loom clip that attaches to the engine case behind and just to the rear of the sprocket. You'll need to rig something up for that, something to hold the loom in against the case and away from the chain.
 
Yes, do make sure to route that alternator wiring loom behind the shift shaft guard or you could end up with this .....

Ouch!

This is what caused my $200 Special's charging issues and why the owner stopped driving it. Of note, you also appear to be missing the wire loom clip that attaches to the engine case behind and just to the rear of the sprocket. You'll need to rig something up for that, something to hold the loom in against the case and away from the chain.

There is a little clip that was attached to the alternator wiring. I'll find it or rig up something to retain the cable. Does it attach to the rear shift shaft guard mount?

While the engine is out, gonna go over the bike and tidy up somewhat. For example, may use cable ties to secure any bits of wiring that aren't snug.
 
Yes, that's where it goes. It was peened on so yes, re-fit and try to re-peen it so it stays put. Here's a little better pic of it .....

F9xPEtS.jpg


If you can't repair it then I suppose you could make one to fit on that rear shift guard bolt.
 
The eagle eyed will no doubt have spotted before I did that there is no gear change shaft guard.
Also, discovered one bolt missing from the starter motor cover - these are of course related issues.
No problemo, remove guard from Spare and clean it up a bit:
View attachment 164326
Clearly, it's had a hard life. Goes with the territory where it has lived for 40-plus years. Poor thing deserves a rest. But unfortunately, it's not going to get one:
View attachment 164329
Coated the gear change shaft with grease first and whanged the guard on. The bolt that secured it on the 447- replaces the missing one on the new engine. I assume that the alternator cable routes behind the tab that locates to the starter motor cover?
Nice to have time to mess about with these little issues. No real sense of urgency to get the bike back on the road . . .
If anybody reads that in a few years time, the significance will be lost?
Hi Raymondo
alternatively, you could move that shaft-guard to your "useless item" shelf.
IMHO "neither use nor ornament" is it's best description. It's use prevents installing an 18T front sprocket
even with normal chain and won't let you run H-D or O-ring chain on the stock 17T front sprocket.
My XS650 has been running an O-ring chain/17T without a shaft guard ever since the bike's original el-cheapo chain set
wore out and yes, the shifter shaft has had two little polished grooves in it since 1989 but they ain't gotten any deeper since.
 
When I took the sprocket off yesterday, quite surprised how set in the rust was. Well, it's a forty-year old engine.

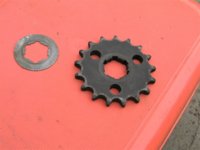
Soaked sprocket and tab washer overnight in vinegar, then wiped them off this morning:


PICT2121.JPG


It's a technique I've never used before and I'm very pleased with how well it has worked. Think I saw it one of those 1001 Things Our Grandmas Knew books.

Since taking the picture, coated both with Harley-Davidson SAE 90 gearbox & transmission oil. Good a use for it as any?
 
As you're probably aware, the sprocket nut needs to be very tight, like 90 ft/lbs tight, to prevent oil leaks. We're attempting to seal the back of the sprocket to a short sleeve fitted onto the countershaft through the seal, and also seal the inner end of that sleeve to a bearing race inside. If too loose, oil can and does run out along the splined shaft .....

YVfRgnj.jpg


You've probably also noticed that the sealing surface on the sprocket isn't really smooth, it's sort of textured. So, to aid it in sealing to the sleeve, I put gasket sealer on it. I also apply some to the back of the lock washer and the nut .....

BkG5dv2.jpg


DhESc45.jpg


Heiden sells an improved sleeve with an o-ring groove and o-ring for better sealing .....

https://www.heidentuning.com/xs650-...on/transmission-bushing-main-axle-detail.html
 
Back
Top