I agree. I encourage you to asap get the bike out on the road and thoroughly test the tranny under hard acceleration in all gears.It is just above that, visible by looking through wind screen a bit. You're correct though, I won't see it when riding. I'm getting too fussy with this bike. I need to focus on the mechanical issues.
-
Enjoy XS650.com? Consider making a donation to help support the site.
XS650.com receives a small share of sales from some links on this page, but direct donations have a much greater impact on keeping this site going.
You are using an out of date browser. It may not display this or other websites correctly.
You should upgrade or use an alternative browser.
You should upgrade or use an alternative browser.
My next Yamaha project
- Thread starter TX650A Van Islander
- Start date
Will do that asap. This weekend is carb rebuild so hopefully that goes well. The weather may allow riding by March/April so hopefully have a plate by then. I understand your concern for the transmission.I agree. I encourage you to asap get the bike out on the road and thoroughly test the tranny under hard acceleration in all gears.
Have now started on the carbs. What is anyone's experience with polishing emulsion tubes/needle jets with steel wool, inside and out? Saw a guy do this on YouTube...
Seems like a good idea to reduce rough spots but I do know these wear out so? This photo of the emulsion tube is after cleaning with carb cleaner and blow out with air. The bolt is a drift I made to get the tub out and back in. Other photos


 of before and setting up for the job.
Seems like a good idea to reduce rough spots but I do know these wear out so? This photo of the emulsion tube is after cleaning with carb cleaner and blow out with air. The bolt is a drift I made to get the tub out and back in. Other photos
If you clean the outside of the tube it shouldn’t affect performance unless you clean or polish too much where it fits into the carb body. You want that to remain a fairly snug fit. Don’t know about cleaning the needles with an abrasive though. Can you replace them if bad? Cleaning the inside of the tube (where the needle passes), plus polishing the needle will increase the gap and theoretically richen the mixture - enough that it makes a difference - dunno.Have now started on the carbs. What is anyone's experience with polishing emulsion tubes/needle jets with steel wool, inside and out? Saw a guy do this on YouTube...
Seems like a good idea to reduce rough spots but I do know these wear out so? This photo of the emulsion tube is after cleaning with carb cleaner and blow out with air. The bolt is a drift I made to get the tub out and back in. Other photos View attachment 260181View attachment 260182View attachment 260183of before and setting up for the job.
I have rebuilt several carbs including 3 4 cylinder XJ650 carbs and each time for the brass I start off by doing an ultrasonic cleaning. Then I go with Polishing.
Something like flitz which is what I have handy. If flitz does not take stuff off, I might take a high # sandpaper (1000 or 2000) and wet sand.
Always take pick to the emulsion tube holes but not trying to expand or anything.
In the carb rebuilding I always try to re use the stock brass parts cause often the rebuild kits brass parts fit poorly or are questionable.
If I mess up the brass, then I will be forced to use brass from the kit.
Finished up the carbs today. I didn't polish the emulsion tubes in the end, but did clean them well. I replaced the pilot jets and kept everything else, which were all stock sizes. New o-rings installed. All JIS screws replaced with Allen bolts.  Everything is buttoned up, ready for installation.


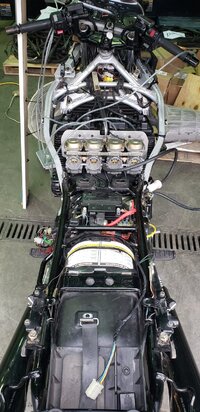
Everything is buttoned up, ready for installation. This past week I got the carbs installed and yesterday it flashed right up as soon as the fuel pump was finished filling up the system! I built myself a manometer to tune the carbs but I think I need some more robust tubing. The wall thickness of the 3/16" ID tubing I used is pretty thin and it succumbed to the heat from the engine. Today I inserted 1/16 welding contact tips to reduce the flutter in the fluid (2 stroke oil) and used some more robust tubing to connect to vacuum ports so no melting. It worked ok but going to check it out with a set of guages a friend has. I couldn't get it perfect but maybe I didn't create this tool properly either. It is idling nicely though. Stoked to get the plastics sorted and installed. New Bridgestone Battlax BT-46 on order for the original wheels now and will drop the wheels off this week at the bike shop.
The video is from this am. Airbox etc all installed. Again, thank God for the parts bike as the fuel guage and clock from that cluster works! I'll be fiddling with guages exchange today.
The video is from this am. Airbox etc all installed. Again, thank God for the parts bike as the fuel guage and clock from that cluster works! I'll be fiddling with guages exchange today.
Attachments
Excellent!!This past week I got the carbs installed and yesterday it flashed right up as soon as the fuel pump was finished filling up the system! I built myself a manometer to tune the carbs but I think I need some more robust tubing. The wall thickness of the 3/16" ID tubing I used is pretty thin and it succumbed to the heat from the engine. Today I inserted 1/16 welding contact tips to reduce the flutter in the fluid (2 stroke oil) and used some more robust tubing to connect to vacuum ports so no melting. It worked ok but going to check it out with a set of guages a friend has. I couldn't get it perfect but maybe I didn't create this tool properly either. It is idling nicely though. Stoked to get the plastics sorted and installed. New Bridgestone Battlax BT-46 on order for the original wheels now and will drop the wheels off this week at the bike shop.
The video is from this am. Airbox etc all installed. Again, thank God for the parts bike as the fuel guage and clock from that cluster works! I'll be fiddling with guages exchange today.
Nice work! Sounds great!
The sound of that engine is for me a sweet blast from the past.
.
Thanks YamadudeExcellent!!
Nice work! Sounds great!
The sound of that engine is for me a sweet blast from the past.
.

I'll post some more running videos.
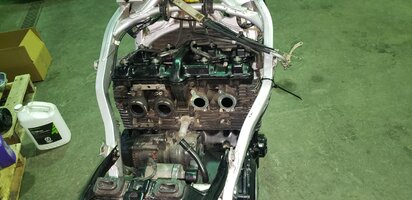
Do these two bikes have that goofy cross passage tube that ties all the intakes together?
Enquiring minds.
Enquiring minds.
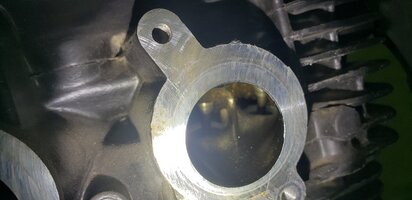
No. This was when I was replacing the o-rings on each intake. There is a recessed groove in each one for the o-ring.Do these two bikes have that goofy cross passage tube that ties all the intakes together?
Enquiring minds.
The head has a great shape going into each valve.
Attachments
Sounds great! You’ll be riding it soon!This past week I got the carbs installed and yesterday it flashed right up as soon as the fuel pump was finished filling up the system! I built myself a manometer to tune the carbs but I think I need some more robust tubing. The wall thickness of the 3/16" ID tubing I used is pretty thin and it succumbed to the heat from the engine. Today I inserted 1/16 welding contact tips to reduce the flutter in the fluid (2 stroke oil) and used some more robust tubing to connect to vacuum ports so no melting. It worked ok but going to check it out with a set of guages a friend has. I couldn't get it perfect but maybe I didn't create this tool properly either. It is idling nicely though. Stoked to get the plastics sorted and installed. New Bridgestone Battlax BT-46 on order for the original wheels now and will drop the wheels off this week at the bike shop.
The video is from this am. Airbox etc all installed. Again, thank God for the parts bike as the fuel guage and clock from that cluster works! I'll be fiddling with guages exchange today.
I am getting close! Plastic bits of the broken fairing connections glued and stitched together and mounted the fairing and lower cowling today. Tail section was installed yesterday. Oil and filter change yesterday too. Today a friend brought over a very nice carb tuner and I got them dialed in a bit better than the video:
This is how she looks now. This week I'll take the wheels into Mile Zero Motorsports in Ladysmith and have the new Bridgestone Battlax BT-46s installed. I'm happy I went back to the stock 16" rear wheel vs 17". I just think it looks better on this old motorcycle. I couldn't use the crappy setup which was on the bike when I bought it anyway.


This is how she looks now. This week I'll take the wheels into Mile Zero Motorsports in Ladysmith and have the new Bridgestone Battlax BT-46s installed. I'm happy I went back to the stock 16" rear wheel vs 17". I just think it looks better on this old motorcycle. I couldn't use the crappy setup which was on the bike when I bought it anyway.
This one for Yamadude:
You’re doing very nice work on that bike, I’m sure you’re going to have a blast riding it! 
Thanks BobYou’re doing very nice work on that bike, I’m sure you’re going to have a blast riding it!
")
It will be the sort of bike I could ride down to Arizona! It is not a show bike but a nice 10 to 15 foot rider.
This past Friday I picked up the new tires installed on the original 1989 wheels.
Today I removed the brake pads and cleaned up the calipers, tested the pistons moving freely, replaced the brake fluid, and installed the wheels. I also installed the new petcock and the fuel guage float and tested the tank for leaks. Tank and some fairings now installed. This week I will finish fixing the front fender and get the fairings and windscreen installed


Today I removed the brake pads and cleaned up the calipers, tested the pistons moving freely, replaced the brake fluid, and installed the wheels. I also installed the new petcock and the fuel guage float and tested the tank for leaks. Tank and some fairings now installed. This week I will finish fixing the front fender and get the fairings and windscreen installed
Last edited:
That’s one sharp looking machine! Great colours. Looking forward to seeing the final pictures and your report on the first ride.!This past Friday I picked up the new tires installed on the original 1989 wheels.
Today I removed the brake pads and cleaned up the calipers, tested the pistons moving freely, replaced the brake fluid, and installed the wheels. I also installed the new petcock and the fuel guage float and tested the tank for leaks. Tank and some fairings now installed. This week I will finish fixing the front fender and get the fairings and windscreen installed
View attachment 261586View attachment 261587View attachment 261588View attachment 261589
Last edited:
Bike is looking remarkably good after all your efforts. Really clean and straight machine without any unnecessary add ons. No doubt it will be a blast to ride.This past Friday I picked up the new tires installed on the original 1989 wheels.
Today I removed the brake pads and cleaned up the calipers, tested the pistons moving freely, replaced the brake fluid, and installed the wheels. I also installed the new petcock and the fuel guage float and tested the tank for leaks. Tank and some fairings now installed. This week I will finish fixing the front fender and get the fairings and windscreen installed
View attachment 261586View attachment 261587View attachment 261588View attachment 261589
Cracking job well done

GaryInVA
XS650 Enthusiast
Fantastic looking rebuild. Congrats on the new rider.
Similar threads
- Replies
- 65
- Views
- 3K
- Replies
- 6
- Views
- 2K
- Replies
- 785
- Views
- 81K