Videos have there place but for me a Tutorial or well constructed thread with pics is far better.
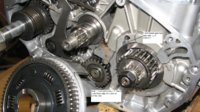
Here is a link to a thread on the clutch and its correct assembly and the alined index hole, #13.This is very important
http://www.xs650.com/forum/showthread.php?t=28286
Here is a link to a thread on the clutch and its correct assembly and the alined index hole, #13.This is very important
http://www.xs650.com/forum/showthread.php?t=28286


.jpg")

