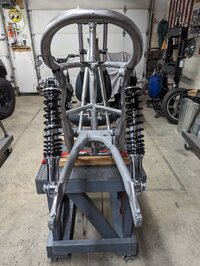
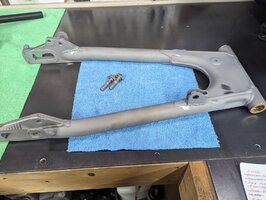
Awesome! Thanks Jim!I welded up all the open seams on my swingarm. Before you start, measure the distance between the axle plates. The heat will distort it. Then use a jack to open it back out to the correct distance.
View attachment 258661
-
Enjoy XS650.com? Consider making a donation to help support the site.
XS650.com receives a small share of sales from some links on this page, but direct donations have a much greater impact on keeping this site going.
You are using an out of date browser. It may not display this or other websites correctly.
You should upgrade or use an alternative browser.
You should upgrade or use an alternative browser.
New here!
- Thread starter Peepz
- Start date


Spent the weekend preparing this wheel for a trial run with the powder coat, had to build a makeshift stand out some scrap for the wheel to sit in the oven at 40° tilt, only way it'll fit, most the day was blasting and grinding off all the unwanted casting marks. This particular wheel has the most runout wobble out of the ones on the shelf so it's a good test wheel, may still use it if it comes out ok.


The powder coating came out really well. This was more of a test for my method as I've never attempted three coats. Black, two-toned with the green metal flake, then clear. Came out great but I'm pretty sure I'm going to choose a different color other than the green, I like it, there just isn't enough contrast there to please the eye. The two-tone pattern is the same as the stock wheel coating. Guess this one will end up being a clock for the shop


Hey guys, jumped back over to 81' daily rider, she's still a little rough looking and I kind of prefer that, just abusing her until a full rebuild once the 80' is done. BUT, I was looking at the seat the other day and decided I would treat her to a diet. So I went at fitting a counter balance seat I had ordered for the 80'. It was a fun little upgrade and came out pretty cool!

Started by shaving all the junk off the rear rail.


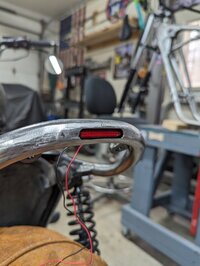
I then frenched in a rear tail light box.


I also used the front of the original rear fender, welded on a fabbed up seat pan, then used the front piece of a front fender welded onto the rear of the pan for a very well fitting fender.


I then moulded in some run/turn/stop signal lights and fabbed up a rear shock mount plate holder, lights for the plate will be ran through the swingarm at a later date, I have to do bronze bushings soon anyway.

Did a little powder coating, as I work on this bike more in the future I will continue to coat parts this metallic black color, may look a tad off at first as these are the only pieces this color right now, but it will tie together in the future.


Wired everything up and set the seat! I think she looks a lot better! Obviously the tank paint needs work, I'm toying around we with powder coating this as well, the front shocks are getting a full rebuild with lowering blocks soon, those will be coated at that time as well. Cheers!
Started by shaving all the junk off the rear rail.
I then frenched in a rear tail light box.
I also used the front of the original rear fender, welded on a fabbed up seat pan, then used the front piece of a front fender welded onto the rear of the pan for a very well fitting fender.
I then moulded in some run/turn/stop signal lights and fabbed up a rear shock mount plate holder, lights for the plate will be ran through the swingarm at a later date, I have to do bronze bushings soon anyway.
Did a little powder coating, as I work on this bike more in the future I will continue to coat parts this metallic black color, may look a tad off at first as these are the only pieces this color right now, but it will tie together in the future.
Wired everything up and set the seat! I think she looks a lot better! Obviously the tank paint needs work, I'm toying around we with powder coating this as well, the front shocks are getting a full rebuild with lowering blocks soon, those will be coated at that time as well. Cheers!
Attachments
Sweet!!!
That looks great! Nice job…..
Really nice work! Looking forward to seeing the end result! 
I see a bare frame in the background. Is that what your going to put the dual ft brakes on? Also a 40 ford hood, dash and headlight rings. Do you have a 40?
Nice build by the way.
Nice build by the way.
Haha! Good eye man! Ya, the bare frame is the 80', the dual brakes are indeed destined for that! And that sure is a 40 hood! We have a 40 standard that is in the middle of being built as well, we saved a 58' Olds 371 J2 engine that will eventually be it's power plant, I'm pretty far on the sheet metal work as it was rear ended in a previous life. Currently focusing on the XS's, but I will eventually get back to it soon.I see a bare frame in the background. Is that what your going to put the dual ft brakes on? Also a 40 ford hood, dash and headlight rings. Do you have a 40?
Nice build by the way.
I had a couple of 40 Deluxe coupes with the usual "Ho Hum" small block Chevy`s but a Rocket 88 with 3-2`s is what God intended for the 40 ford motor to be. That`s why he invented it in the first place.
I had a couple of 40 Deluxe coupes with the usual "Ho Hum" small block Chevy`s but a Rocket 88 with 3-2`s is what God intended for the 40 ford motor to be. That`s why he invented it in the first place.
I couldn't agree more! The triple-deuces will look great under that (louvered) hood.
There is a smaller community of GM devotees not committed to SBCs. I know very little about them. @Ben1 and I built a very "stout" Buick 455 for his 67 Riviera years ago.I had a couple of 40 Deluxe coupes with the usual "Ho Hum" small block Chevy`s but a Rocket 88 with 3-2`s is what God intended for the 40 ford motor to be. That`s why he invented it in the first place.
[/Q1UOTE]
Last edited:
About 1970 my dad bought my mom a '67 Buick Electra 225 (Deuce and.a Quarter if you will). That Buick had a 430 4V, Wildcat Power V8. It was an absolute torque monster. At 15 I dreamed of sliding it into one of those Bird Automotive '23 T kit cars.
Good ole days.
Good ole days.
Decided I need the front end of the 81' a little lower. I have a spare set of forks I'm rebuilding with damnper valves and lowering blocks for a quick swap when done. My question pertains to the studs on bottoms of the left front shock? The set I have looks a little too pitted to reuse, plus it would be a little easier to powder coat these without the studs installed anyway? What's the preferred method for removing these? Heat the shock body? I only ask because rust/steel/aluminum combo never ends well for me
 .
.

.yeah heat and double nut or a stud puller they should come out.
From here only one looks bad?
From here only one looks bad?
 What Gary said.... pen. oil, heat and double nut.
Since you have a welder.... sometimes I'll just weld a nut to the stud instead of double nuts. Gives a solid purchase and the heat from welding helps break up the rust and thread locker inside the fork hole.
Thanks Gary! Heat and double nut worked!yeah heat and double nut or a stud puller they should come out.
From here only one looks bad?
Thanks Jim! The welder was my next move! Appreciate the help guys!
Since you have a welder.... sometimes I'll just weld a nut to the stud instead of double nuts. Gives a solid purchase and the heat from welding helps break up the rust and thread locker inside the fork hole.