Operation Street Tracker

Street Tracker, keep the pictures coming. And by the way, your uncle Ron was one of THE dudes...

Will do and you do the same if you have anymore of these old pics please. Yes he was one of THE dudes and the son of a bitch is still fast at 70 believe it or not and looks the same when you see him out there on the track undeniably Ron Moore weather you get to see him coming or going it definitely one or the other! Jim Wood has put some rides together for him and calls him the "Living Legend" and I think he has ridden Mr Ed's Yamaha 650's a couple times also he told me he he missed a shift scattered the holy crap out of one of them too! He still lives down south four hours away for me so I don't get to be apart seeing him as much as I would like too.
 
Big brown truck was in the neighborhood today! He dropped off the Avon Road Runner AM 26 100/90/19 multi-directional tires. Went with a DOT for now for a couple reasons cost and I still have to go for a VIN check for registration once I get enough motorcycle together to pull it off, the more DOT compliant stuff the better. Plan to put dirt tracker tires on when she is all said and done but I just need so much right now and want to get a roller rolling.
 

Attachments

  • IMG_0439.jpg
    IMG_0439.jpg
    172.7 KB · Views: 190
Hey Donny! Glad to see you're movin' along. Great back story! Did you get a title with the bike? If so when was it last registered?
 
Hey Donny! Glad to see you're movin' along. Great back story! Did you get a title with the bike? If so when was it last registered?

Dave,
Good to see you here man, see what you started!
No pink bill of sale only, early 90's from what I have found out.
Went to get the process started when I bought it and do have the initial paper work on file with DMV but unfortunately I ran out of all talent, luck and hope laid it down and got into the hay bails if you will. It came to my sudden attention that the VIN check process at the CHP was well, kind of a subjective process. If you don't have a seat, tank exhaust on it it is not a motorcycle in the eyes of the State, as the VIN check process is not only a VIN check but also a vehicular inspection process, even if you just want a non op title on a previously state legal manufactured vehicle. So the officer was real cool told him exactly where I was not going to spend a fortune to bring back what is considered a motorcycle without some assurance I did not have a pile rust that was hotter than a porn star had more legal issues than a politician. I had previously done my homework having the local PD run the VIN before I bought it just to see if there were any issues, and there was none. So the CHP officer agreed to run through the process and told me well,,, if it were to be a motorcycle today I would give you the go ahead to go back to DMV and title it. He even called over to DMV and let them know I would be a..... umm ..... a... little.... while and he said you basically have two years to get it all completed and assured me they have absolutely nothing on it that would impede, limit or stop the process. So again it was Ready...Shoot.....Aim! :bike:
 
Last edited:
unfortunately I ran out of all talent, luck and hope laid it down and got into the hay bails if you will.

Apt analogy for a tracker project. My situation was a little different. Had the title, bike was last regitered in 1995. Went to the DMV (keep in mind any trip to the DMV revolves around the person you get), filled out a stament of facts (including that the bike was a gift). The gal charged me $90.00 and told me all I had to do was get the CHP to verify the vin. Called the CHP and he said pretty much what you said. All I had at that point was pieces. He said the frame alone would not do but that it "had to look like a motorcycle". He said it did not have to be street legal though. took it down lookin' like this:


misctrackerpics.jpg


he ran the frame and motor numbers, signed me off. Went back to the DMV and they gave me a plate.
 
Dave,
Analogies seem to kind of come right off the tongue for me always have sometimes good... sometimes not so much! Yes I do recall the day you loaded that 79 in the back of your 79 Toyota pickup to go down to get registered a great day to say the least. Good news is yours worked out and I confident mine will be the same. The guys in the thread "barn find in California" I think it is called tell a lot of of the same story and I hear depending on which CHP office you go to also you may be looked at for being DOT compliant that was straight from the kind officer who helped me out anyhow.
 
Thought I would post some pictures of the parts I have been collecting but yet to document so a little catching up here just for general information. The forks I got from a guy on the forum who had bought a bike to make a bobber I believe. He found literally A 79 I think it was with only 3 miles on the speed meter and the bike looked the part. It had been stored museum style all these years having every stock part in mint condition on it he had a link to a youtube video of when he went to buy it could not believe it, tires had even been kept up with treatments! So I bought them wondering what I would really get and man I tell you they are like brand fricking new! KYP sticker in tact still like new, movement is plush as it ever could have been. I will be stuffing a set of 35/50 Progressive springs in them and changing the oil and seals and bolting them on. I bought the famous aluminum handle bar o-ring riser bushings from Hugh's what an operation that kid has going too cool. I also trying to spread the wealth around to all I can a new swing arm axle, swing arm brass bushings and tapered steering head bearings from Michele Mercury Morris man he has been a big help on the phone to me getting things sorted out from fact to fiction. He also ran around Ascot back in the day so good to talk too, if you need some straight poop and have some time on your hands give him a call. Found the oil tube on ebay as my is rusted horribly and this is one prominent part I want to be contrasting to all of the black got lucky and had a great guy to deal with.
 

Attachments

  • IMG_0444.jpg
    IMG_0444.jpg
    285.1 KB · Views: 157
  • IMG_0445.jpg
    IMG_0445.jpg
    274.2 KB · Views: 180
  • IMG_0442.jpg
    IMG_0442.jpg
    233.2 KB · Views: 145
  • IMG_0441.jpg
    IMG_0441.jpg
    222.4 KB · Views: 154
OK today I got a couple thing delivered the big brown truck was in the hood again shortly after I got home, love that guy! In the delivery were my rotors the front and rear and off an 81 from an ebay bay guy Vic's Parts good to deal with shipping is in cost, ships right away, packed nice and really great shape rotors! I bet they never even wore out a set of pads on them. Also I had no tire irons or wheel protectors for changing tires so those came Motorcycle Super store good guys to deal with. I also got inner tubes as one of my mags is tubeless and the other is not. I also am going to try dyna balancing beads on this bike I won't run on my Harley because I ride it to much loaded down and many many miles. But I do not want weights hanging on my wheels on my tracker and I won't be riding it much but around here for fun so I am going to give them a shot. I also got a rear brake resevor mount since I have to complete the rear disc conversion again from another guy on ebay joe_wiseguy I think same thing all good news with this cat he has lots of parts also.
 

Attachments

  • IMG_0447.jpg
    IMG_0447.jpg
    305.1 KB · Views: 185
  • IMG_0443.jpg
    IMG_0443.jpg
    293.2 KB · Views: 158
  • IMG_0446.jpg
    IMG_0446.jpg
    303.3 KB · Views: 155
OK with some fresh parts and a couple new tools in the garage its time to grab a beer and go out there and do something. So I mounted the new correct rotor on the rear wheel, grabbed the WD-40 and mounted the rear tire which I have not done since I was a kid as I don't mess with my $3k wheels on my Harley. All went well pretty much got the tire all on by hand and foot except for the last 12" of bead is all I had to iron on. Threw the wheel on the bike and I tell you what with the right rotor it all fits... go figure! So the 19" Omar's kit and new Avon AM 26 look pretty good to me so far, but... can't wait for the more toadiest look of those dirt track tire at a later date. I also had bought the correct caliper stay arm but to tell you the truth the drum one would have worked also, the only difference is the drum arm is flattend out a bit right at the tire interaction area instead of being round the entire length. Comparing the two stay rod arms length, bends and holes are identical and I think engineering wise they would have the same values even though disc get used in compression and the drum is in tension. I have to find the shouldered bolts so any of you that have a line on new correct or perfect replacement bolts please direct me to them. I have the old rusted bolt on the swing arm but still need a new one and I just ran down to the hardware store to get a temporary bolt for the caliper.

Next on the list clean the garage and finish a honey do of mow strips and some more concrete in the back for a BBQ I also built today in the back yard. I am also going try to post some pictures of parts I now know I am not going to be using I will try to do complete this weekend also I am hoping, since we have a long on this week. I will post a link on this thread to the classified ad when I get it posted.
 

Attachments

  • IMG_0448.jpg
    IMG_0448.jpg
    211.6 KB · Views: 247
  • IMG_0449.jpg
    IMG_0449.jpg
    258.7 KB · Views: 214
  • IMG_0450.jpg
    IMG_0450.jpg
    259.6 KB · Views: 214
  • IMG_0451.jpg
    IMG_0451.jpg
    232.6 KB · Views: 235
Don, I started out with a smaller rear tire also. A Shinko 110/90/19. Just never looked right:
rear2a.jpg

Here's the 27/7/19 Maxxis dt tire:
010.jpg

Here they are side by side:
cd3vs7052.jpg
 
Racerdave,
Yes it sure makes a huge difference for sure, I will end up there just have so much to do and would like to get to a rolling state as I have to keep moving bikes around to work on it so the wife can still park in the garage.

Pregrid,
Yes I understand those things really work I spoke to Mike Morris pretty in depth about them. I would like to we will see once I actually get there I will try to plan on it.
 
Ok guys got the BBQ built the fire pit built also and with those out of the way being ahead of schedule I went to work on the front end today.

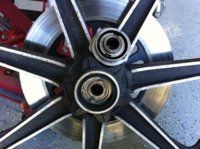
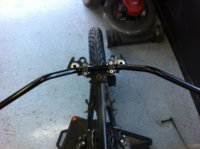
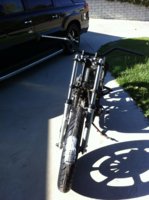
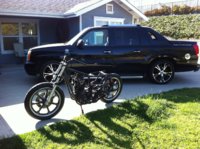
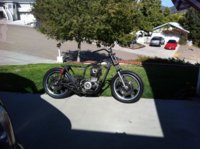
I was able to mount the front tire, install the rotor, put Hugh;s solid risers on and changed the forks out. I know have a ROLLER!!!!! :bike:

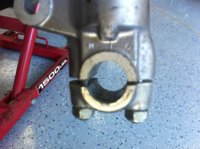
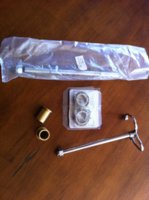
The Hugh's kit with it's O-ring fit is a really nice kit. I had to sand down the riser clamp stem bolts that go through his kit as everything was to tight with old gunk and even the factory paint that was on the stems. So I ran Scotch bright on the shouldered stems and even had to file a bit an the end of the shouldered area as it had been kind of mushroomed from all the flexing of the original rubber mounting. Cleaned up the holes the bushings go in lightly oiled and bolted it all up nice improvement!

I also ran Scotch bright all of the holes in the triple clamps and lightly oiled them to slide those fine looking forks in without scratching them up, I pulled them up about 85mm for now to drop the front end a bit, and because I know my Dad would had done this we did with many times and know all the hows and whys of it.

Went to mount the caliper and it needs rebuilding and is frozen up so I had to remove the pads to get it on. That phillips screw that holds them in is ....well..... turned to shit as it was so rusted and froze up so bad it took me a bit to get the SOB out. But here is cool part for me I went over to that old Craftsman tool box of my Dad's and in there is the Craftsman screw and nut extractor kit I had seen him use many times. Selected the correct size a slight tap with a ball peen hammer to get it started gave her a twist with the ratchet and it came right out, the old guy is still with me out there!

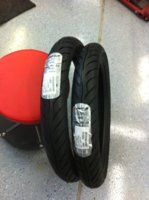
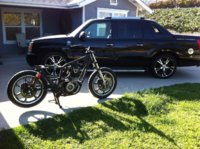
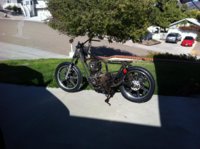
So I took the roller out for a roll so it could be seen from the sky above and it's first rays of sun light it seen for quite some time. It starting to take shape in the stance and looks department. Looks like she will fit in with the trio I had spoke about in the preamble of the thread. The tires I have now look small on the rear but really look pretty good on the front.
 

Attachments

  • IMG_0462.jpg
    IMG_0462.jpg
    166 KB · Views: 212
  • IMG_0459.jpg
    IMG_0459.jpg
    310.8 KB · Views: 248
  • IMG_0458.jpg
    IMG_0458.jpg
    276.9 KB · Views: 250
  • IMG_0457.jpg
    IMG_0457.jpg
    204.9 KB · Views: 205
  • IMG_0454.jpg
    IMG_0454.jpg
    310.8 KB · Views: 225
  • IMG_0453.jpg
    IMG_0453.jpg
    273.2 KB · Views: 242
I do have a question on this front axle and fork alignment issue I am seeing in this picture. When I placed the speedometer drive unit up against the fork leg before even mounting it, it will nestle up in the rotation stop notch and sit flush to the fork leg where the axle passes through on the raised boss area. On the speedometer drive unit you can see where either the raised boss area of the fork leg or a spacer has left it's mark from what ever bike it was on before. My problem is this I do not see any spacer or washer if you will in the manuals that goes between the fork leg and the speedometer drive unit.

Now when I draw the axle up tight and tight the split clamp on the lower fork leg as per the manual the axle seems to draw the speedometer away from the fork leg even though I start off with it all nestled correctly in the rotation stop and the raised boss area of the fork leg. I tired several times to fit this slowly and methodically and everything is definitely in place with the speedometer drive unit and the anti rotation notch. I cannot for the life of me figure out what is going on and why there would be the wear marks on the parts if this is the way it is supposed to be. The raised area of the speedometer drive unit is up against the fork leg and not on the raised area of the fork leg yet I have this gap at the raised boss are of the fork leg and speedometer drive unit.

I need a little help please guys.... I have not ever having seen one installed correctly personally or had a complete set up to take apart to be sure I have it correct :wtf: am I doing wrong or missing? :banghead:
 

Attachments

  • IMG_0456.jpg
    IMG_0456.jpg
    204.9 KB · Views: 190
Well I think I figured out the forks, I guess you just have to somewhat squeeze the forks together after you get everything lined up, the axle snugged up, then squeeze the forks together and thigh then the clamp bolts on the left fork. I have had two sets of forks on the bike the originals and these both lined up the same way and all of the wheel components are in the wheel.
 

Attachments

  • IMG_0469.jpg
    IMG_0469.jpg
    267.7 KB · Views: 147
  • IMG_0468.jpg
    IMG_0468.jpg
    162.8 KB · Views: 152
  • IMG_0467.jpg
    IMG_0467.jpg
    178 KB · Views: 159
  • IMG_0466.jpg
    IMG_0466.jpg
    189.1 KB · Views: 143
  • IMG_0465.jpg
    IMG_0465.jpg
    254.6 KB · Views: 183
  • IMG_0470.jpg
    IMG_0470.jpg
    187.2 KB · Views: 137
Back
Top