mjamusic
XS650 Addict
So I have no spark, running pamco e advance with HHB PMA. I used the following test method as per Pete:
Testing the coil:
Using the lowest scale on the meter, measure the resistance between the primary terminals with the wires removed. Should read from 2.5 to 4.5 Ohms.
=3.6 ohm, brand new Accel 140403s coil
Using the highest scale on the meter, measure between one of the primary terminals and the center core of the coil. Should be infinite resistance. (open)
= infinite
Measure between one of the primary terminals and one of the plug wire terminals. Should be infinite resistance. (open circuit)
= infinite
Measure between one of the plug wire terminals and the core of the coil. Should be infinite resistance (open circuit)
= infinite
Measure from one plug terminal to the other. Should be 15,000 to 20,000 Ohms
Testing the PAMCO
= 25.9 ohm (200k scale, plug caps on)
1. Use a voltmeter and check for battery voltage on each of the red/white wires with the key and kill switch are turned on.
= 12.9
2. The dual output coil has to have both spark plug wires connected to a spark plug at all times.
3. To test for spark, connect one of the spark plug wires to a spark plug that is grounded to the engine.
To test for spark without having to turn the engine over, do this procedure:
1. Remove the PAMCO rotor.
2. Remove the locating pin in the advance rod.
3. Reinstall the rotor, but without the pin.
4. Replace the nut holding the rotor on loosely. This will allow you to spin the rotor to produce a spark without having to turn the engine over.
5. Connect one of the spark plug wires to a spark plug that is grounded to the engine, but not installed in the engine.
6. Make sure that the other spark plug wire is connected to a spark plug in the engine.
7. Turn on the ignition switch and the kill switch.
8. Spin the rotor while looking at the gap in the spark plug for a spark.
9. Turn off the kill switch and the ignition switch.
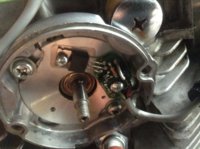
I'm not sure how to proceed from here? I'd like to test the pamco with a separate battery but not sure how to wire that up? Also, I noticed that one of the leads on the pamco is bent...see pic. Lastly, I think my wiring connections might not be solid, I am using bullet connectors and it seems the wires are too small for the connectors, Pete what is the best method to make these wiring connections? Solder? Please help! Weather is gorgeous and all I wanna do is ride.
Testing the coil:
Using the lowest scale on the meter, measure the resistance between the primary terminals with the wires removed. Should read from 2.5 to 4.5 Ohms.
=3.6 ohm, brand new Accel 140403s coil
Using the highest scale on the meter, measure between one of the primary terminals and the center core of the coil. Should be infinite resistance. (open)
= infinite
Measure between one of the primary terminals and one of the plug wire terminals. Should be infinite resistance. (open circuit)
= infinite
Measure between one of the plug wire terminals and the core of the coil. Should be infinite resistance (open circuit)
= infinite
Measure from one plug terminal to the other. Should be 15,000 to 20,000 Ohms
Testing the PAMCO
= 25.9 ohm (200k scale, plug caps on)
1. Use a voltmeter and check for battery voltage on each of the red/white wires with the key and kill switch are turned on.
= 12.9
2. The dual output coil has to have both spark plug wires connected to a spark plug at all times.
3. To test for spark, connect one of the spark plug wires to a spark plug that is grounded to the engine.
To test for spark without having to turn the engine over, do this procedure:
1. Remove the PAMCO rotor.
2. Remove the locating pin in the advance rod.
3. Reinstall the rotor, but without the pin.
4. Replace the nut holding the rotor on loosely. This will allow you to spin the rotor to produce a spark without having to turn the engine over.
5. Connect one of the spark plug wires to a spark plug that is grounded to the engine, but not installed in the engine.
6. Make sure that the other spark plug wire is connected to a spark plug in the engine.
7. Turn on the ignition switch and the kill switch.
8. Spin the rotor while looking at the gap in the spark plug for a spark.
9. Turn off the kill switch and the ignition switch.
I'm not sure how to proceed from here? I'd like to test the pamco with a separate battery but not sure how to wire that up? Also, I noticed that one of the leads on the pamco is bent...see pic. Lastly, I think my wiring connections might not be solid, I am using bullet connectors and it seems the wires are too small for the connectors, Pete what is the best method to make these wiring connections? Solder? Please help! Weather is gorgeous and all I wanna do is ride.