Pamco Question

truenorth,

Did you check the advancer installation instructions?

Hi Pete...got back at it today and was able to check install against instructions....100% installed as instructed but the ability of the advance weights to move is still directly related to how tight the rotor nut is....

Pics below...the 2 bushings on the right side move around very freely and easily sit 'below' the cam ends.........same with the 1 bushing on the left side....no protrusion there either. Not sure what to look at next..?

Like I have said I can loosen the rotor nut and the advance weights move nicely. I realized tonight that the point where the weights move, is also the same point where the big washer that sits atop the rotor turn independently on the rotor......clearly that means the nut is not tight enough.

End to end of cam as measured through cam is 8 11/16 (using reg tape measure)

and shoulder to shoulder on the advance rod appears to be 8 11/16

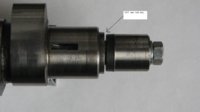
The rotor is sitting nicely directly atop the cam end on the left side, but there is about 4 threads on the advance rod that sit below the washer that sits on the rotor end...last pic. Its almost like the adv rod needs a longer shaft on the left side so the nut can bottom out on the shaft......?

my bike is an 81 if that has anything to do with it....

odd that I have read a ton of posts (thnx TwoManyXS1Bs), where people are concerned with end play.....and I am concerned with no end play...?


Thanks Pete !!!

photo3_zps99885625.jpg


photo4_zpsb6524e68.jpg


photo5_zps5b1a033f.jpg
 
Mikesxs is well known to sell parts that don't fit the same as OEM parts. I'm wondering if your advancer shaft was manufactured too short from shoulder to shoulder. In order for it to work freely, the advancer shaft needs to be about 1/32" longer than the camshaft.

Perhaps hard to measure with a tape measure, but you say they measure the same, which is not good.

You can see in my picture that I had 0.031" axial end play.

One solution may be to simply add a shim washer, at either end of the advancer rod, which will then effectively make the advancer rod longer from shoulder to shoulder.

The exact amount of end play does not matter. Just find a very thin washer that will give you say 0.015" to 0.025" free play.
 

Attachments

  • Advancer shaft end play.JPG
    Advancer shaft end play.JPG
    114.3 KB · Views: 180
Mikesxs is well known to sell parts that don't fit the same as OEM parts. I'm wondering if your advancer shaft was manufactured too short from shoulder to shoulder. In order for it to work freely, the advancer shaft needs to be about 1/32" longer than the camshaft.

Perhaps hard to measure with a tape measure, but you say they measure the same, which is not good.

You can see in my picture that I had 0.031" axial end play.

One solution may be to simply add a shim washer, at either end of the advancer rod, which will then effectively make the advancer rod longer from shoulder to shoulder.

The exact amount of end play does not matter. Just find a very thin washer that will give you say 0.015" to 0.025" free play.

ok....glad my giberish made sense. I think a shim in between the right side adv rod shoulder and the 'slotted rotor' would be heading the right direction.....thought about doing that tonight but figured I would see what you and Pete thought, but dont see any other way and dont see why that would not be mechanically sound.

Thanks !!!
 
Hello Pete, RGentleman, Leo,....everyone

My bike is super close to being done...I am super happy with the way it came out, and I did get the new adv rod......clearly looks like the answer to my advance problems as I now have a tiny bit of lateral play and no advance bind.........THANK YOU Pete!

.......but now I have a new problem I have created.........maybe...?

When I was going through final assembly of my elect tank, I inadvertently pushed the Power/Pamco lead off the coil when I was trying to push a few inches of wire back into the assembled elect tank.....I did not know I did that as the tank was bolted shut.

Tried to start and no start obviously........:doh:

pulled elect tank apart and found it hanging there. Popped it back on and checked the fuses.....

I have a 7.5 amp between the Coil and the Pamco,
and another 7.5 amp between Ig Switch Power and the Pamco....

both blown !

My question is this......what is the chance I damaged the Pamco, and is there any reason I should not just plug in 2 new fuses and try and fire it up tomarow.......?

Thank you in advance !!
 
Thanks for everything Pete !

Started up after about 2 revs :thumbsup:

Tweeked timing some - seems real close....nice throttle response, adv working perfectly....little pops now and there so will check valve lash tonight, but plugs look right......ride tomarrow !!

Thanks Again,
-Mike
 
I have a few questions about tuning - all the electrics appear to be working great !

...and maybe I should start a new thread, but trust the thoughts I have gotten on this one so please forgive :wink2:

Ride 1 - It ran pretty good. Pulled super hard and smooth in the upper range of the power band....but popped and occasional gargle on the bottom.

pulled plugs....the LEFT plug looked right to me while the other looked a tad rich....so a slight adjust on the sync screw, and then they both look like the darker one....(I did not take another pic but they are very similar.

photo_zps79dba478.jpg


but it is stumbling on the bottom slightly worse......?

Could that mean that I am actually running rich...?

I know its tough without a bunch of other info, but I am comfortable with the basic setup of the engine - time chain tension good, valve lash good, idling right at F, ig timing is advancing like it should, etc...

one more thing seems odd to me;
I am running clear inline fuel filter - and I see bubbles in the line preceding the filter, and the line after the filter is clearly filled with gas but the line before the filter often appears to be even empty at idle....? but I can thump it with my finger and it will fill with fuel :shrug:

the line is a straight shot with no fancy loops or anything....that may be normal and I am just over thinking it.

anyway.......thank you !
 
My take on plug readings (after generally riding around) is that they can tell you if you need to do some carb rework, but not exactly what to do. That's where the plug chops come into play, to isolate each particular zone...
 
one more thing seems odd to me;
I am running clear inline fuel filter - and I see bubbles in the line preceding the filter, and the line after the filter is clearly filled with gas but the line before the filter often appears to be even empty at idle....? but I can thump it with my finger and it will fill with fuel :shrug:

the line is a straight shot with no fancy loops or anything....that may be normal and I am just over thinking it.

anyway.......thank you !

That is normal. To verify, remove one of the carb bowl drain plugs, turn on the gas and see if it flows freely.
 
Pete.....two questions.

-I have a 1979 xs650 with a Hughs PMA alternator kit and a Boyer Branson that is
cooked. I would like to replace with a PAMCO and would like to get your opinion
as to the right model.

-I have a 1980 xs650 that i bought a PAMCO from MikesXS recently and have run
into a an intermitent problem where the bike will start and then it wont, however
when i barely wiggle the wires to the PAMCO VOILA'....it will fire up.

Thanks in advance.....no electrical pun intended!

WRMDOVR
 
true...in your first picture (remember im a newb to the xs scene) according to the directions with the pamco...aren't the timing marks you scribed incorrect ? It says you use the notch and .500 inches to the left of it for 15dtc
 
I just installed the Complete Pamco Electronic Ignition Kit, #14-0902...and I have a few questions if any one could help that would be great.

1 - I received 3 pins - one went in the cam on the right side to locate the advance unit. The other 2 sounded like they were destined for each end of the advance rod....but there were pins already in the advance rod.....so out of the 3 pins I received....I only used 1.

Does that sound right or did I miss a secret pin install...?

2 - I was reading Hughs install guide as well as Pete's.....Hugh's showed a rotor with 2 magnets, and he said with left cylinder at TDC....magnets would align horizontally.
My rotor has 4 magnets....and they did not align horizontally....? Looking further, I now know there are 90 deg rotors and 60 degree rotors....mine appears to be a 60.

Do I need a 60 or a 90, and do my magnets need to align horizontally while I am at TCD...?

Below is the PMA while left cyl is at TDC - yes I am positive !
Next pic is advance unit while at TDC
and rotor assembly while at TDC

photo2_zps6ca70fd6.jpg


photo3_zps8b5419a6.jpg


photo1_zps0541ecdd.jpg

true...in your first picture (remember im a newb to the xs scene) according to the directions with the pamco...aren't the timing marks you scribed incorrect ? It says you use the notch and .500 inches to the left of it for 15dtc

Thanks for the quick response Pete !!

1-3 - makes complete sense...thank you !!

4-6 - prob would have helped if I posted a pic of the engine cover with the timing marks huh

I also now know why you said to put a plug in - so the engine stays put when you are not at TDC right..?

EDIT: - Bigger reason; So I don't drop crap down into the cylinder !!!!!!!!!!!

anyway...another string of pics below showing 15 btdc and the associtated pics of the advance unit and ignition.....please let me know if that looks right to you Pete.

Thanks a million !

photo1_zpsbd26c4ac.jpg


photo2_zps6f1177af.jpg


photo3_zps2dead43f.jpg

you had me thinking for a sec......the 4th picture in the orig thread, (quoted above) shows the TDC and 15d advance marks that I scribed into the timing cover.......pic shows sitting at the adv mark. I could have blown it but the motor runs real well. Still always the possibility its off.........does that sound right to you..?
 
i think i am close to what they show...there are a few, guys on this forum that are much more knowledgable in that area than I...(correction...MANY guys).......but 2 of which posted in this thread...Leo and Retiredgentleman....well 3.....Pete !

All super helpful !!

So if you are getting ready to start a PMA/ignition project...you are in the right place
 
Mikesxs is well known to sell parts that don't fit the same as OEM parts. I'm wondering if your advancer shaft was manufactured too short from shoulder to shoulder. In order for it to work freely, the advancer shaft needs to be about 1/32" longer than the camshaft.

Perhaps hard to measure with a tape measure, but you say they measure the same, which is not good.

You can see in my picture that I had 0.031" axial end play.

One solution may be to simply add a shim washer, at either end of the advancer rod, which will then effectively make the advancer rod longer from shoulder to shoulder.

The exact amount of end play does not matter. Just find a very thin washer that will give you say 0.015" to 0.025" free play.

Do you have any info on where a shim like this could be found? I'm in the middle of doing my pamco/advancer install in my 83 and im getting a sīmilar binding when the nuts are tight. I've checked the bushings to make sure they aren't sitting proud of the cam shaft and I made sure that the advance rod was lubed before installation. I don't really want to remove my cam shaft to properly measure its overall length but i cam see where the pamco rotor is rubbing on the cam shaft when the nuts are tightened.
 
fox23,

The shim is to take out excessive end play. You have the opposite problem of having zero end play. Perhaps a snap ring on the un-threaded end of the advance rod on the advancer side? (right where the locating pin is)

snap ring.jpg
 
Last edited:
Hey pete, yes I know that the large shim would be for excessive play, I'm referring to a smaller one that just goes behind the pamco pick up wheel, but fits inside the cam shaft. Like you said, right behind the pin. Similar to what this guy made, post #12. http://www.xs650.com/forum/showthread.php?t=28824 You think an e-clip will work? No worries about it not being symmetrical, like a flat washer?
 
fox23,

Well, I looked at that post #12 and that appears to be a shim that takes out the excessive play. The clip I suggested would be the same thickness in all the areas that it comes in contact with the advance rod and the slotted disk on the advance side. I suggest putting it on the advancer side as the large washer on the PAMCO side uses a few of the available threads on that end of the rod.

You could also use a piece of stainless steel safety wire wrapped aroung the rod as well. Anything to increase the end play. I would also take a very close look at the finish on the end of the cam shaft. Look for rough spots or burrs, especially if the engine was originally a TCI and never had the advancer installed. The factory may not have finished the ends of the cam shaft in that case.
 
Back
Top