-
Enjoy XS650.com? Consider making a donation to help support the site.
XS650.com receives a small share of sales from some links on this page, but direct donations have a much greater impact on keeping this site going.
You are using an out of date browser. It may not display this or other websites correctly.
You should upgrade or use an alternative browser.
You should upgrade or use an alternative browser.
Plugs fouling, top end rebuild?
- Thread starter Tecrekka
- Start date


Tecrekka
XS650 Enthusiast
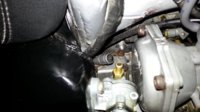
Jesus, I believe I found a significant issue. I remove the diaphragm for the right carburetor to see how everything looked on that side. After looking at how it was assembled it was clear to me that the needle in the left carb was clearly installed improperly; the needle was not below the ring that hold it down but rather on top of it, basically just floating out in space... I've discovered the source of the "puff" I was concerned about in the good news is it's not coming from the left carburetor. I believe I should be able to tune probably from here on out and if you guys can help me with 1 last identification I'd greatly appreciate it. The puff as it were seems to be coming from something that I assume is some sort of crankcase ventilation? maybe this was attached to the factory air box? Thank you so much everyone for your assistance, I truly truly appreciate it!
(Please disregard, see edit)
THANK YOU GUYS!
(Please disregard, see edit)
THANK YOU GUYS!
Attachments
Last edited:
Yes, your needle was installed wrong in that carb. That would make it sit much higher and that would make it run very rich. The black color is gas residue. That's normal and can just be cleaned off with a mild solvent like kerosene. Take care using anything stronger like carb cleaner in that area around the rubber diaphragm. Carb cleaner eats rubber.
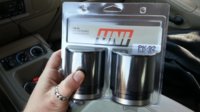
You'd better take a close look at those new pilots. They look to be the VM22/210 style with the metering orifice at the top. Look at the drawings of the pilot jets in my post #4. The tiny hole through the jet, the metering orifice, needs to be on the bottom like on those #40s you got.
You'd better take a close look at those new pilots. They look to be the VM22/210 style with the metering orifice at the top. Look at the drawings of the pilot jets in my post #4. The tiny hole through the jet, the metering orifice, needs to be on the bottom like on those #40s you got.
Tecrekka
XS650 Enthusiast
Yes, your needle was installed wrong in that carb. That would make it sit much higher and that would make it run very rich. The black color is gas residue. That's normal and can just be cleaned off with a mild solvent like kerosene. Take care using anything stronger like carb cleaner in that area around the rubber diaphragm. Carb cleaner eats rubber.
You'd better take a close look at those new pilots. They look to be the VM22/210 style with the metering orifice at the top. Look at the drawings of the pilot jets in my post #4. The tiny hole through the jet, the metering orifice, needs to be on the bottom like on those #40s you got.
I was thinking the same thing when I first saw them but I thought that maybe the actual metering point sat differently with different sizes?
It looks from that diagram that even the ported jets can potentially sit higher than the bottom position, as far as were the actual metering point is?
Could they be the ported jets and still have the metering orfice in the wrong position? The orfice on these appears to be about 1/3 from the bottom.
Every BS30/96 type pilot I've seen had the metering orifice at the very bottom like those #40s you got. Of course, these were all genuine Mikuni jets. The ones you got might be a different brand. On non-Mikuni mains, I have seen the taper to the metering orifice vary. This is why I only use genuine Mikuni jets. I just have to believe that the angle and depth of that taper makes a difference in the way the jet flows. Who knows if an aftermarket #42.5 pilot is flowing the same as a genuine Mikuni #42.5 pilot. How can you tell if the jet is genuine? Look for Mikuni's trademark emblem stamped on the jet somewhere .....

Tecrekka
XS650 Enthusiast
Well, the puff wasn't the carb but rather an uncapped case vent. I've got the absolutely correct jets now, Currently I've got the 45s in, but I've also got a set of 47.5s just in case. As5twins suggested I got the foam filters too. Now, it seems the left carb is fine and the right is bogging out. As always it will idle no problem but if I give it any gas the right carb sputters and puffs, bogging the engine down. I would greatly appreciate any ideas as I'm really not sure how to proceed now. I'd hoped that with all the right parts I'd be in the ballpark at least??
Tecrekka
XS650 Enthusiast
Here's a video:
wherearewe
Rub on Ya Titties
Your video is set to private.
Tecrekka
XS650 Enthusiast
Oops sorry, should be public now.
When you cleaned and checked the pilot circuit you SAW fluid coming through all three ports above the butterfly?
Tecrekka
XS650 Enthusiast
(Slide?)When you cleaned and checked the pilot circuit you SAW fluid coming through all three ports above the butterfly?
Hmm no, I did not visually verify that. It seems like blockage to me because it will be fine one try and not the next. The only thing I thought I would be able to do next was taking everything apart and start over? I guess this might be a good way to see if there some type of obstruction?
It just seems to me that if something was obviously wrong it would be wrong all the time and not an intermittent symptom. So I should actually see gas coming out of 3 ports?
Last edited:
Tecrekka
XS650 Enthusiast

Tecrekka
XS650 Enthusiast
(The debate has halted my progress)

Tecrekka
XS650 Enthusiast
Ok back. So @weekendrider, you think I'm on the right track? It just seemed it should work, or not. It will idle fine, and sometime catch when I twist it but when it bogs it's only on that right side. I think tomorrow I will take both carbs down and make sure they are super cleaned out.
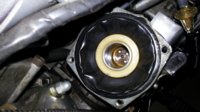
In the pick you showed the upper port is just a vent for the float bowl. The lower is the fuel crossover. Neither of these are were you hook the manometer.
You hook the manometer to a the vacumm ports in the carb holders if you have them, or you remove screws in the side of the carbs and install adapters to hook too.
Just looked back through this thread at your pics. Your carb set has no provision for using the manometer. You need to set the sync by the dead cylinder method.
Leo
Tecrekka
XS650 Enthusiast
Okay so I'm not missing something then! It was driving me crazy everyone telling me I was supposed to have a vacuum port! Thank you for clarifying that for me.
Tecrekka
XS650 Enthusiast
Tecrekka
XS650 Enthusiast
Well I got into the carbs and realized that the lemon juice was major overkill so I didn't bother. I DID go through the carb guide (thanks millions 5Twins for the manual and your patience as well as sorry for my previous redundant questions in this thread) cleaning process and made sure (as per Weekendriders suggestion) that every single hole and port was completely free and clear, and replaced any o-ring or gasket that looked even slightly worn or questionable by any measure. After reassembling and putting the carbs back on, I still had problem with the right side, as it seemed it was only firing intermittently. In addition, my idle changed and became erratic. The idle would accelerate in steps, 1100, 1200, 1300..hesitate, 1100, 1200, 1300..hesitate, 1100, etc etc. I messed with the mixture a bit again but the right side still wasn't firing properly and was bogging down like it did in the previous video I posted on YouTube.
This led me to deduce that if the carbs had been completely gone though, and the proper jets installed, the next possible issue MUST be ignition....so I dove into the points.
I've been messing with them for most of last night and most of today, and I've now got a bike that ran rough yesterday and won't start now. When it was running, I allowed it to warm up and adjusted the cam chain per the manual but I am beginning to become concerned that it may be out of spec.
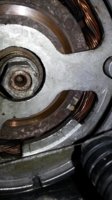
I filed and cleaned the points, and adjusted the gap to .015". I found the point where they were opening by using my multimeter to check for 0 continuity by attaching one end to wire lead (from points) to the corresponding coil/cylinder and the other to ground. Doing this I found the only way I could get the top/right cylinder close to range was to rotate it CW as far as it could go. In this position I was able to get the bottom/left cylinder to open dead on the F mark of the stator, but only in the farthest CW orientation. Also, even though I tightened the cam chain when the bike was warm, I notice probably 6° of total rotational play in the cam, leading me to believe the chain is still loose.
Attached is some photos of where I ended up (I changed all the screws with allen socket heads to ease adjustment).
I've already decided I want to go with a Pamco and PMA from Hughs as I don't want this hassle again but I realize that if it's the chain nothing but replacement is going to fix that, and I'd really like to understand completely what is going on here.
This led me to deduce that if the carbs had been completely gone though, and the proper jets installed, the next possible issue MUST be ignition....so I dove into the points.
I've been messing with them for most of last night and most of today, and I've now got a bike that ran rough yesterday and won't start now. When it was running, I allowed it to warm up and adjusted the cam chain per the manual but I am beginning to become concerned that it may be out of spec.
I filed and cleaned the points, and adjusted the gap to .015". I found the point where they were opening by using my multimeter to check for 0 continuity by attaching one end to wire lead (from points) to the corresponding coil/cylinder and the other to ground. Doing this I found the only way I could get the top/right cylinder close to range was to rotate it CW as far as it could go. In this position I was able to get the bottom/left cylinder to open dead on the F mark of the stator, but only in the farthest CW orientation. Also, even though I tightened the cam chain when the bike was warm, I notice probably 6° of total rotational play in the cam, leading me to believe the chain is still loose.
Attached is some photos of where I ended up (I changed all the screws with allen socket heads to ease adjustment).
I've already decided I want to go with a Pamco and PMA from Hughs as I don't want this hassle again but I realize that if it's the chain nothing but replacement is going to fix that, and I'd really like to understand completely what is going on here.
Attachments


Last edited:
Tecrekka
XS650 Enthusiast
I guess I'm kind of just thinking out loud now but, let's say perhaps my gapping with incorrect, on the small side. Someone please correct me if I'm wrong but I feel this would certainly cause the points to open late. For once I'm not actually sitting directly in front of the bike but I think I'm going to double check that when I get back to the garage.
75jazz
XS650 Enthusiast
I know this probably won't help, but I was going through something like this with my 72 Triumph. After a couple of months of beating my head against the wall with the carbs, I started tracing all the wiring and found out I had a pinched spark plug wire. It had been rubbed bare between the battery and side cover. Threw off timing, gave intermittent spark, intermittent problems when riding, etc....
Similar threads
- Replies
- 22
- Views
- 542