Poor decisions, another xs build

AtoXS, your bike looks great. I'd like some advise on how to get my engine as nice looking as yours. Please.

All the clean up of the engine, wheels, top tree, etc was just these guys going from various degrees of abrasion. I can't remember who I heard about them from, but it was someone on this site that did the same thing.
3_B1_zMN1q9uGTZ50xP3I1LUCzIPDElLz-ed3EUu9E8=w767-h567-no
 
All the clean up of the engine, wheels, top tree, etc was just these guys going from various degrees of abrasion. I can't remember who I heard about them from, but it was someone on this site that did the same thing.

I believe that would be gggGary, from these 'polishing' threads:

http://www.xs650.com/forum/showthread.php?t=4899
http://www.xs650.com/forum/showthread.php?t=4932
http://www.xs650.com/forum/showthread.php?t=12667
http://www.xs650.com/forum/showthread.php?t=28975
http://www.xs650.com/forum/showthread.php?t=33040
 
So here is some fairly big news. I was at the Gypsy Run over the weekend and got roped in to take the place of someone that dropped out of the final spot on the Greasy Dozen. It looks like the updates are going to be coming quicker since I really need to push to get this done now. I just finished the brake stay and the linkage along with getting the wheel laced up the right way this time.

IMG_20140915_190850096.jpg

IMG_20140915_190930016.jpg

IMG_20140915_190948544.jpg

IMG_20140915_191055073.jpg

IMG_20140915_090852047.jpg
 
I got my rectifier, coil, cap and electrical box all setup and the wires all chased to their respective places. Now all that's let I think is to install the Pamco, move my tire over to the new wheel and get it wired. Hopefully I'll get my covers back from the engraver soon, but if not I have this spare on the PMA and an oil filter cover I can pull off another engine.

IMG_20140917_160424.jpg

IMG_20140923_165315365.jpg

IMG_20140923_172112.jpg

IMG_20140923_173152271_HDR.jpg
 
Here's a quick photo of the paint. It looks a bit pink in the photo but it's really more a dark ruby red flake. This thing has a TON of clear on it and the flake still isn't buried so it's taking up a lot of time to finish since I don't want to go too heavy before each layer of clear time to harden.
IMG_20141008_052352313.jpg
 
IMG_20141015_214511156_HDR.jpg
Just a small update. I've been doing a hell of a lot of sanding to get the tank smooth. I used a ton of clear to cover all the glitter so it was quite a process. It's hard to tell but the tank is now smoothed out with 1000 grit and will see 1500 and 2000 later. I imagine the fender should go a lot quicker since I won't be dealing with all the curves and can actually use a sanding block. After both are done I'll be hitting everything with Spraymax 2k clear.
 
I really need to get a real camera for stuff like this, but here are the tins with a fresh coat of Spraymax 2k clear. Now all that's left is to buff and sand.
IMG_20141022_210740.jpg

IMG_20141022_211235.jpg
 
So it's been a while since I've updated this post, basically because I couldn't really do much over the winter in an unheated garage. Before winter I did get the frame and sissy painted.

After I initially assembled the bike, I noticed a huge problem with the paint on the tank and fender. I guess in a rush to try to get the tins done I applied too many coats too fast and the end result was the paint degassed and left a bunch of pinholes everywhere. I actually didn't notice it at first because of the flake and it wasn't until after the 2k started peeling off in sheets that I noticed it. I'm guessing the degas caused the 2k to not stick, or the can could have not mixed properly or it was too cold or applied too fast, etc, etc, I guess I'll never know.

Anyway fast forward to a few weeks ago. I striped the paint off the tins and started over. This time instead of using Krylon red glitter blast I decided to shoot silver glitter and red metalcast. The results were much better and the color is much closer to what I had in my head before I started painting.
 

Attachments

  • IMG_20141031_172851.jpg
    IMG_20141031_172851.jpg
    149.4 KB · Views: 149
  • IMG_20141105_153559.jpg
    IMG_20141105_153559.jpg
    151.3 KB · Views: 166
  • IMG_20150326_213431.jpg
    IMG_20150326_213431.jpg
    136.1 KB · Views: 173
  • IMG_20150501_220826607.jpg
    IMG_20150501_220826607.jpg
    123.1 KB · Views: 170
  • IMG_20150501_220839373.jpg
    IMG_20150501_220839373.jpg
    151.7 KB · Views: 170
  • IMG_20150502_172856401_HDR.jpg
    IMG_20150502_172856401_HDR.jpg
    304.4 KB · Views: 172
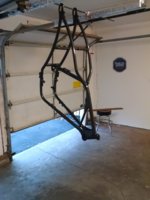
Fast forward a few weeks to yesterday. I got the tins remounted, the electrical all tied in and was at last ready to try to start it. Initially it was all kick, kick, kick, nothing. Maybe the Sparx was bad, so I pulled the battery out of my Hinkley and ran some jumper wires to it, flipped the key to start, the neutral light came on, then to run and the headlight and tail came on, great at least I didn't screw up that wiring. Back to start, more kicking and nothing.
I decided to call Dieselchanic and we talked about a few idea and he mentioned maybe trying to hit the carb with some starter fluid and it worked sort of. After the initial spray I gave it a big kick and the engine roared to life and was pinned at max throttle. I can't even describe how fricking loud this was in the garage and I scrambled to find the key. Our first thought was the throttle was stuck open, but a quick twist quickly ruled that out as it snapped right back. Another spray, another kick with the same ear bleeding results. It was about this time the neighbor came over to complain about the noise.
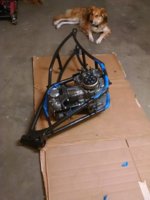
Time for some new troubleshooting. Obviously the throttle was fully open and it wasn't until we pulled the cable off the throttle that we saw the problem. This is the first vm36 carb I've had so when we looked it inside we saw movement of the slide up and down, but we didn't know just how low it was supposed to go in the body. With the throttle removed we quickly realized that it was sitting a good half inch higher with tension then without it.
Now I'm kind of pissed because this was a custom cable from Motion Pro that I spent weeks waiting for and but was assured it would be correct since I sent them my throttle tube to get the measurements right. After pulling the cap off the housing I was able to cut back the liner and reinstall the cap without having to remove the cable. With this problem fixed I buttoned everything up, opened the petcock and gave it a kick. The engine fired to life again, but at a much more reasonable level.
So now comes the dialing in to ride it. I have to get a timing light to get still, but have the challenge of doing it without a tach, hopefully I can get close. Second, it looks like the clutch it stuck since as soon as I put it in first the bike cuts out. I'm going to try to crack it open with the front tire against the wall and some rpms in first. Hopefully this will work.
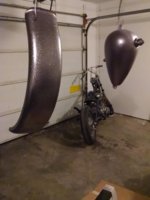
Overall I'm really pleased that we were able to get the bike running yesterday, both cylinders are firing and even though it's not timed it seems to idle pretty decent. I had no idea if it would happen and actually pretty much assumed it wouldn't. Full pictures of the finished bike soon to follow once I actually get it out in the sun. In the mean time I'm going to try to get video linked to it being fired up on youtube, but if you are interested you can see it in my instagram.
Oh on a side note. The Sparx worked just fine, turns out the problem with that the diagram they send is for British bikes that use a positive ground which always seemed weird to me when I was connecting it. As soon as I swapped the connections everything turned on just fine with the bike running.
 
Congrats. It is always nice to hear them roar to life even if it is at full tilt and we may lose a bit of our hearing. Pics are always nice.
 
Back
Top