-
Enjoy XS650.com? Consider making a donation to help support the site.
XS650.com receives a small share of sales from some links on this page, but direct donations have a much greater impact on keeping this site going.
You are using an out of date browser. It may not display this or other websites correctly.
You should upgrade or use an alternative browser.
You should upgrade or use an alternative browser.
Power to the Coil
- Thread starter Paul75
- Start date
Yeah I know, I'm a bit OCD!
On another note, after finally getting to actually wheel the bike off the ramp today I noticed the forks are marshmallow soft.......is there a sure fire way of getting these sorted? New springs? I think whilst I'm at it I'd like to lower the front a tad too (already dropped the forks through the yokes 10mm).....
On another note, after finally getting to actually wheel the bike off the ramp today I noticed the forks are marshmallow soft.......is there a sure fire way of getting these sorted? New springs? I think whilst I'm at it I'd like to lower the front a tad too (already dropped the forks through the yokes 10mm).....
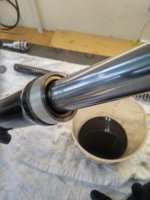
Looking at your photo, it appears you've dropped the forks more than 10mm. It looks closer to an inch. That may already be too much. There isn't much space between the fork lower and lower tree at full fork compression, only about 5/8" to 3/4" at most, and that's without the dust cover. When you do get into the forks, with the spring removed, slide the fork lower up as high as it will go and that will show you how much space you have available. There are internal methods for lowering the forks but any lowering done that way will reduce the fork travel by that amount.
Yes, you can replace the springs but you might want to try adding some preload 1st to the stock ones. They are a nice dual rate spring, just a bit soft. You can add a 1" spacer. Your top cap is a preload adjuster and has 2 more steps above the minimum setting. Each step increases the preload by 10mm but the stock springs usually still need more. A 1" spacer is about 25mm. That will have you starting out about a half step stiffer than the stiffest setting you have now, then you have 2 more stiffer steps after that.
The fork oil amount speced for these 35mm forks is just under 6 ounces. Use about 7 ounces. This will really improve the way they work. There will be less air space above the oil which increases the "air fork" effect. This will greatly reduce front end dive during braking. I use the standard recommended 10wt. oil and think it works fine.
Lastly, you can "Minton Mod" the damper rods. This will smooth the fork action out and make them more responsive, especially to the little bumps.
Brilliant reply and very well observed, I recon it must be close to 25mm thinking about it. Now when you say "Your top cap is a preload adjuster and has 2 more steps above the minimum setting" - I don't understand what 2 more steps above the minimum setting means? Also, increasing preload, that's clockwise I presume?
I'd rather not replace springs unless absolutely necessary, mainly because I'm on a budget and it's running out! A spacer and new oil though is perfectly ok. I'll search up the forum for more info on this......
I'd rather not replace springs unless absolutely necessary, mainly because I'm on a budget and it's running out! A spacer and new oil though is perfectly ok. I'll search up the forum for more info on this......
Last edited:
If you look into the top "nut" on your fork cap, you will see a pin with a screwdriver slot in it. That's the preload adjuster. The concept is similar to the spring preload adjusting ring on a rear shock, except done internally. Here's some top caps set minimum to maximum. As you can see, each step moves the pin (and pushes the spring down) 10mm .....

You have to push down quite hard on the pin while you turn it to get it to move. Sometimes, they're froze up. It's probably best you check the caps once removed to see that they're free before trying any adjusting. There should be a protective rubber cap over them to keep water out. I don't see them on yours.

You have to push down quite hard on the pin while you turn it to get it to move. Sometimes, they're froze up. It's probably best you check the caps once removed to see that they're free before trying any adjusting. There should be a protective rubber cap over them to keep water out. I don't see them on yours.
So I'm going to take the fork legs out today and get them apart, I'll probably end up opting for the 25mm spacer mod to help to further stiffen things up, are these spacers available to buy or do I need to have them machined? I think combined with new oil they will feel right again.
The dilemma with the bike now is getting it to 'sit' right. If you look at the bike side on, especially as it's a special with 19" front wheel, the front is much higher than the rear, this isn't the look I want from it. I now know dropping the forks through the yokes isn't an option like it is with upside down forks, so I will set these back to near standard. I can cut the springs but that'll sacrifice travel, is there a 'safe' amount I can cut them by to get a noticeable lowering or will it actually not make that much of a difference? The other option is to leave the springs alone but get new longer rear shocks to even things up - initially I think this would be a good way forward but I'd love input from others please!
The dilemma with the bike now is getting it to 'sit' right. If you look at the bike side on, especially as it's a special with 19" front wheel, the front is much higher than the rear, this isn't the look I want from it. I now know dropping the forks through the yokes isn't an option like it is with upside down forks, so I will set these back to near standard. I can cut the springs but that'll sacrifice travel, is there a 'safe' amount I can cut them by to get a noticeable lowering or will it actually not make that much of a difference? The other option is to leave the springs alone but get new longer rear shocks to even things up - initially I think this would be a good way forward but I'd love input from others please!
I agree with you 5T, this is the logical way however if the washer goes on first then the lock tab doesn't sit flush as it's up against the washer, frustratingly there are also a couple of youtube videos which don't show it like this........if I do take the clutch out again I'll alter it your way.....
I have to confess my instinct is to fit the locktab on first and then fit the washer on top, under the nut. the reasoning that I used is that the the larger area of the washer keeps the thin locktab from distorting under torque so that the tiny bent over locking tab cannot lift and twist out
You're right about the locktab not sitting flush too ...exactly my observation it just doesn't sit happily over the washer
. Washers always go under nuts anyway lol
Excellent thread this I'm learning lots about forks which will probably be my next job.
Lovin your workshop Paul that is truly awesome .
Here is my train-wreck of a shed in comparison. The cupboards all fell off the wall together yesterday.....can't think why

Last edited:
Thanks Peanut, I remember when we moved into the house, I'd never had a garage but desperately wanted one so naturally the garage was the 1st 'room' to get sorted out....(much to my wife's despair.....lol)....PS your cupboards did make me laugh!!!!
So, now I've got the forks off, top nut off, springs out and oil drained I need a little help if I may please because I want to fit the 25mm spacer we have been talking about. Do I need to strip them down any further? .as always very grateful for advice.....
Also, I forgot to add that my preloads were in the softest setting, I did dial them up to hardest but it made very little difference....
There is also pitting to the chrome plating on one of the fork tubes, it's not too horrendous but is it possible I could flip it round so the top is then in the bottom? I'm worried that otherwise when under heavy braking it may not provide a proper seal and oil may escape.....

Last edited:
The problem arises because various year microfiche for the XS650 show the lock tab and conical washer in different orders. For my 81 the order was conical washer first then tab followed by nut, but some earlier models showed the order reversed.
When you remove the fork tubes you will find they are not reversible. At the base there is a machined/narrow section and at the top there is the threading to hold the pre-load adjusters. My long gone RD250B had a rust pit but this did not cause a great problem. Suck it and see but remember a bad oil leak is an MOT failure.
....indeed - you cannot flip the tubes top for bottom and an oil leak is a bad thing.
However, fork gaiters could, perhaps be installed to lend an air of "vintage authenticity"...and perhaps make the leak less....visible to those who would seek to suck the fun out of life.
...n'est-ce pas?

However, fork gaiters could, perhaps be installed to lend an air of "vintage authenticity"...and perhaps make the leak less....visible to those who would seek to suck the fun out of life.
...n'est-ce pas?
Last edited:
For the 1" spacer, simply find some pipe about the same diameter as the fork springs and cut them from that. You will also want to place a washer between the spring and the spacer so you'll need to find a couple of those as well (or file some down to fit).
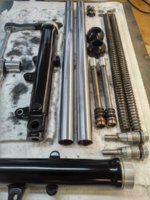
So a rainy day was had today in the UK so I made the best of it and dismantled the forks....the separate Hughes lowering thread spurred me on! I've contacted Hughes to try to get the lowering kit shipped over.......
For reference 225ml of oil came out combined, was a pretty thick and sludgy....think these will do well to get some fresh oil in them!

For reference 225ml of oil came out combined, was a pretty thick and sludgy....think these will do well to get some fresh oil in them!

....indeed - you cannot flip the tubes top for bottom and an oil leak is a bad thing.
However, fork gaiters could, perhaps be installed to lend an air of "vintage authenticity"...and perhaps make the leak less....visible to those who would seek to suck the fun out of life.
...n'est-ce pas?

I think these will look pretty neat actually......sorted thanks MaxPete!
I gave my forks a good wash and scrub inside with petrol to clean all that sludge out; Avoid UK white spirits on any bike parts with seals because it will swell and weaken the rubber due to the high aromatic content. Once it was clean I let it dry then refilled on assembly with Castrol 10W fork oil from Halfords. There is just enough in a 500ml bottle for both forks. I bought a 100ml syringe from China to make it easier to dispense the correct amount of oil to each fork - also handy if you over-fill the engine. You may have read that some recommend adding an extra ounce of oil, but I have not tried this. The SH manual said to use either 10W or the 20W-40 engine oil.
Regarding Pitting on the Forks: If the pitting is heavy then it leads to premature fork seal failure. You will know when this is happening because the oil ring left on the forks gets more pronounced with time. In the future you could look out for a replacement fork tube.
Regarding Pitting on the Forks: If the pitting is heavy then it leads to premature fork seal failure. You will know when this is happening because the oil ring left on the forks gets more pronounced with time. In the future you could look out for a replacement fork tube.
Thanks Paul. You can just about make out the pitting half way up the left tube, I'll get a decent photo tomorrow. In the meantime I'll look out for a tube. I'm going to order the lowering kit tomorrow from Hughes, will most likely go 2", shipping to the UK only 12 dollars..... 
So a rainy day was had today in the UK so I made the best of it and dismantled the forks....the separate Hughes lowering thread spurred me on! I've contacted Hughes to try to get the lowering kit shipped over.......
For reference 225ml of oil came out combined, was a pretty thick and sludgy....think these will do well to get some fresh oil in them!
View attachment 105486
great pic paul thats very helpful for others like me who are contemplating this job for the first time.
Thats impressive progress today ,looking forward to seeing the rest of this work before tackling it myself
Many manuals from the '70s say motor oil is OK in the forks. I think that may be because real fork oil wasn't readily available back then. Today it is, so I wouldn't use anything but.
For cleaning inside the tubes and lowers, I fashioned a simple little "special tool". It's nothing more than a length of 1/4" rod with a tight loop bent in one end. You thread a rag through the loop, wrap it around the rod, dip it in solvent, and swab away to your heart's content. It works great .....


For cleaning inside the tubes and lowers, I fashioned a simple little "special tool". It's nothing more than a length of 1/4" rod with a tight loop bent in one end. You thread a rag through the loop, wrap it around the rod, dip it in solvent, and swab away to your heart's content. It works great .....
So.....more advice if I may! Whilst I wait for the Hughes lowering kit I've been cleaning up the forks and taking the old seals out. Now I've decided to take your recommendation MaxPete and use fork gaiters to cover up the mild pitting. I'm just wondering whether or not to take some 2000grit paper just to smooth over the effected area?
Also, with the 2" lowering kit, if I wish to stiffen things up (which I do), should I cut anything off of the springs?
Also, with the 2" lowering kit, if I wish to stiffen things up (which I do), should I cut anything off of the springs?
Last edited:

