Puzzled about removing early 6-bolt timing chain cover

TeeCat

One-Mik Wonder
Messages
1,631
Reaction score
41
Points
48
Location
Jensen Beach, Florida
Hi, guys...

I have been looking at the parts diagrams at biker.net, but not really enlightened any at all, so I'll ask here.

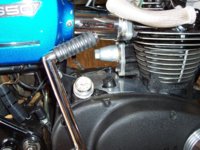
I think my '73's 6-bolt timing chain adjuster case gasket is leaking, mimicking what I thought might have been a head gasket leak. I recently replaced the large cork gasket between the big dome cover and the adjuster case, but I still pull my finger away damp with oil at the lower left screw, so I have a new gasket on the way.

I went out there today and removed the large dome cover, cork seal, six small bolts, and the tensioner lock nut. At that point I expected the 6-bolt cover to come off, but it does not. There are large threads that the dome cover threads onto, and I can't determine if they are part of the damper assembly, or part of the 6-bolt cover that I'm trying to remove.

So, should the cover come off at this point, or do I need to remove the whole tensioner and everything (thus disturbing my adjustment) just to get this cover off and replace a gasket? At this point I don't want to do that and find that it was unnecessary. Again, my Haynes shows a later model, and the biker.net schematics make it appear as though I have to remove the whole tensioner arm assembly (#11) just to replace this gasket.

Any help is appreciated!

TC
 
just stuck on by the gasket (note two of the bolts are locater bolts)
 

Attachments

  • cam chain adjusters.PNG
    cam chain adjusters.PNG
    227.7 KB · Views: 132
jayel, thank you! Great pic!

Mine appears to be Type B, left. So, I guess I can put the locknut back on and just give the thing a good few whacks with a hammer on a wooden dowel or something? My motor had been painted black, so maybe it's just stuck on. And the whole assembly will come out, including the little arm and star wheel, right?

TC
 
Okay... I got it off. It was stuck on there good, by either paint, or the old gasket, or both. The gasket was brittle as heck and a lot of it has stuck to the part. I'll have to carefully soak the painted part in kerosene or naptha to get the paint off, and I'll have to clean the gasket surfaces. The tricky one will be cleaning the surface on the back of the jugs.

I had a little trouble wiggling it out because of the adjustment tension on the plunger. I might have to go ahead and slacken the adjustment to get everything back in when I get the gasket, and then do a cold and hot adjustment over again, trying to get really close to what I had. Maybe I can mark the threads with a reference point.

The part itself looks quite good, I think. The plastic bumper for the plunger looks good, and the plastic under the star wheel seems virtually unworn, save two very slight parallel impressions. I hope I can draw a conclusion, based on that, that the front guide might be fine as well. I have never seen any plastic in my filter/strainer.

Anyone have a favorite gasket surface cleaning tool that doesn't gouge?

TC
 
spray gasket remover :D yes back off the adjuster you just have to bite the bullet on this one


(of course it also eats paint and/or anything not metal) might spray some into a plastic cup and paint it on with Q-tips 1/2 hour later the gasket will be mush
 
Oops, I forgot to ask...

With regard to the locator bolts, does it make a difference which two? They all appear identical, so I guess this refers to their position. Also, do they all bear the same torque? I can't imagine it would be more than about 7 ft pounds or so... about like the sump plate bolts.

Also, there are small flatwashers on the bolts, but they are not sealing washers, correct?

I'm actually glad I have to replace this gasket because it gave me a chance to inspect the tensioner.

TC
 
Yes, about 7 ft/lbs on the M6 bolts (I use 80 in/lbs). Pull the adjuster screw right out. The adjustment you had is now "out the window" because of the new gasket. You will need to re-do it. The washers are not sealing type, just normal washers. If you have any paint stripper around, that will work for removing the old gasket. It's basically the same thing as that gasket remover, just a different consistency.
 
Thanks, twins. You know, I was thinking that the new gasket would add about a millimeter to the adjustment, so I'll just re-do it. And thanks for the confirmation on the M6 bolts.

I do have several flavors of paint stripper, so I'll just use that. I have found the gel type really handy in my past woodsmithing life.

TC
 
Oops, I forgot to ask...

With regard to the locator bolts, does it make a difference which two? They all appear identical, so I guess this refers to their position. Also, do they all bear the same torque? I can't imagine it would be more than about 7 ft pounds or so... about like the sump plate bolts.

Also, there are small flatwashers on the bolts, but they are not sealing washers, correct?

I'm actually glad I have to replace this gasket because it gave me a chance to inspect the tensioner.

TC
the top right and lower left are supposed to be dowel bolts (shouldered to fit holes in the plate) to position the plate correctly yours have obviously been changed out to regular bolts if you see no difference in them..... damn PO's :laugh:
 
I'll look more closely, jayel... I just glanced at them before you mentioned the locator aspect, and I was just looking for length, basically. They may still be original, but I'm glad you mentioned it... I'd have never noticed it.
 
Yup, I still have the shouldered ones.

jayel or anyone... little problem:

A Previous Moron put the last gasket on wet. :( To my knowledge, they go on dry. I have the actual adjuster gasket surface cleaned up nicely, having used paint remover and a plastic bristled cone brush on my dremel. On the motor, however, it's been tougher to get the gasket surface clean. Is it safe, on that alloy, to use a tiny wire dremel cone brush? I don't want to dig around on that surface too much with any scraping tools. I think I have most of the gasket off.

And it does go on dry, right?

Thanks guys... I don't want this to leak when I'm done.

TC
 
I would keep at the gasket remains with the paint stripper. Sometimes it takes multiple applications to get it all softened up and removed. Apply, let sit for 10 minutes or so, scrape off the softened parts, re-apply. The paint stripper won't usually fully penetrate the gasket on the first go. I lightly scrape with an old small knife. It does no damage if you're careful and the gasket is soft.

I install most of my gaskets oiled with motor oil. Oil both sides then let it sit 10 minutes or so to soak in. This puffs the gasket up slightly and I think it helps it to seal. You can also get the part off easily in the future if need be.
 
twins, thanks... I have some more stripper sitting on there while I eat lunch. Then I'll go at it again.

Yup, some idiot used some sort of amber colored cement on there. What a mess!

Good suggestion about the oil... I'll dab a bit on there as you suggest.

Thanks!

TC
 
Okay, guys... thanks for your assistance on this. That job was a holy mess because of the PO... tied up most of my Saturday because I had to do a lot of cleanup. But I took her out for a little run up to temp and to check for leaks. The bike runs beautifully so I feel good about the valves and the timing chain adjustment.

At the moment, I don't see any oil dampening in the area that "seemed" to be a possible head gasket leak (where my finger is pointing in the first pic below). (Some of you may recall that I re-torqued my head in January and replaced the OEM washers because I thought the head gasket might be leaking. I'm hoping that it was all because of this PO idiocy with the adjuster cover.) The shiny "rim" on the gasket is, as I recall, some paint where I touched up and it was a little thick. But I don't see any oil pooling there at the moment, nor do I see any leaking from my new work. So, I'll just have to keep an eye on it. But I suspect that oil was weeping from the adjuster cover case/gasket/screws and crawling along the lip of the gasket, then pooling in that little nook on the case. Hope that's all it was anyway. Will advise.

So thank you again!

TC
 

Attachments

  • 100_1387.jpg
    100_1387.jpg
    303.3 KB · Views: 63
  • 100_1386.jpg
    100_1386.jpg
    304.5 KB · Views: 81
After several heat cycles, like 5 or 6, you may want to check the torque on the bolts again. New gaskets will compress slightly many times after being on there and put through the expansion/contraction of several heat cycles. The bolts haven't really moved or backed out but they are now looser because the gasket is squished.
 
I will, twins. I dampened the new gasket in oil as you recommended (and as I have done in the past), and put 80 inch pounds on the M6s. But I'll check them again after a few cycles. Thanks so much again.

This looks nice and clean now and I'm glad I did it. It got to the point where it just had to be seen to anyway.

(Damn, this bike is runnin' like blimmin' heck right about now! :p )

TC
 
Back
Top