Removing tach cable from right side engine cover

jradvantage

XS650 Addict
Messages
128
Reaction score
227
Points
43
Location
Onalaska, WI
I've got a 1978 XS650E and I'm trying to remove the tach cable from the right side engine case. I've looked at the various threads related to the removal and I'm still not getting it.

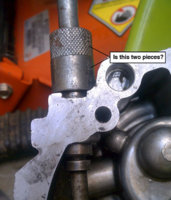
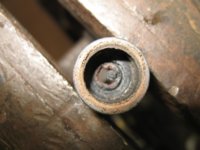
It appears from some other posts that the top end of that knurled housing is supposed to have some threaded bit you remove that enables you to remove the cable. Mine doesn't appear to have that...it is solid.

Is the knurled portion screwed into the solid portion just below it? I attached a pic to illustrate what I'm getting at. I don't see any other way this might come off.

Thanks for your help.

John
 

Attachments

  • Tach Cable.jpg
    Tach Cable.jpg
    75.7 KB · Views: 424
The knurled portion along with the cable unscrews from the solid portion on my 77. I assume it would be the same for yours.
 
Ok. Thanks for the confirmation. I'm assuming they are normal threads. Counter-clock wise to remove.

I've soaked it with penetrating oil and have tried twisting it off with vise grips (with leather between the grips and the part). Tried heat. Any other suggestions also appreciated. It's kind of driving me nuts.

Thanks again,
John
 
jradvantage

be patient with the housing. It will come out. If it's been in there a long time it may want a little persuasion. tap from the inside with a hammer and thin but hard piece of wood and knock slowly and gently - use more oil as your go.
A burr of metal may well have formed where the grub screw turns into the side of the housing.

If you do want to use a tap harder than the casing metal (alluminium) then be careful, be patient, be accurate.

It will come out.

ANLAF
 
Ok. Thanks for the confirmation. I'm assuming they are normal threads. Counter-clock wise to remove.

I've soaked it with penetrating oil and have tried twisting it off with vise grips (with leather between the grips and the part). Tried heat. Any other suggestions also appreciated. It's kind of driving me nuts.

Thanks again,
John
Yep, it is 2 pieces as you have shown in your pic. I had to put the oxy-acetylene rig on mine to get it loose, and of course that burned up the old seal(which I was replacing anyway). Had to make it glow to get it to release, so be careful. You can see the threaded portion on the background of the 2nd pic sitting on the anvil of the vise.
EDIT- I used a 1/4" drive deep socket to drive the new seal into place, can't remember the size, whichever one fit the best. Little motor oil to lube the seal going in.
 

Attachments

  • IMG_0311.jpg
    IMG_0311.jpg
    173 KB · Views: 383
  • IMG_0317.jpg
    IMG_0317.jpg
    183.7 KB · Views: 337
  • IMG_0318.jpg
    IMG_0318.jpg
    145.9 KB · Views: 318
Thanks for the pictures and advice! I now know what I'm up against, so I will be patient with it.

Your responses to my question help in a big way. Thanks again!

John
 
Here is a parts break down of the tach drive. The cable nut threads onto the adapter # 4, which threads into # 1, which is held in the case by #5.
It's been on there for 35 years, it needs some TLC to come off. Often the adapter unscrews along with the cable.
Leo
 

Attachments

  • TACHOMETER_GEAR.png
    TACHOMETER_GEAR.png
    25.2 KB · Views: 371
Thanks XSLeo.
I put some heat on it last night with the leather covered vise-grips…no luck.
It's currently sitting in an oil bath. Hopefully, that will work. Thanks for the reminder to use a little TLC. It's very tempting to try the alternative!

John
 
Finally did get everything apart. The housing ended up getting scratched a bit. Nothing that a little light sanding won't cure. Thanks again for all the knowledge and wisdom!

John
 
I am going to suggest a slightly different seal removal procedure.

Clamp the lower part of the collar in the vice, (it has a thicker wall down low and the vice pressure won't distort the threads. Use a suitable size drill bit or other rod to stop the collar from turning instead of excessive vice pressure.
Select a washer that is a GOOD fit in the slots, I filed the outside radius and the stamping flash on the washer down a bit so it was a REALLY good fit in the slot then used an adjustable wrench. Mine came apart with no drama but it was in much better shape than the one in the pics above. The torque did bung that weep hole a bit so a little filing sanding of the hole area was needed.

tach 001.JPG tach 002.JPG


part # 3 oil seal 93104-07036-00 OIL SEAL, SO-TYPE list $4.76 partszilla $3.24

Part #2 o-ring 93210-11313-00 O-RING list $3.13 partzilla $2.10

Prices as of 7-20-14

PS I have ordered extra seals and o-rings and will mail a set to whoever needs them at reasonable cost.

I am still working on the best way to extract the old seals! they're mashed in there good.
 
Back
Top