-
Enjoy XS650.com? Consider making a donation to help support the site.
XS650.com receives a small share of sales from some links on this page, but direct donations have a much greater impact on keeping this site going.
You are using an out of date browser. It may not display this or other websites correctly.
You should upgrade or use an alternative browser.
You should upgrade or use an alternative browser.
Restoring 1981 XS650 as my first bike!
- Thread starter Gunnar
- Start date
-
- Tags
- pictures restoration
")
Barnett has been a big player in aftermarket clutch parts since these bikes were new!
Gunnar
XS650 Enthusiast
Hey guys, I have a problem that I can't solve.
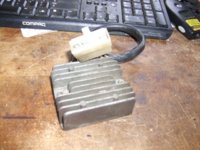
I bought a pre-made wiring harness from the mikes XS and rewired the bike. It was a relatively easy job to pull the old one out and put the new one in. Rectifier, however, was soldered to the harness directly instead of having a connector.
I cut the wires from the rectifier and put the new wiring harness in. Everything clipped in nicely except for the rectifier. I used some crimps and created a male connector for each wire and connected to the corresponding colors on the main harness connector. There were 3 solid-white wires there and main harness had 3 white wires with different stripes, but I didn't differentiate at which white goes to which striped white. From what I read it didn't make a difference.
Now when I start my bike it drains the battery dry. I checked the voltages and on my battery it normally gives 13v without bike running and 13v with bike running at 2.5k rpm. That tells me that the battery is not charging.
Bike was working before I put the new harness in. Since I didn't touch any components directly and only changed the wiring, except for the rectifier, I presume that the problem is in it.
I am not sure how to deal with the problem. Any advice?
Radradratorius
XS650 Member
I would say if the battery is not charging that's an alternator problem. Regulator is only supposed to balance the current out so it don't overcharge.
Gunnar
XS650 Enthusiast
Thing is I didn't have a regulator, I only touched rectifier wires. Is there a good guide for troubleshooting the charging system? I am not very savvy with electric.
Gunnar
XS650 Enthusiast
The stock 1981 came with a combined rectifier/regulator. You seem to indicate that you re- wired the rectifier by itself. If you could post a picture of the rectifier, we can all see what you are working with.
Gunnar
XS650 Enthusiast
Thank you retiredgentleman and XSLeo for your input.
I have followed this guide and figured out I had two issues. First one my battery was not good and I switched to nice new Lithium one. Then after checking that rectifier and figuring that all diodes works - I decided to re-crimp connectors and that seemed to fix my charging problems. Been driving my bike for 3 days straight with no issues yet (knock on wood).
Now after driving it for couple days I am thinking about changing my tires because there is a decent amount of dry rod and I don't think they are too safe due to their age. While at it - I also want to address couple other issues.
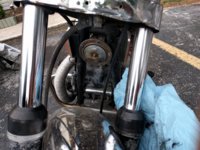
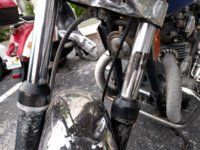
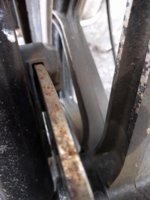
First, one of my friends told me that my forks might be leaking. I have cleaned them both and then rocked the bike as hard as I could. And I got a pretty bad stain on the left fork. Please check the pictures. Does that mean that I have to rebuild this left fork? Any suggestions on diagnosis?
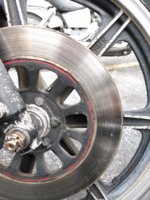
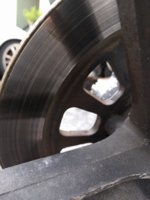
Second, since my front wheel will be off during tire change, I can work on my front break. I have already flushed the system with new break fluid and got a LOT of gunk out of there. But I feel that break is still stiff and is not as effective. I thought about replacing break pads and turning my break disc - but it seems that you can't do that with bikes rotors because they are too thin and I have buy a brand new one. I am attaching picture of mine. How bad is this mine? Should I buy a new one or keep the old one? Considering they are very expensive - I am hesitating.
Any advice will be appreciated. Thank you so much for all your help. Seriously, without this forum I would be so lost!
I have followed this guide and figured out I had two issues. First one my battery was not good and I switched to nice new Lithium one. Then after checking that rectifier and figuring that all diodes works - I decided to re-crimp connectors and that seemed to fix my charging problems. Been driving my bike for 3 days straight with no issues yet (knock on wood).
Now after driving it for couple days I am thinking about changing my tires because there is a decent amount of dry rod and I don't think they are too safe due to their age. While at it - I also want to address couple other issues.
First, one of my friends told me that my forks might be leaking. I have cleaned them both and then rocked the bike as hard as I could. And I got a pretty bad stain on the left fork. Please check the pictures. Does that mean that I have to rebuild this left fork? Any suggestions on diagnosis?
Second, since my front wheel will be off during tire change, I can work on my front break. I have already flushed the system with new break fluid and got a LOT of gunk out of there. But I feel that break is still stiff and is not as effective. I thought about replacing break pads and turning my break disc - but it seems that you can't do that with bikes rotors because they are too thin and I have buy a brand new one. I am attaching picture of mine. How bad is this mine? Should I buy a new one or keep the old one? Considering they are very expensive - I am hesitating.
Any advice will be appreciated. Thank you so much for all your help. Seriously, without this forum I would be so lost!
Attachments
On your forks, what I'd do is:
Pop off the dust seals, slide them up, clean their insides, clean the forks and slider tops.
Leave the dust caps up at the top of the forks, redo your 'rocking' test'
See what shows on the legs.
Pop off the dust seals, slide them up, clean their insides, clean the forks and slider tops.
Leave the dust caps up at the top of the forks, redo your 'rocking' test'
See what shows on the legs.
Hi Gunnar,
First, "break" is what happens to your neck when you are hanged.
At least, it is if they use the correct "long drop" method.
The thing that slows your bike down is a "brake".
Back on topic:- your fork seal is leaking and the only fix is to replace it.
A complete teardown is best, most likely there's a lifetime of crud in there that needs cleaning out.
Do the other leg too. If one seal is worn, the other one ain't far off from failure.
Same deal with the brake. The entire system is most likely full of crud. Full teardown, clean & rebuild is best.
And how old is the brake hose?
The recommended 5-year replacement is pushing it but a stainless steel wire reinforced replacement will also give better braking.
That brake disk is fine.
Although I'd advise drilling it full of holes.
The holes not only help keep the brake disk clean, they also seem to improve the disk's surface finish over time.
Gunnar
XS650 Enthusiast
On your forks, what I'd do is:
Pop off the dust seals, slide them up, clean their insides, clean the forks and slider tops.
Leave the dust caps up at the top of the forks, redo your 'rocking' test'
See what shows on the legs.
I will do that tomorrow and see what will happen. I am hoping it's just stuck grime.
Hi Gunnar,
The thing that slows your bike down is a "brake".
Back on topic:- your fork seal is leaking and the only fix is to replace it.
A complete teardown is best, most likely there's a lifetime of crud in there that needs cleaning out.
[...]
And how old is the brake hose?
The recommended 5-year replacement is pushing it but a stainless steel wire reinforced replacement will also give better braking.
That brake disk is fine.
Although I'd advise drilling it full of holes.
Thanks for pointing it out. English is not my first language, I didn't proofread it enough!
I looked at this tutorial and it seems to show a very involved process which requires a lot of special tools. I am not sure I will be able to do it myself. If the oil will keep showing up after I do what TwoManyXS1Bs suggested - I will most likely just try to replace the oil and seals inside both forks.
And about the brake system - good to know that rotor looks good! I will get a new hose and and pads and see if that fixes it. Maybe I will even ask a shop to polish and drill my rotor, if I have extra money left.
Cheers!
Hi Gunnar,
yeah, break vs brake and all those other words that sound the same with their different meanings only determined by their different spelling. The whole to, too and two thing. It comes of English being a plywood language; laminations of Pictish, Gaelic, Anglo-Saxon, Scandinavian, Norman-French and bits and pieces of other languages and their spelling from every group of refugees that came to England and from every other country the Brits invaded over the years.
But enough about the history of tongues.
Alas that to change the fork seals you will have to use at least some of the tools and methods shown in that tutorial.
Although I did see on line photos of a different and allegedly easier method.
Remove the fork leg, pour it completely full of oil, put the cap back on and squeeze the fork closed with a long plank as a lever and your back porch as a fulcrum so the hydraulic pressure forces the seal out.
So I tried it.
It might have worked if I'd remembered to first remove the snap ring and washer that held the seal in. (there's a photo in that tutorial that shows them)
As it was, my back porch got lifted off it's foundation.
About the brake disk.
XS650 brake disks are made from a stainless steel that's tougher than old boots and unless you have a drill press and cobalt-steel drill bits perhaps having a shop drill it for you is the best way to go.
Or you could look for a slotted brake rotor from a late model XS11. It'll bolt straight on.
Similar threads
- Replies
- 61
- Views
- 2K
- Replies
- 11
- Views
- 1K