Slow battery drain

How thick is the magnet? I used a 0.5mm thick magnet because it will experience less force when the rotor turns. When you glue it on you need to make sure the surface is thoroughly clean. I also had a good coating of glue around the edges. A Neodtmium magnet is much stronger than the older types, so even if it looses some strenght a engine temperature it should still work the ignition.

Recently, apologies to the author, an ignition issue was solved just by shining the surface of the old magnet back to looking new. You try this.
 
Fixed my old rotor (stronger magnet) by soldering the loose wire back on, getting a good resistance reading. Put it back on and it was making contact with the stator. Thought the rotor was sticking too far out, but it turns out a few of the teeth that hold the stator in place have broken off, so when I tighten the stator its way too close to the rotor. For it to be the right distance the stator has to be completely loose. Not sure where to go from here, don't have access to a welder and now the bike won't start. Probably because I don't have the right distance from the magnet to the pickup.
Resized_20180909_134117.jpeg
 
:agree:

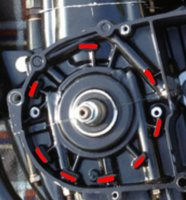
The stator mount tabs are 2 level, from the picture it looks like the critical lower machined surface is intact on the broken tabs. Pull the rotor again, check fit on the crank. Any background on how or why the stator tabs were broken? Spin the crank, is the rotor centered, or wobbling? Did you remove the rotor with the correct tool or a generic puller?
 
Last edited:
I thought the same about the rotor not seated fully. Took it off, cleaned it out, made sure woodruff was clean and it slides on easily. I guess I have to get a impact wrench cause I can't get it tightened further.
In this video, when he fully tightens the rotor, he's able to twist the rotor by hand. Should that happen? Mine is completely tight and wouldn't move by hand like that. I'll clean the rotor off, the dark rings from the brushes are surface level and come off easily.

 
I used a rotor puller from Mike'sXS. 2 of the tabs were already broken, and one just recently broke when I was tightening the stator. Just snapped off like nothing.
 
Thanks for the measurements. You were right, the rotor wasn't fully seated. I ended up renting a impact wrench and got the rotor past the first thread.
Still wouldn't start up, so I was troubleshooting the TCI and found out I wasn't getting a resistance reading from the black to grey or black to orange, and
switched it out with my old stator which had the right reading. Starts up first kick, charging up to 13.5! Headlight on and everything. Going for a test ride now.
 
...The stator mount tabs are 2 level, from the picture it looks like the critical lower machined surface is intact on the broken tabs...

Yes, the tab mount bases look ok.
There's a total of 8 tabs.
StatorGuideTabs.jpg

The protruding part of the tabs guide and align the stator housing during assembly, so that it's centered and concentric about the crank. Once assembled and the mount screws are tightened, the guiding part of the tabs have done their job, and now the important part is the machined base of the tabs, against which the stator housing is pressing. So, be sure that the stator housing is fully contacting the remaining tabs while tightening the mount screws, and it should be ok...
 
Back
Top