CHAPTER 1 - The PAMCO System & the Coil Mounting Plate
As part of my on-going program to resurrect my red 1976 Standard (aka Lucille), I had bought a PAMCO ignition system complete with the electronic spark advance module known as an E-Advancer. I bought the kit from XS650 Direct which is the Canadian affiliate of MikesXS.
They offer several different PAMCO kits and the one I bought is part number 14-0910 which includes an electronics module (the blue box in the photo below) that replaces the mechanical spark advance system on pre-1980 XS650s. For 1980 and later bikes, a different kit is required - although those bikes actually came with a factory electronic ignition system called a TCI - so I don't completely understand why you'd want to buy a PAMCO to replace the factory ignition system since it also includes an electronic advance system and is reported to be maintenance free and highly reliable.
Here is a photo of the 14-0910 kit from the XS650 Direct website.

The kit includes all of the actual ignition system components - BUT - there are some additional wiring and hardware items that you will need to supply, including:
The new ignition coil is fastened under the fuel tank using the original mounting pad for the left hand OEM coil. The exact dimensions of the plate are really up to you but as many other forum members have done, I used a piece of 1 inch wide x 1/4" thick aluminium with a drilled and tapped a pattern of holes to receive M6 SHCS so that I could use the same metric tools as fit the rest of the bike. It is very important that the coil be mounted securely. It is fairly heavy and puts out around 50,000 volts - so you do not want it flopping around bashing through the underside of your 40+ year old fuel tank.
Here is a photo of my el-cheapo shop drawing of the plate.

Sorry this drawing is rotated - but I think you get the idea. The only "critical" dimensions are the spacing of the "outer" holes at 102mm - to match the mounting pads on the coil and the spacing of the "inner" hole pattern at 54mm to match the mounting holes on the bike's coil mounting pads. The relationship between these two hole patterns is not critical and it will work if you do it as shown in the drawing.
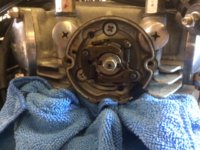
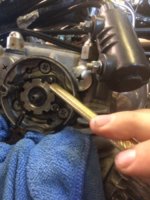
Here are photos of the plate - ignore the extra holes - I was experimenting with several inner hole patterns to move the assembly around under the tank. Also below are photos of the coil in place - from the LH side and from the RH side of the bike. The stand-offs shown in the photos are two pieces of 10mm dia. steel tubing each of which is 24mm long.


In the next chapter - I will describe the installation of the mechanical components of the PAMCO ignition system.
Cheers,
Pete
As part of my on-going program to resurrect my red 1976 Standard (aka Lucille), I had bought a PAMCO ignition system complete with the electronic spark advance module known as an E-Advancer. I bought the kit from XS650 Direct which is the Canadian affiliate of MikesXS.
They offer several different PAMCO kits and the one I bought is part number 14-0910 which includes an electronics module (the blue box in the photo below) that replaces the mechanical spark advance system on pre-1980 XS650s. For 1980 and later bikes, a different kit is required - although those bikes actually came with a factory electronic ignition system called a TCI - so I don't completely understand why you'd want to buy a PAMCO to replace the factory ignition system since it also includes an electronic advance system and is reported to be maintenance free and highly reliable.
Here is a photo of the 14-0910 kit from the XS650 Direct website.
The kit includes all of the actual ignition system components - BUT - there are some additional wiring and hardware items that you will need to supply, including:
- two male bullet connectors to connect the sensor module to the red-white ignition system wires on the bike (there is a double-female plug located under the fuel tank to which you will connect the system and the main coil power wire WITH A FUSE);
- two female spade connectors to connect the little blue E-Advancer box outputs to the new dual-output coil;
- a modern blade-style automotive fuse holder and a 7.5 amp fuse which protects the delicate PAMCO system in case the coil fails (otherwise, a current surge could reportedly cook the unit);
- a small metal plate and two 24mm long stand-offs on which to mount the coil under the fuel tank;
- two 45mm long M6x1 SHCS and two 15mm long M6x1 SHCS to secure the coil to the mounting plate and the plate to the bike (BTW - a SHCS is a socket head cap screw or an "Allen" bolt);
- some zip-ties to lash the wiring down so that it doesn't get tangled up with anything.
The new ignition coil is fastened under the fuel tank using the original mounting pad for the left hand OEM coil. The exact dimensions of the plate are really up to you but as many other forum members have done, I used a piece of 1 inch wide x 1/4" thick aluminium with a drilled and tapped a pattern of holes to receive M6 SHCS so that I could use the same metric tools as fit the rest of the bike. It is very important that the coil be mounted securely. It is fairly heavy and puts out around 50,000 volts - so you do not want it flopping around bashing through the underside of your 40+ year old fuel tank.
Here is a photo of my el-cheapo shop drawing of the plate.
Sorry this drawing is rotated - but I think you get the idea. The only "critical" dimensions are the spacing of the "outer" holes at 102mm - to match the mounting pads on the coil and the spacing of the "inner" hole pattern at 54mm to match the mounting holes on the bike's coil mounting pads. The relationship between these two hole patterns is not critical and it will work if you do it as shown in the drawing.
Here are photos of the plate - ignore the extra holes - I was experimenting with several inner hole patterns to move the assembly around under the tank. Also below are photos of the coil in place - from the LH side and from the RH side of the bike. The stand-offs shown in the photos are two pieces of 10mm dia. steel tubing each of which is 24mm long.
In the next chapter - I will describe the installation of the mechanical components of the PAMCO ignition system.
Cheers,
Pete
Last edited:
") );
);

 What WER sez about re-enforcing