It has been a few years, but I've seen those Aussie scallops. They didn't fit. The metal badges shrink a bit and if they haven't updated them, they don't fit and that makes them garbage. Great if they've been updated to fit.
-
Enjoy XS650.com? Consider making a donation to help support the site.
XS650.com receives a small share of sales from some links on this page, but direct donations have a much greater impact on keeping this site going.
You are using an out of date browser. It may not display this or other websites correctly.
You should upgrade or use an alternative browser.
You should upgrade or use an alternative browser.
angus67
Welder's penetrate deeper!!
They won't be going on original 71 covers, just the 80 covers I already have, so hole position didn't matter. I assume that's what your talking about?
But in any case , 67 to 90 bucks is way out the budget.
I just finished up re wiring the older left box to the later wires, crimped, shrink wrapped and everything, looks great, but all that works is the horn. Tail lights and blinks aren't wires in so I was hoping to get the head light working properly. Nope. Back to the drawing boarding
angus67
Welder's penetrate deeper!!
Ugh.....I hate wires. I got 10 and half volts at the headlight connected to bulb, but won't light up . Ground is good. Even a test light won't light it should at least glow with 10 volts, rite?
It has been a few years, but I've seen those Aussie scallops. They didn't fit. The metal badges shrink a bit and if they haven't updated them, they don't fit and that makes them garbage. Great if they've been updated to fit.
Which Aussie scollops? Diablocycle is Canadian and the Ebay one is US based
The ebay chrome "C's" fit perfect and look great on an early cover, mikes has early tank badges in black to fit special tanks.
Fuel Tank Badge - Yamaha Black for "Specials" Photo Badge Set - XS1 style to fit 1978-84 "Special" model fuel
Tank (Set of 2)
Give your bike a different look with these attractive Black and silver tank emblems.
Dimensions: 135mm long, 55mm high, 102mm from center of holes
Part #65-6506 $43.95 $39.95 USD Set/2
the XS650 scripts are a bit pricey but I think they have actually gone down some.
angus67
Welder's penetrate deeper!!
I seen those tank badges. are you sure they fit a special? The tank I have has the cap off center to the right.The ebay chrome "C's" fit perfect and look great on an early cover, mikes has early tank badges in black to fit special tanks.
Fuel Tank Badge - Yamaha Black for "Specials" Photo Badge Set - XS1 style to fit 1978-84 "Special" model fuel
Tank (Set of 2)
Give your bike a different look with these attractive Black and silver tank emblems.
Dimensions: 135mm long, 55mm high, 102mm from center of holes
Part #65-6506 $43.95 $39.95 USD Set/2
the XS650 scripts are a bit pricey but I think they have actually gone down some.
I also read somewhere that if any solvent like gas or what have you, makes the paint on the back of mikes emblems come off.
angus67
Welder's penetrate deeper!!
I'm trying to track the y/r wire that powers the head light , but looking at all the connectors, I don't see it. What connector out of the harness is it ran into? 1980 special
View attachment 22985
The only red yellow in the headlight shell I see on an 80 goes from the LH control to the turn signal canceling unit, Headlight is always black, green, yellow?
The only red yellow in the headlight shell I see on an 80 goes from the LH control to the turn signal canceling unit, Headlight is always black, green, yellow?
On the '71 left handlebar switch, the red/yellow feedline simply comes from the ignition switch.
On gggGary's schematic, the equilalent is the L/Y (bLue/Yellow) feedline that comes out of the reserve lighting unit.
View attachment 22978
On gggGary's schematic, the equilalent is the L/Y (bLue/Yellow) feedline that comes out of the reserve lighting unit.
View attachment 22978
angus67
Welder's penetrate deeper!!
Thanks, guys.
I got the turns signals working with the early box, turned the horn button into the start button. Checked compression. 150+ both side. I did the top end on it about 4-5 years ago, so I guess while I have the tank off, I should retorque the head.
Coming along nice. But the head light thing bugs me. Does it not turn on until the engine starts? My 1980 chop was in boxes, so I have no reference. And my other 1980 is just a roller. I did just for shits and grins, give a shot of either and crank it over. It reved, and the check headlight bulb came on, I didn't have the bulb hooked up when I did that.
Correct.headlight does not turn on until the engine starts?
angus67
Welder's penetrate deeper!!
Thanks, gggary. But I find it odd I have 10+ volts feeding the low beam headlight, is that normal? When I switch to hi, the power disappears. Must be the magical rlu doing its thing?Correct.
Well Angus with mixing and matching electric parts from different years I guess you will have to be the master sleuth and figger it out. AFAIK the relay doesn't give any juice to the headlight RLU till the engine has at least been enthusiastically kicked (with the start lever  ).
).
).Thanks, gggary. But I find it odd I have 10+ volts feeding the low beam headlight, is that normal? When I switch to hi, the power disappears. Must be the magical rlu doing its thing?
Clean all of the electrical contacts, especially the kill switch. A little corrosion at every switch or connector will cause a loss of current. Deoxit is a great choice if you can find it.
angus67
Welder's penetrate deeper!!
Clean all of the electrical contacts, especially the kill switch. A little corrosion at every switch or connector will cause a loss of current. Deoxit is a great choice if you can find it.
I took it all apart wasn't bad at all, solder joints looked fine. Shined up the contacts, packed with dielectric grease.
The headlight checker glowed when I was test the start button
packed with dielectric grease.
 Why? Dielectric grease is an insulator. IMHO, no good can come from using it. Anywhere there's a spark, like a switch or relay contact, you're likely to get outgassing and silicon dioxide. It's like coating the contacts in glass.
Do as you will, but I say get that stuff off if you can. Save it for lubing o'rings. It's good for that.

Yes, dielectric grease should not go directly onto contacts. Its useful to add it around the area of the contacts, so that it can exclude water and oxygen from getting to the contacts.
Its great stuff for rubber...................carb diaphrams, carb intake boots, door seals on cars/trucks, sunroof seals, etc.
Its great stuff for rubber...................carb diaphrams, carb intake boots, door seals on cars/trucks, sunroof seals, etc.
angus67
Welder's penetrate deeper!!
Oh, ok. I'll dig that stuff out
Yes, dielectric grease should not go directly onto contacts. Its useful to add it around the area of the contacts, so that it can exclude water and oxygen from getting to the contacts.
Personally, I don't want it near anything electrical, with the possible exception of a spark plug boot. Electrical connectors are tucked out of the weather on these bikes anyway. At least, they should be.
angus67
Welder's penetrate deeper!!
[/URL][/IMG]
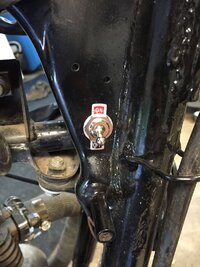
electrical is done. Found a good spot for a kill switch. Its just below the front of the tank on the right side. I hate the way the socket I used scratched it.
Started it yesterday. Wont idle on its own. blocked pilots/ idle circuit. No big deal.
When I first started it, it had 1980 throttle cable in the early throttle tube, so when it lit off, it raced backwards almost crashing into my table packed with wire, solder stuff, tools, parts big and small, before I could turn it off. I looked at the carb to cable linkage and it had the throttle almost half open. Guess I should have checked that first. lol. I put a 1971 throttle cable on, and its now the right length.
I'll clean out the grease from the left box, and see if I get the hi beam back. the low works. Headlight is bench tested and good
Attachments
Similar threads
- Replies
- 785
- Views
- 81K