Timing was off, and couldn't get both points to fire.

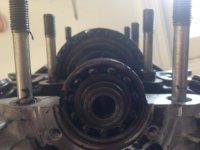
The cam sprocket with 36 teeth means one tooth jump is 10 degrees.
Before I tore it down I might try shifting the chain around the sprocket enough to get the marks to line up.
With tensioner loose, slide the bearings off one side of the cam, lower cam, work the chain around sprocket one tooth. Lift cam, check marks, repeat till they line up.
tighten the tensioner.
One or two teeth off probably isn't enough for valve to piston contact.
If you get it lined up, try setting the points. If they set then try running it. If it runs ok with no extra noises then run it.
If you have to run the tensioner way in, so the cap barely fits then the chain is stretched.
You can do a complete tear down but why not try adjusting the chain and points, it may be fine.
Leo
 
so...

I didn't even have to slide the bearings off. I released all the tension in the tensioner. I was able to move the chain a little forward, and rock the cam back into place(See pic). While at TDC. However, it being that easy makes me think the chain is super worn out. Also, you will notice from the (second pic) the tensioner is almost bottomed out. because I can't tension the chain correctly, I ordered a new chain the other day. So I need change that. The predicament I find myself in, is this...I doubt I'm going to keep the bike(but I may keep it). I like to fix them and sell them or trade them. So, if the compression is within spec's, is it ok to just change the chain, or should I pull the head and check/change valves, polish up the jugs and put new rings in them. I'm sure if I put it all back together and haven't checked the valves and jugs and pistons. I'll probably kick myself in the long run, but if I don't keep it..I will put my integrity and ethics into question...Ugh....
 

Attachments

  • IMG_6751.jpg
    IMG_6751.jpg
    141.7 KB · Views: 150
  • IMG_6752.jpg
    IMG_6752.jpg
    129.4 KB · Views: 135
Yes, that chain is shot, very badly stretched. If the motor hasn't ever been torn down before, there's a good chance the front chain guide is toast as well. My usual routine for a top end is new chain, front guide, rings, and a valve job. If you test the valves for leaks, you will most likely find some. I always seem to .....

Leaks3.jpg


Leaks.jpg

Yea, yesterday the new chain, front guide came in. I'll check the valves the way you did. My question is...under the tech section 650 PistonRings INXS stated they the following rings can be used? Anyone's thought on if this practice? was it ever used? I guess I could buy them from Mikes...but I'm getting tired of ordering from them.

- 86-89 Honda Acura Integra D16A1-16V-NPR
- 86-89 Honda 2C JDM DOHC 16 V

- the rings for these cars are the same as those for the XS, come in a set of 4 and are a fraction of the cost of XS rings

....75....1.2-1.5-2.8......piston diameter and ring thickness from top down
 
You might consider these from that eBay piston guy in Japan, about half the cost of original or Mike's .....

http://www.ebay.com/itm/141204444852?_trksid=p2060778.m2749.l2649&ssPageName=STRK:MEBIDX:IT

I'm trying a set in the motor I'm working on now. I have not used them before but the guy has a good rating and not many complaints. Shipping is amazingly fast, considering they are coming all the way from Japan. I ordered on a Monday and had them Thursday.

Wow! That's amazing. Because I order from Mikes last Monday, and got the parts this Tuesday.. OK, I'll look in to that. Thanks!
 
Here is what it looked like when I opened it up. The guide was all chewed up. But the good thing is the valves and pistons didn't touch while the cam was so far out of whack. for your viewing pleasure....

Also, you may notice some type of bond all around the jug surface...the PO used some type of wet gasket all over the head and on the bearings to keep everything in place, I guess he had it opened at one time. I've been peeling this stuff off all over the place.
 

Attachments

  • IMG_6754.jpg
    IMG_6754.jpg
    177.3 KB · Views: 131
  • IMG_6755.jpg
    IMG_6755.jpg
    204.2 KB · Views: 132
  • FullSizeRender_1.jpg
    FullSizeRender_1.jpg
    174 KB · Views: 130
Well, took the head to my guy...He cleaned it all up. Valves look good, just need to order new rings. The PO on this motor, must have been very hamfisted on every nut, he stripped out the spark plug hole on the left side. So my machinist is fixing that too. Here they are all clean and looking good. Just need to lap the valves back in, and I'll eventually get to the timing problem, that I was originally told was a dirty carb issue. This is why I am happy I didn't pay what he was originally asking.
 

Attachments

  • IMG_6780.jpg
    IMG_6780.jpg
    118.4 KB · Views: 119
  • IMG_6779.jpg
    IMG_6779.jpg
    137.1 KB · Views: 119
  • head Clean.jpg
    head Clean.jpg
    140.5 KB · Views: 123
Got the bike all put back together. Got the new chain all set, valves all set, points all set. Wouldn't start. Switched the plug wires...started right up. So, I guess I have the advance rid in 180 out. I'll fix that tonight, and take it for a little brake in spin.
 
Got the bike all put back together. Got the new chain all set, valves all set, points all set. Wouldn't start. Switched the plug wires...started right up. So, I guess I have the advance rid in 180 out. I'll fix that tonight, and take it for a little brake in spin.

Just reverse the wires at the points.

Yes, stripped spark plug threads is the sign of real amateur mechanics. Spark plugs should only be installed using your fingers. This allows you to feel the threads, so no cross threading can occur. Don't put anything like anti-seize on the threads, as it just gums them up.

Once the plugs are fully screwed in by hand, use a torque wrench and 14 ft-lbs.
 
Here's some video of the bike running. Took it out last night. What a great feeling taking something someone else screwed up, and making it right. I do the same at work, but somehow the rewards of fixing a motorcycle are much more rewarding opposed to pushing paper around. http://instagram.com/p/01WjvoQOHl/ It's on my Instagram page, hope you can view it. Thanks for any and all advice, it didn't fall on deaf ears!!
 
I like that seat. Did it come that way or did you do it?
 
Would it be a Sargent? If so, that's like a $300 upgrade.
 
You might consider these from that eBay piston guy in Japan, about half the cost of original or Mike's .....

http://www.ebay.com/itm/141204444852?_trksid=p2060778.m2749.l2649&ssPageName=STRK:MEBIDX:IT

I'm trying a set in the motor I'm working on now. I have not used them before but the guy has a good rating and not many complaints. Shipping is amazingly fast, considering they are coming all the way from Japan. I ordered on a Monday and had them Thursday.

Hey 5twins. I got a set of these. I only saw markings on the Gray Top of the piston ring, but it's didn't say anything of meaning to me. I didn't see any markings on the rest of them indicating which direction was up. I know they can't fit but one way in their own slot in the pistion, but do you know how to tell which direction the ring point toward the head?
 
I encountered the same thing. If a ring has a non-symmetrical profile, like with a step in it or a bevel on the outer face, they are usually marked and the marked side faces up. These rings look to be a plain rectangle profile so I guess it doesn't matter which side faces up. I did put the markings on the one that was marked facing up, but I don't know if it matters. I couldn't see any profile indicators, like steps or bevels.

I will say I liked the way these rings fit. They had lots of "spring" to them. They were quite easy to fit onto the pistons but harder to insert the assembled piston into the bore than rings I've used in the past. The harder install into the bore is telling me they fit nice and tight in there, and hopefully a good seal will be the result.

Ok. Well what you just said helps me. I am embarrassed to say, I couldn't figure out a way to get the wavy oil rings, between the two chrome rings to compress enough to get the bottom of the piston into the bore, so my dumb a$$ trimmed the wavy ring. Guess what...The motor smoked like crazy on the left side, which is the side i trimmed the most. I tried everything before taking it apart again. I tried to re-torque the head, and tried to run it hard and slow, and put miles on it, in order to seat the rings. Nope, still smoking. So, I've pulled the motor again, ordered new rings, had the cylinders honed again, and back to the drawing board. Just so everyone knows, I'm an auditor for a living. It's not worth doing, unless you've done it twice. :banghead:
 
Yes, squeezing those oil rails and wavy spacer into the bore bottom was a bit of a chore, but they went in. If you rock the piston back and forth as you're working the rings in, it helps. That gets one side started and in, then you can rock towards the "out" side while pushing in on the ring (or ring "assembly" in the case of the 3pc. oil ring set-up).
 
Ok. Well what you just said helps me. I am embarrassed to say, I couldn't figure out a way to get the wavy oil rings, between the two chrome rings to compress enough to get the bottom of the piston into the bore, so my dumb a$$ trimmed the wavy ring. Guess what...The motor smoked like crazy on the left side, which is the side i trimmed the most. I tried everything before taking it apart again. I tried to re-torque the head, and tried to run it hard and slow, and put miles on it, in order to seat the rings. Nope, still smoking. So, I've pulled the motor again, ordered new rings, had the cylinders honed again, and back to the drawing board. Just so everyone knows, I'm an auditor for a living. It's not worth doing, unless you've done it twice. :banghead:

When installing oil control rings onto the pistons, install the expander first, then install the 2 oil rings on each side of the expander.

I don't know how you installed the pistons into the cylinders, but here's a suggestion.
Put the cylinders on the bench upside down. Slide the piston down into the cylinder, letting the chamfer on the cylinder bottom help you get the rings installed. A popsicle stick is useful to guide the rings.
 
Back
Top